Share this page


Projects
The Tenant Management > Projects area lets admin users create and configure projects within your tenant.
Create and configure projects
The Projects tab enables admin users to designate a project for specific workgroups, products, or teams within your organization.
Load generators can be shared by multiple projects. However, assets such as scripts, monitors, and load tests cannot be shared between projects.
Manage projects
Create, edit, and remove projects from your tenant.
| Action | Task |
|---|---|
| Create a project |
|
| Edit a project |
or
Manage the selected project in one or more of the following areas: |
| Delete a project |
Highlight an existing project and click the Delete button |
 , and select Tenant management.
  , click Projects.
 .
. Edit general settings
You can edit general project settings in the General pane. If your tenant is integrated with OpenText Core Performance Engineering Analysis and the project is assigned, you can also manage data streaming to the Analysis tool.
To edit project properties:
-
In the Projects grid, select the project you want to edit.
-
Select the General tab
 .
. -
In the General pane, you can update:
-
Project name
-
Project description
-
Data streaming status. Use the Enable streaming to Core Performance Engineering Analysis switch to manage data streaming to OpenText Core Performance Engineering Analysis. The switch is available when the tenant is integrated with OpenText Core Performance Engineering Analysis. For details, see To stream data to Analysis:.
-
-
Prerequisite. The tenant must be integrated with OpenText Core Performance Engineering Analysis.
-
In the Projects grid, select a project to stream.
-
Use the Enable streaming to Core Performance Engineering Analysis switch in the Core Performance Engineering Analysis column.
-
Turn the switch On to assign the project to OpenText Core Performance Engineering Analysis. The corresponding Analysis project is created or updated, and project users are synchronized automatically. The project and its users become visible in Analysis without waiting for a first run.
Note: When a project is assigned, the selected project stays synchronized in OpenText Core Performance Engineering Analysis with current metadata and user assignments while the project exists in OpenText Professional Performance Engineering.
-
Turn the switch Off (default state) to stop streaming for new runs from this point forward. Project synchronization continues for metadata and users, and historical runs are retained.
If project assignment or unassignment fails, the switch returns to its previous state and an error message is displayed.
After a successful assignment or unassignment, it can take a few minutes for the change to be reflected in OpenText Core Performance Engineering Analysis.
-
To configure data streaming per load test in assigned projects, see OpenText Core Performance Engineering Analysis integration.
Tenant Admin and project visibility
As a Tenant Admin, in Core Performance Engineering's Tenant management, you can view all projects configured to stream data to OpenText Core Performance Engineering Analysis. This visibility helps you monitor which projects are actively sending data for analysis.
Note: The project assignment setting (On/Off) is managed by tenant administrators. Only tenant administrators can enable or disable data streaming for a project.
Manage users
To manage users in a project, choose a project and select the Users tab  .
.
You can perform the following actions in the Users pane.
| Action | Task |
|---|---|
| Add |
|
| Delete a user |
|
Manage licenses
To allocate licenses to a project or track license usage for a project, choose a project and select the Licenses tab  .
.
You can perform the following actions in the Licenses pane.
 to open the Allocate licenses to a project dialog box for each of the selected license types.
Manage on-premises load generators
To add and remove on-premises load generators for your projects, choose a project and select the Load Generators tab  .
.
In the Load Generators pane, select the On-premises tab. You can perform the following actions.
| Action | Task |
|---|---|
| Add a load generator |
Add one or more on-premises load generators to your project:
|
| Remove a load generator |
To remove a load generator, highlight it and click the Remove LG button |
| View which projects are assigned to this load generator | If you highlight a specific load generator in the grid, a list of all the projects using this load generator is displayed in the Project area, along with the usage. |
| Refresh |
Updates the view of the on-premises load generator grid. This is useful for checking a load generator's current connectivity status. For example, if a load generator was temporarily unavailable, click Refresh and view the Status column to check its availability. |
Manage cloud load generators
The Load Generators > Cloud area lets admin users set lower limits for the number of Vusers. By setting the lower limit, you control the maximum number of Vusers that end users can run on cloud load generators per protocol.
To configure cloud load generator limits for a project:
-
Choose a project and select the Load Generators tab
. -
In the Load Generators pane, select the Cloud tab. A list of protocols and their lower and upper limits is displayed.
-
In the Active column, turn on the switch for the protocols that you want users to be able to customize Vuser capacity in their tests. If you do not activate the protocol, it uses the tenant's default limits.
Note: Only those protocols included in your bundle are available.
-
Modify the lower limit of active protocols as required. This provides control over the Vuser multiplier ratio that may apply for calculating license usage. For a summary of the multiplier ranges, click the Vusers Multipliers Range button
 .
. -
Click Apply.
-
End users can manually lower the limit of Vusers through the Test settings. For details, see Set Vuser limits.
Note: The new lower limit also applies to previous tests. If the maximum number of Vusers set manually by the end user (see Configure test settings) is lower than the admin's lower limit, it is automatically set to the new lower limit.
Manage agents
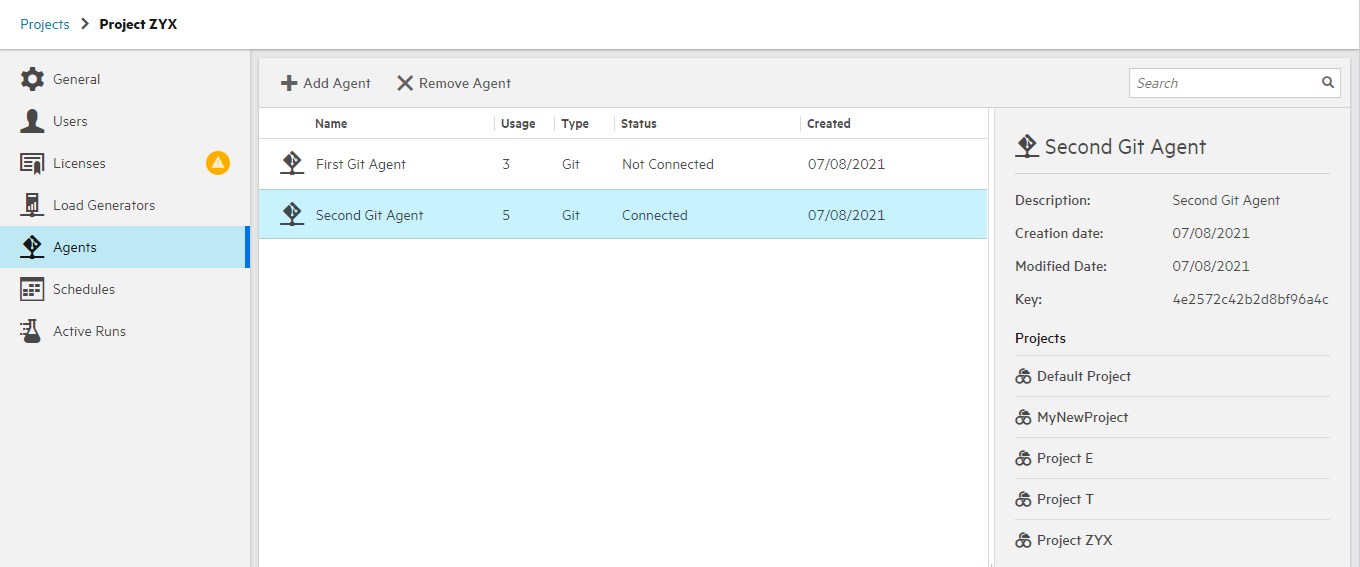
The Agents area lets you add or remove a Git agent from the current project.
To manage Git agents for a project:
-
Choose a project and select the Agents tab
 . The Agents pane displays a list of agents, their usage, type, status, and creation date.
 .
. -
Click the Add Agent button
 to add an agent to the current project. If the account that configured the Git agent does not have access to the project, the Add Agent dialog box does not show that agent.
 -
Click the Remove Agent button
 to remove the selected agent from the current project.
View test schedules
To view all the tests that are scheduled to run for the project, choose a project and select the Schedules tab  .
.
For each test schedule listed, the Schedules pane displays the following information:
-
The name of the test.
-
The scheduled date for the test run.
-
The scheduled time for the test run.
-
The duration of the test.
To filter the displayed test schedules:
-
Specify a date range in which tests are scheduled to run.
-
Search for specific test names.
View active runs
Active test runs are runs that have been started, but have not yet finished. This includes runs that have a status of running, stopping, initializing, connecting, or delayed.
To view active test runs:
-
Choose a project and select the Active Runs tab
 .
. -
The Active Runs pane shows the following information for each test run in the selected project.
-
The test run ID. Click the Run ID link to see the Dashboard for the test run.
-
The name of the test. Click the Test name link to see the test's scripts.
Note: The test ID and name only include links if the user is assigned to the project.
-
The run status: Running, Stopping, Initializing, Connecting, or Delayed.
Tip: You can group the test runs by test name or status.
-
The time the test run started.
-
The current duration of the test run.
-
The number of Vusers configured for the test.
-
Who triggered the test run.
-