LoadRunner Enterprise and Azure DevOps (previously TFS/VSTS)
This section describes how to integrate LoadRunner Enterprise with the Azure DevOps continuous integration and continuous delivery system.
The plugin enables developers to work on-premises using Azure DevOps Server, formerly named Visual Studio Team Foundation Server (VSTS or TFS), or in the cloud using Azure DevOps Services.
Plugin prerequisites
To use the LoadRunner Enterprise-Azure DevOps/TFS plugin extension, you must have the following installed on your Azure DevOps/TFS server:
-
A LoadRunner Enterprise server designed to run load tests on LoadRunner Enterprise hosts. For details, see LoadRunner Enterprise Installation Guide.
-
The LoadRunner Enterprise-Azure DevOps/TFS plugin. For details, see Install the LoadRunner Enterprise plugin for Azure DevOps/TFS (LoadRunner Enterprise CI).
-
Powershell version 4.0 or higher.

Install the LoadRunner Enterprise plugin for Azure DevOps/TFS (LoadRunner Enterprise CI)
Before you can run LoadRunner Enterprise tests as part of your build on a Azure DevOps CI system, you have to install the plugin extension on your Azure DevOps/TFS server.
-
Prerequisites
You must have Administrator privileges on your Azure DevOps/TFS server to install the extension.
-
Verify that your Azure DevOps/TFS server is up and running. For details, see the Azure DevOps Server documentation.
For the supported Azure DevOps/TFS server versions, see the Integration with non-Micro Focus products section of the System and protocol requirements.
-
Download the LoadRunner Enterprise plugin for Azure DevOps/TFS extension file (Micro-Focus.PCIntegration-1.0.3.vsix) which is available from either:
-
Upload the file to your Azure DevOps/TFS Manage extension section (
http://<TFS_server_and_port>/tfs/_gallery/manage). -
Install the plugin extension to your team project collection.
For details on uploading and installing extensions to Azure DevOps/TFS, see the Microsoft Azure DevOps Server documentation.
Run a LoadRunner Enterprise test from the Azure DevOps/TFS build process task
Access your Azure DevOps/TFS build and do the following:
-
Add an additional build step in the correct place in the build order.
-
In the Task catalog, select the Test tab to view a list of all available test tasks.
-
Select the LoadRunner Enterprise Test task and click Add. A new, empty task is added as part of your build plan.
-
Click Close to edit your build step. Provide the following details for your task:
Name Description Display Name Enter a name to distinguish this build step from other steps. PC server and port Enter the hostname or IP address and port of a LoadRunner Enterprise server in the format:
http(s)://(LR_Enterprise_Server):(port)Default: http://mypcserver:80
User name Enter the user name required to connect to the LoadRunner Enterprise server. Password Enter the password required to connect to the LoadRunner Enterprise server.
Note: You can create a variable of type
secretin the Azure DevOps/TFS build to store the password, and specify the variable to avoid exposing a password in the build configuration. For example,'$(PCPassword)').Domain Enter the LoadRunner Enterprise domain in which the test to run is stored. Project Enter the name of the LoadRunner Enterprise project in which the test to run is stored. Test ID Enter the Test ID. You can get the ID from LoadRunner Enterprise > Test Management. Select your test and find the ID in the General Details: ID <number>. Test Instance Select an option for adding the Test Instance ID:
-
Automatically select existing or create new if none exists. If you select this option, LoadRunner Enterprise creates a test instance or locates the existing test instance.
-
Manual selection. Enter the Test Instance ID from the Assign and Select Test Set dialog box. For details, see Edit a test set.
Proxy URL Add your local proxy in the format http(s)://(host):(port#), or leave empty if not using a local proxy.Proxy user name If you use a proxy, enter the user name. Proxy password If you use a proxy that requires authentication, enter the password.
Note: You can create a variable of type
secretin the Azure DevOps/TFS build to store the password, and specify the variable to avoid exposing a password in the build configuration. For example,'$(ProxyPassword)').Post Run Action Choose an action to perform when the run is finished: Collate Results, Collate and Analyze, or Do Not Collate. Trending (Available only when Collate and Analyze is selected as the Post Run Action)
Select a trend report option:
-
Do Not Trend. No trend report is created.
-
Use trend report associated with the test. If Auto Trending is selected in the Load Test, select this option to automatically publish trend results.
-
Add run to trend report with ID. If you select this option, enter the trend report ID.
Timeslot Duration Enter a duration for the Ad-Hoc timeslot.
Maximum: 480 hours
Minimum: 30 minutes
Use VUDs Choose whether to use a Virtual User Day (VUD) license. This provides you with a specified number of Vusers (VUDs) that you can run an unlimited number of times within a 24 hour period.
Before using this option, make sure that VUD licenses are applied in your LoadRunner Enterprise environment.
Status according to SLA Select this option to set the build-step status according to a predefined SLA (Service Level Agreement) configured within your performance test.
If you do not select this option, the build-step will be labeled as "Passed" as long as no failures occurred.
On Timeslot creation failure Choose an action to perform if the timeslot cannot be created: Do not repeat (the task ends), or Repeat with the following parameters:
-
Delay between attempts. Amount of time, in minutes, to wait between a failed attempt and the next attempt (the minimum is 1 and the maximum is 10).
-
Number of attempts. The number of attempts to run the test (the minimum is 2 and the maximum is 10).
Artifacts directory Enter the path to the artifacts directory where the result files are stored. 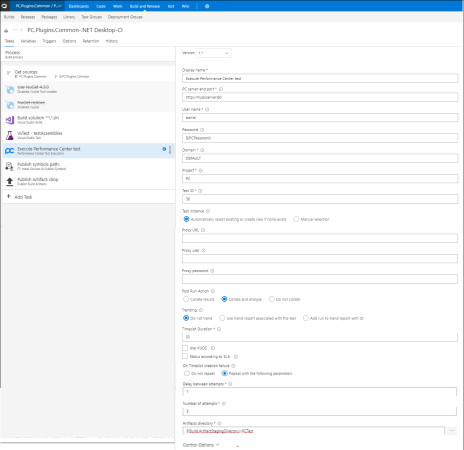
-
-
Save your build step settings.
Note: The only validations performed on the task form are to ensure that you supply a value (not a valid or correct value). If you supply an incorrect test ID, the test run will fail during runtime. If you supply invalid repeat values, they are replaced by the default values.
-
Run the build.

View the test results
The LoadRunner Enterprise testing task saves the log file and report in the build artifact directory (supplied in the Artifacts directory field of the LoadRunner Enterprise Testing task; by default “$(Build.ArtifactStagingDirectory)/PCTest”).
The LoadRunner Enterprise Test task does not publish the build artifact directory to the Azure DevOps/TFS server. Therefore, you should add another task to the Azure DevOps/TFS CI build process to publish the artifact.
 See also: