Share this page


Modify project settings
This topic describes how to modify LoadRunner Enterprise project settings in LoadRunner Enterprise Administration.
View or edit project settings
In LoadRunner Enterprise Administration, select Management > Projects to view details about your projects and manage their settings in the Projects page.
To edit project settings, select a project from the Projects list (click the link in the Project Name column). The project details page opens in the Main Details view.
You can perform actions on projects (delete, remove, activate, deactivate, or upgrade projects) using the toolbar in the Projects page, or by clicking More Options ![]() in the upper right corner of the project details page. For details of the various actions, see Manage projects.
in the upper right corner of the project details page. For details of the various actions, see Manage projects.
Projects Page/Project details (Main Details view)
Use these pages to view all your projects and to manage their settings.
|
Field (A-Z) |
Description |
|---|---|
| Projects page | |

|
Filter. Enables you to filter projects to display only those projects that meet the criteria that you define. For details, see Filter. Alternatively, click the |

|
Export to XLS. Enables exporting information from the Projects grid to an Excel file. Data from the grid is saved to an Excel file and downloaded to the Downloads folder of the client user. |

|
Select Columns. Enables you to determine which fields to display in the grid. |

|
Refresh. Refreshes the grid so that it displays the most up-to-date information. |
| Project Details page | |
| Concurrent Run Limit |
The maximum number of concurrent test runs allowed within a project. |
|
Database (For LoadRunner Enterprise using an Oracle environment only) |
If you are creating a project with a custom Oracle user, select Specific, and enter the Oracle user credentials in the Database Name and Password boxes. For details, see Create a project with a custom Oracle user. To create a new project using the default LoadRunner Enterprise user, change the setting to Default. |
|
Database Name (For LoadRunner Enterprise using an Oracle environment only) |
If you are creating a project with a custom Oracle user, enter the name of the custom Oracle user that is used to hold the schema of the LoadRunner Enterprise project. For details, see Create a project with a custom Oracle user. Note: Available only when Database is set to Specific. |
| Deactivation Date | The date on which the project was deactivated. |
| Description | Displays a description of the project (if added during project creation). |
| Domain / Domain Name |
The domain in which the project was created. To move the project to another domain, open the project details page and select the Main Details view. Click the Domain Name dropdown, and select a different domain for the project. |
| Host Limit |
The total number of hosts (Controller + load generators) reserved for a timeslot may not exceed this limit. |
| ID / Project ID | The project's ID. |
| Last Run |
The time and date of the last test run in the project. |
| Mode | Indicates whether the project is versioned or non-versioned. |
|
Password (For LoadRunner Enterprise using an Oracle environment only) |
If you are creating a project with a custom Oracle user, enter the password of the user that is used to hold the schema of the LoadRunner Enterprise project. For details, see Create a project with a custom Oracle user. Note: Available only when Database is set to Specific. |
| Pool / Pool Name |
The project's host pool. |
| Post-Run Action |
Select the action that is triggered automatically when the test run ends. This does not replace the user permissions, and is not enforced on collate or analyze actions that can be performed by the user from the Test Runs page at a later time.
Note:
|
| Project Name |
The name of the project. To rename a project, open the project details page and select the Main Details view. Modify the name in the Project Name box. |
|
Displays the selected project's state. It can be one of the following:
For details, see Deactivate or activate a project. |
|
|
Project Status Note: ALM migration is no longer supported. Instead, you must first migrate ALM projects to LoadRunner Enterprise 2023, and then upgrade to the latest LoadRunner Enterprise version. |
Displays the selected project's migration or upgrade status. It can be one of the following:
For details on migrating projects, see Migrate projects to LoadRunner Enterprise. For details on upgrading projects, see Upgrade projects to the latest LoadRunner Enterprise version. |
| Project Unique ID |
The project's Unique ID number. |
| Recurrent Timeslot | Indicates whether recurrent timeslot reservations are active or inactive (default) for the project. For details, see Enable recurring timeslots. |
|
Test Connection (For LoadRunner Enterprise using an Oracle environment only) |
If you are creating a project with a custom Oracle user, enter the custom Oracle user credentials in the Database Name and Password boxes, and then click Test Connection to check the connection to the database server using the credentials provided. For details, see Create a project with a custom Oracle user. Note:
|
| VUFDs Consumed |
The number of Virtual User Flex Days (VUFDs) consumed by the project. |
| VUFDs Limit |
The maximum number of Virtual User Flex Days (VUFDs) a project can run at once. The total number used by all of the project's concurrent performance tests must not exceed this limit. |
| Vuser Limit |
The maximum number of Vusers available to the project. |
| VuGen Working Mode |
The mode to use to upload scripts from VuGen:
|
 filter box under the column you want to filter, and select a filter (or enter text to filter).
View or edit project database settings
The Project Database view enables you to view database settings for your projects and change the password for a custom Oracle user.
-
On the LoadRunner Enterprise Administration sidebar, select Management > Projects.
-
Select a project from the Projects list (click the link in the Project Name column). The project details page opens in the Main Details view.
-
Select the Project Database view to display the following project database settings:
Field
Description
Database Name
The project name, as defined in the database. By default, the database name is automatically provided by LoadRunner Enterprise in the format:
LRE_<Domain Name>_<Project name>_DBIf a custom Oracle user was used to create the project, this field is populated with the Oracle user that holds the schema. For details, see Create a project with a custom Oracle user.
Password
(For LoadRunner Enterprise using an Oracle environment only)
If a custom Oracle user was used to create the project, this field is populated with the password of the Oracle user that holds the schema (the value is hidden by asterisks).
For details on changing a user password, see Update an Oracle user password.
Maintenance State
Indicates whether a maintenance task, such as migrating a project, is being performed on this project.
Possible values are:
-
Idle. No maintenance is being performed on this project.
-
Corrupted. Maintenance cannot be completed because the project is corrupted. To resume, a backup copy of this project must be restored.
-
Under maintenance task. Maintenance is being performed on this project.
For details on maintaining projects, see Migrate projects to LoadRunner Enterprise.
Connection String
String to connect to the project database.
Project Directory
The GUID of the project relative to the project repository root directory. For details on the repository, see View the project repository root path.
Note: For a non-migrated project, this field displays the location of the project repository in the ALM file system.
-
Manage users assigned to a project
You can manage the users assigned to the project from the project user settings.
-
On the LoadRunner Enterprise Administration sidebar, select Management > Projects.
-
Select a project from the Projects list (click the link in the Project Name column). The project details page opens in the Main Details view.
-
Select the Users view.
-
Edit the project user settings as required.
Field
Description
 Assign Users
Opens the Assign Users dialog box, enabling you to assign users to the project. The users list displays only the users not already assigned to the project. Select the users you want to assign, and click Assign. Unassign Enables you to unassign users from the project. For details, see Remove users from a project.  Assign to Role
Opens the Assign Users to Role dialog box, enabling you to assign a role to the selected users. For details, see Assign projects and roles to a user. User Name Name of the user assigned to the project (the LoadRunner Enterprise login name).
Full Name Full name of the user (optional). Role Role of the user assigned to the project. You can change the user role by clicking the Role dropdown and selecting a different role.
Note: Before project migration, all users are automatically set with Viewer role. After migration, any TDAdmin users from the ALM project are set with Performance Tester permissions in LoadRunner Enterprise, and the rest are set with Viewer permissions.
Manage the disruption provider assigned to a project
You can view or change the disruption provider assigned to a project from the project's disruption providers view.
-
On the LoadRunner Enterprise Administration sidebar, select Management > Projects.
-
Select a project from the Projects list (click the link in the Project Name column). The project details page opens in the Main Details view.
-
Select the Disruption Providers view.
-
You can perform the following actions:
Field
Description
Assign provider Enables you to assign a disruption provider to the project. Click Assign Provider to open the Assign Provider dialog box. Select the provider you want to assign, and click Save.
Note: Only one provider can be assigned to a project.
Unassign provider Click Unassign to unassign the displayed disruption provider from the project.
For more details on disruption providers, see Chaos testing.
Follow VUFDs transactions in your projects
You can follow the VUFDs transactions in your projects from the VUFDs Transactions view.
-
On the LoadRunner Enterprise Administration sidebar, select Management > Projects.
-
Select a project from the Projects list (click the link in the Project Name column). The project details page opens in the Main Details view.
-
Select the VUFDs Transactions view.
The view displays the following VUFDs information:
Field
Description
VUFDs Transaction ID The action ID. Post Date The date that the transaction occurred.
Action The VUFDs action performed. For details about the possible actions, see VUFDs actions. VUFDs Number The project's VUFDs limit. In use by Run ID The ID of the test run that is currently running the VUFDs. Updated Pending VUFDs The current number of VUFDs that are in the Pending state as a result of the transaction. Updated in use VUFDs The current number of VUFDs that are running as a result of the transaction. Updated Project Limit The project's VUFDs limit as a result of the transaction. Responsible The user, or automated system process responsible for the transaction. The following table lists the possible VUFDs (Virtual User Flex Days) actions. For details of VUFDs, see LoadRunner Enterprise licenses overview.
View the project log
You can view details about the project, including creation, migration, and upgrade steps, in the Logs grid.
-
On the LoadRunner Enterprise Administration sidebar, select Management > Projects.
-
Select a project from the Projects list (click the link in the Project Name column). The project details page opens in the Main Details view.
-
Select the Logs view.
The Logs grid displays detailed information about the project, including step name, start and end time, status, and messages.
-
Click Export to Excel File
to export the log data to an Excel file.
For details on troubleshooting project issues, see View migration issues and View upgrade issues.
View project repository usage
The file storage reports enable you to keep track of file usage and see how much storage space is used for each project.
Tip: To view details of file storage usage at the system level, see View repository usage for all projects in the system.
-
On the LoadRunner Enterprise Administration sidebar, select Management > Projects.
-
Select a project from the Projects list (click the link in the Project Name column). The project details page opens in the Main Details view.
-
Select the File Storage Reports view.
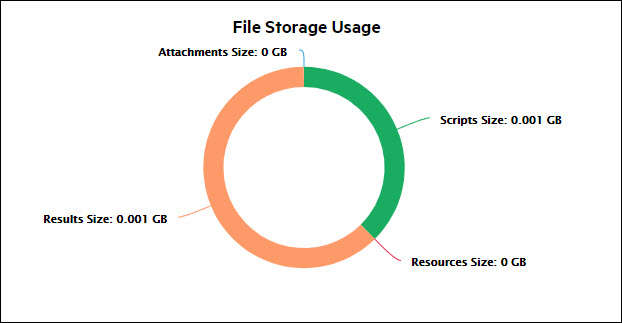
The view displays the following information about file usage for the selected project:

File Storage Usage. The pie chart shows the usage of each file resource type by size.
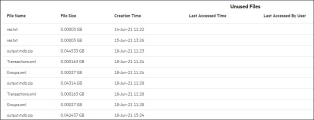
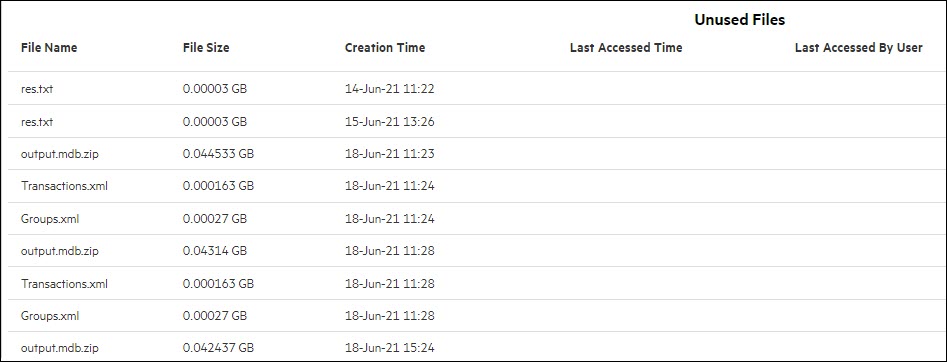
Unused Files. The grid shows a list of unused files, with their name, size, creation date, last access date, and last access user.
 See also: