Share this page


Package an iOS app manually with the iOS Enabler
The iOS Enabler utility is provided to simplify and support the re-signing and repackaging of apps. The iOS Enabler is available in both GUI and command line versions.
Prerequisites
Make sure that your Mac machine meets the required system requirements. For details, see Support matrix.
- In the Terminal window, type
codesign
The usage of codesign should be displayed. - If the codesign command is missing, Xcode is not properly installed, and you should reinstall it.
Additional required resources
Copy the following resources to your Mac machine:
| Resource | Details |
|---|---|
| iOS Enabler |
The Enabler is located in the Agent directory on the Digital Lab server machine: Windows:
The iOS Enabler tool is available in both GUI and command line versions. |
| Agent apps (only when using the iOS Enabler to sign the Agent apps) |
Download the Agent apps from Apps > iOS Agent Apps in the Digital Lab console (admin users only). ValueEdge Digital Lab: Locate the Agent apps in the connector's Agent folder. |
| UFT Mobile dylib | This library enables your apps to work with Digital Lab. The library is included in the Linux: <Digital Lab_server_installdir>/server/Agent <Digital Lab_server_installdir>\server\Agent |
| Code signing certificate |
This is the certificate your organization uses to code sign apps. The certificate must be installed on the Mac machine that you are using, and can be seen in the Keychain Access program. For more details on the certificates needed, see iOS app signing. |
| Code signing provisioning profile | This is the mobile provisioning profile that your organization uses to code-sign apps. This is originally a file downloaded from the Apple Developer Member Website and installed on your Mac. For details on how to generate a provisioning profile, see Generate a development provisioning profile. |

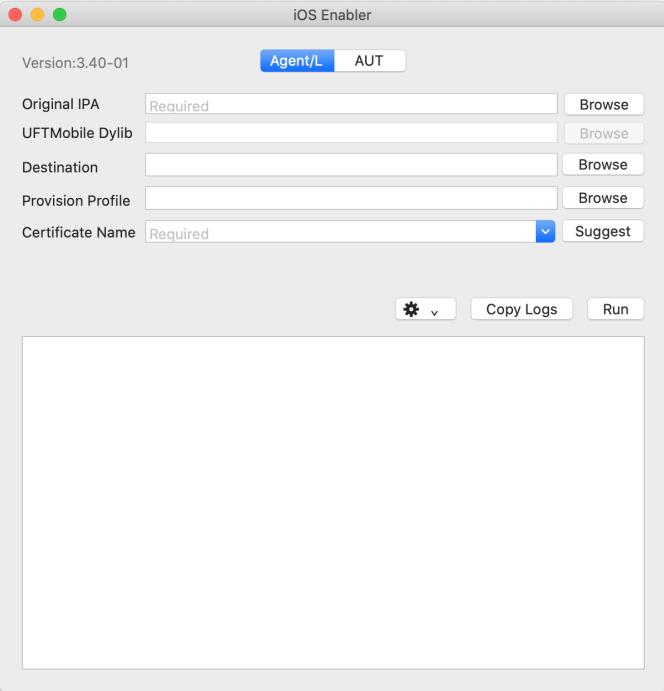
iOS Enabler on Mac - GUI version
The GUI version of iOS Enabler allows you to enter the required values in an accurate and simple manner, using a graphical interface.
To re-sign or repackage apps using the GUI iOS Enabler:
- Extract the files onto your Mac machine from the downloaded Enabler.zip package.
-
Open iOSEnabler-GUI.app: Ctrl+click or right-click on the app and select Open from the context menu.
Note: The GUI version of the Enabler is not distributed via the Mac App Store. If you try to install it through the App Store, it issues a security warning indicating that the application cannot be opened since it is from an unidentified developer. Instead, use the method described above.
-
Fill in the fields in the iOS Enabler.
User interface elements are described below:
UI Element Description Agent/L - AUT The Enabler mode:Agent/L mode. For code signing the Agent appsAUT mode. For signing and packaging appsOriginal IPA The full path to the original ipa file that you want to re-sign. For example, if you are re-signing the Agent app, enter/<full_path>/Agent.ipaDigital Lab Dylib In AUT mode only. A library to inject that enables your apps to work with Digital Lab. The library is included in the iOSEnabler.zip file.
Destination A destination for the generated files on your Mac machine.Provision Profile The path to the provisioning profile file on your Mac machine.Certificate Name
A drop-down list of the installed certificates from the Keychain. Select a certificate from the list or click Suggest to get the recommended one. If the certificate is not listed, it is not properly installed on this Mac machine.
Note: The iOS Enabler does not check the validity of the certificate, so you must ensure that it is valid.
Verbose Displays warning and error messages in the text area, if the Agent is not enabled properly.Tip: To keep existing entitlements, make sure to keep the Provision Profile field empty and in the Certificate Name field use the same certificate name as the original ipa.
-
Click Run. This generates an additional ipa file, customized with your code signing certificate and a provisioning profile.
-
A new ipa file is created:
Agent apps: Proceed to Distribute the re-signed Agent apps (manual signing only)
Other apps: Upload the new ipaNote: Whenever you upload a new or modified ipa file, as a result of adding or changing an iOS device, make sure to unplug the device and plug it in again.
- Make sure you have prepared an Apple Development certificate and provisioning profile. For more details, see iOS assets for signing apps.
- Download the iOS Enabler app packager tool for your version from the ADM Marketplace
-
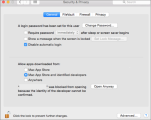
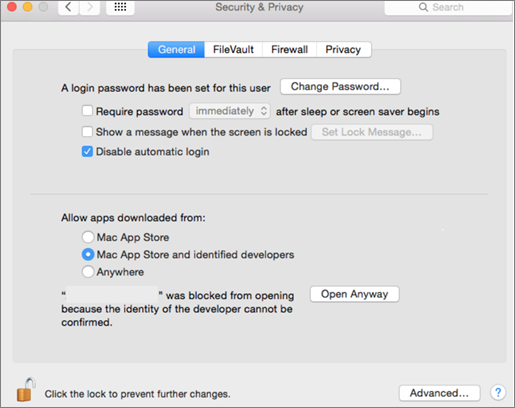
Copy the folder to your Mac machine and double-click on the application file. If you get a system warning, navigate to System Preference > Security & Privacy > General and click Open Anyway, to allow applications from identified developers to run.
-
To re-sign the Agent app with your development certificate, select the Agent/L tab.
Enter the following information:
- Original IPA. Enter the full path to the original .ipa file, for example
/<full_path>/Agent.ipa. - Destination. Specify a destination for the code-signed files on your Mac machine.
- Provision Profile. Browse to the location of the provisioning profile file that you downloaded on your Mac machine.
- Certificate Name. Select the development certificate starting with "iPhone Developer" from the dropdown list.
- Original IPA. Enter the full path to the original .ipa file, for example
- In the Settings, select Verbose to display warning and error messages in the text area, if the agent is not enabled properly.
-
Click Run. Observe the progress of the re-signing. If there are any pop-ups, click Allow.
The re-signed Agent file is generated as Agent-Codesigned.ipa.
- Repeat the above steps to re-sign the Digital Lab Runner apps (WebDriverAgentRunner_less15.ipa and WebDriverAgentRunner.ipa)
-
Rename the files by removing -Codesigned from the file name. For example, the Agent file should be renamed from Agent-Codesigned.ipa to Agent.ipa.
- Upload the apps to Digital Lab.
-
Navigate to Device Lab> Connectors, select the required connectors in the grid, and click Distribute Agents
 . After the updated Agent apps have been distributed to connectors, select the relevant connectors from the grid and click Reconnect Devices. For more information , see View and manage connectors.
Note that even if an earlier upload of an Agent app is selected in the app card, the latest upload is always used for distribution to connectors.
iOS Enabler on Mac - command line version
The command line version of iOS Enabler allows you to re-sign and repackage apps using the terminal command line.
Use the following syntax when running the Enabler from the terminal command line.
$ <path>/iOS Enabler <path>/<original_ipa>.ipa [<options>]
Command line options:
| Option | Details |
|---|---|
| -inject |
Inject the dylib into the app. Provide the full path to theUFT Mobile dylib. |
| -codesign |
Codesign the app with a certificate. This is the certificate your organization uses to code sign apps. The certificate must be installed on the Mac machine that you are using, and can be seen in the OSX Keychain Access program. Use the full name of the certificate as shown in the Keychain. For more details on the certificates needed, see iOS app signing. |
| -p | Attach a mobile provisioning profile to the App. Provide the path to the provisioning profile on your Mac machine. |
| -e | Entitlements file. |
| -r | Resources rules list. Your custom resource rules file. |
| --original-res-rules | Use the Resources rules file from the original IPA, ResourceRules.plist. |
| --generic-res-rules | Apply a generic Resources rules definition. If the codesign fails due to problems with the resources, try this option. A generic template is used. |
| --force-res-rules | Runs the enabler as if the --original-res-rules option was set. If no original rules were found, it runs the enabler as if the --generic-res-rules option was used. |
| --no-url-scheme | Do not add a unique URL scheme in Info.plist. By default, it is added. The format of scheme is hpmc-(a 32 char uid) |
| --verify-agent | Issue a warning if the Agent is not enabled properly. |
| -d destination folder | An optional path to the folder in which to place the new .ipa file. The folder must exist. |
| -n new file name | An optional name for the new .ipa file. |
| -v | verbose |
| -V | print version |
| -h | print usage |
After you run the Enabler, a new ipa file is created.
- Agent apps: Proceed to Distribute the re-signed Agent apps (manual signing only).
- Other apps: Upload the new ipa
Note: Whenever you upload a new or modified ipa file, as a result of adding or changing an iOS device, make sure to unplug the device and plug it in again.
The following examples show some common uses of the Enabler command line tool.
-
Re-signing of the Agent app
<path to iOS Enabler> <path>/Agent.ipa –codesign <certificate_name> -p <path to mobile.provision> --verify-agent
-
Re-signing of the WebDriverAgentRunner.ipa
$ <path to iOS Enabler> <path>/WebDriverAgentRunner.ipa –codesign <certificate_name> -p <path to mobile.provision> -
Re-signing of the WebDriverAgentRunner_less15.ipa
$ <path to iOS Enabler> <path>/WebDriverAgentRunner_less15.ipa –codesign <certificate_name> -p <path to mobile.provision> -
Repackaging an app
$ <path to iOS Enabler> <path to your_app.ipa> -inject <path to UFT Mobile dylib> –codesign <certificate name> -p <path to mobile.provision> –d <destination_folder>
Distribute the re-signed Agent apps (manual signing only)
Once you re-sign the Agent apps, deploy them in the following way:
-
Rename the files by removing -Codesigned from the file name. For example, the Agent file should be renamed from Agent-Codesigned.ipa to Agent.ipa.
- Upload the apps to Digital Lab.
-
Navigate to Device Lab > Connectors, select the required connectors in the grid, and click Distribute Agents
. After the updated Agent apps have been distributed to connectors, select the relevant connectors from the grid and click Reconnect Devices. For more information , see View and manage connectors.
Note that even if an earlier upload of an Agent app is selected in the app card, the latest upload is always used for distribution to connectors.
- The “get-task-allow” entitlement is set to true.
- All the UDIDs of your devices are included in the list.
Note: If the Agent doesn't install or run on a device, there is most likely a problem with your code-signing certificate or provisioning profile. Make sure that:
 See also: