Share this page


Create a release process
You can create a new release process either from scratch or from a predefined template. You can also duplicate an existing process.
Note: Access to the release process settings depends on permissions granted to your user role. For details, see Roles and permissions.
Create a process
First, you need to create a release process, and then define its stages and actions. For details on the process flow, see The release process flow.
To create a release process, use one of the following methods:
| Method | Steps |
|---|---|
| Create from scratch |
To create a process from scratch:
|
| Create from a template |
To create a process from a template:
Alternatively, in the Process Templates grid, select a template that you want to use for a new process, and click Create Process from Template Tip: Add the Process Template column to the processes grid to understand which templates your processes are based on. This helps you quickly identify a template if you need to modify any of its properties. Note: Admins can design business rules to prevent creating processes based on specific templates. For example, if a template is obsolete or was created for a different team. For details about process templates, see Use process templates. |
| Duplicate an existing process |
To duplicate an existing process:
|
 .
.
Define stages
Stages, as well as groups, can be defined as parallel or sequential.
For example:
| Stage | Details |
|---|---|
| Parallel |
All child items are run at the same time. |
| Sequential | An item starts after the preceding item has completed. |
To define a stage:
- Open a release process and select the Process Flow tab.
-
Click + Stage to create the first stage in the process.
Use the Run children in parallel field to determine whether the stage child items can be executed at the same time.
After creating a stage, define actions and quality gates that make up the stage.
Define actions
Actions represent tasks that should be performed as part of a stage.
Prerequisites
Ensure that the prerequisites below are met for the following auto action types:
- Run job: Ensure that the necessary ALM Octane integrations are configured for your workspace. For details, see Integrations overview.
- Update entities and Add comment: Ensure that the API key for auto actions is defined in the release process details. For details, see ALM Octane auto actions.
-
Generate document report: Ensure that API key for auto actions is defined, and that the API key has the Generate Document Report permission from the General System Actions category.
If necessary, contact your admin to grant this permission to the API key user. Also make sure that you have defined at least one document report template. For details, see Document report templates.
To define an action:
-
In the Run Process's Process Flow tab, make sure you have created a stage, as described in Define stages. Select one stage.
- From the Stage dropdown, click + Manual Action or + Auto Action. If one option is not visible, expand the dropdown.
-
Associate each action with the appropriate parent stage or group.
- Assign the action to an owner.
-
For auto actions, select the action type and provide the field values. For details, see Auto actions.
-
Click Add.
Tip: You can organize multiple actions into groups. You can reorder items in the process tree, but you cannot drag an item above an item that has already started. To reorder an item, drag the item up or down the tree. After you move the item, the timings of the surrounding items are adjusted automatically.
Auto actions
Release processes let you perform automated actions in ALM Octane and on the CI and CD servers.
You can create auto actions of the following types:
Some ALM Octane auto actions are performed on behalf of the API key.
API key for auto actions is a user account with the Release Manager role. It is used to perform system actions that are logged and require authentication. For example, when ALM Octane items are updated by an auto action, the updates are recorded in the item's history as the action performed by the API key for auto actions. The API key for auto actions is defined for a release process. Only users with the Workspace Admin or Release Manager roles can define the API key.
Tip: You can also use variables to include automatically generated property values in subsequent auto actions, such as emails and document reports. For details, see Create process variables.
The following are common ALM Octane auto actions:
| Type | Details |
|---|---|
| Update entities |
Performs an update to the following item types:
If the auto action succeeds, the new values replace the original ones, for the specified type. Specify the following values:
Note: By default, the maximum number of ALM Octane items that can be updated by an auto action is set to 500. Your admin can change this number by modifying the RC_AA_UPDATE_ENTITIES_MAX_SIZE parameter. For details, see Configuration parameters. |
| Generate document report |
Generates a document report based on the selected template. The template drop down only includes templates that are shared with all users. If the auto action is successful, the owner of the auto action is notified of the report generation in the My Work area. Note the following:
|
| Send email |
Sends an email with a specific message. Specify the To, CC, and BCC fields, the subject, content, and importance level. |
| Add comment |
Adds comments to the selected item types. This capability is availability for:
Tip: To narrow down the list of items to which a comment will be added, apply a filter. For example:
Note: Comments are added on behalf of the API key. Ensure the defined API key user has permissions to add comments to the selected item type. |
You can create Run job auto actions for common CI servers.
For a CI action, you define the following:
| Field | Details |
|---|---|
| CI server |
The CI server whose job the auto action should run. The supported servers are: Jenkins, Bamboo, Azure DevOps, PulseUno, GitLab, and TeamCity. Note:
|
| CI job |
A job that the auto action should execute, depending on the selected CI server. |
| Execution parameters |
Job execution parameters that ALM Octane should pass to the CI server. Note:
|
| Branch name |
The branch on which the job should run. Note:
|
You can create auto actions for CD servers.
Technical preview: The Deployment Automation integration is provided as a technical preview. It may require a separate license in the future
| Type | Details |
|---|---|
| Run application process |
Deployment Automation: Auto actions can run application processes using snapshots or component versions. Specify the CD server, the application and its environment, a process, a snapshot/component and their versions. Tip: You can parameterize the Deployment Automation component version and snapshot, to run the application process for multiple component versions and snapshots. For example, you can run the auto action with Expression mode on, and again with it off, by using different input variables for the snapshot. For details, see Create process variables. |
Define quality gates
Use quality gates to verify that certain criteria are met before moving to the next stage.
For a quality gate to pass, all its criteria need to be marked as passed.
Quality gate criteria can be a combination of user input and query criteria:
| Criterion type | Description |
|---|---|
| User input criterion |
You enter a textual description of a condition for passing the quality gate. The owner manually marks the criterion as passed or failed. Examples: Does the feature have the owner and QA owner? Is the API impact verified? |
| Query criterion |
You define a rule that checks whether the number of items of a selected type within a given filter meets a specified condition. When the quality gate is processed, the system automatically runs the query. If the condition is met, the criterion is passed. If the condition is missed, the criterion is failed. Example: Defects = 0; Filter: Severity = {Very High, Critical}, Feature = {my feature} |
To define a quality gate:
- Open a release process and click the Process Flow tab.
- Click + Quality Gate . If this option is not visible, expand the item dropdown and select + Quality Gate. For details, see Create a release process.
- In the Add Quality Gate window, enter your information. Click Add & Edit.
-
Click the Criteria tab. Choose a criterion type: + User Input Criterion or + Query Criterion.
-
In the Add Criterion window, define a condition for passing the quality gate. For details on defining query criteria, see Define query criteria for quality gates.
Note: The number of criteria that you can define in a quality gate is controlled by the RC_CRITERIA_PER_GATE parameter. For details, see Configuration parameters.
Define query criteria for quality gates
This section describes how to define query criteria for a quality gate.
Click + Query Criterion, and in the Add Query Criterion dialog box, provide the following details:
| Field | Description |
|---|---|
| Item type |
Select the item type that the query should run on. You can reduce the scope of items by defining a filter. Possible values: Backlog Items, Defects, Last Test Runs. |
| Threshold operator/ Threshold value |
Use these fields to define a numerical condition. If the condition is met, the criterion passes. |
| Filter |
Set a filter to define the subset of items that the system compares with the threshold condition.
Setting these values lets you define the release and milestone for all the query criteria in one place, on the Details tab of a release process. For details on setting filters, see Filter options. |
Simulate query criteria results
You can run a simulation of a query to see how many items the query returns, and see whether the query would pass or fail the criterion.
To simulate the results:
- In the Criteria grid of the quality gate, select the criterion that you want to simulate.
-
In the Preview pane of the query criterion, click Simulate Results.
After the simulation completes, a flag displays in the Preview pane indicating whether the criterion would pass or fail given the current situation.
- Click the results link to list the items that the query returned.
Note:
- You can simulate query criteria of quality gates that are in the Planned phase only.
- The simulation reflects the current situation. The results of the actual quality gate evaluation may be different.
Use process templates
Process templates help you quickly create release processes with a predefined set of properties, such as stages, actions, and quality gates.
Note:
- Any operations on templates require relevant permissions. By default, the permissions are granted to the Release Manager and the Admin roles.
- Any changes to a template affect only new processes based on that template. When a template is deleted, it has no impact on its related processes.
When creating a process template, consider the following notes:
-
You can associate a template with releases and milestones. This helps you create a template for processes with different milestones in a long release.
You can use the same template for processes outside the selected release and milestone.
- You cannot associate a template with work items. The Work Items Count field is not available for templates.
You can create a new process template either from scratch or from an existing release process. You can also duplicate an existing process template.
| Method | Steps |
|---|---|
| Create from scratch |
To create a template from scratch:
Click + Shared Process Template to create a template in all the shared space's workspaces. |
| Create from a process |
To create a template from an existing process:
A new template is added to the Process Templates grid. The template's items, such as stages, actions, and quality gates, are copied from the original process. The template's properties, such as the API key, Release, or Milestone, are also copied from the original process. The fields that are specific to the template entity, cannot be copied. Note: If any fields are required for a Process Template entity, the template is saved in draft mode. The Is draft grid column indicates whether the template is a draft. You can then edit the draft and define the required fields. |
| Duplicate an existing template |
To duplicate an existing template:
|
 .
.Tip: You can view and drill down to all release processes based on a specific template, from the template's Relations tab.
Create process variables
Available in versions: 16.2.100 and later
A process variable is an entity used in the context of a specific process or template in place of a static field value. You can use variables in auto actions.
You can define one or more variables to parameterize your release process. This allows you to use process templates without having to manually adjust the input properties and gate criteria. For a sample flow using variables, see Execution flow with variables.
Note: Creating and managing process variables requires the relevant permissions. By default, permissions are granted to the Release Manager and Admin roles.
To define a variable:
- In Release Management > Process Templates, select a template and navigate to the Variables tab.
- Click + Variable, and define the following variable properties:
- Use a combination of letters and numbers.
- Do not include spaces or special characters. The only exception is the underscore (_).
- Non-Roman letters are acceptable.
-
When creating a template from a process, or when duplicating a process, only default values are copied.
-
if a variable was not defined with a specific value, then it takes the default value when the process moves into the In Progress phase.
-
A value can include a maximum of 255 characters.
| Property | Details |
|---|---|
| Name |
A unique name that represents the purpose of the variable. For example, useful variables could be branch, build_num, version_num, and deployed_url. When defining a variable name, follow these guidelines: Note: Variables can be renamed at a later time. |
|
Type |
String (currently the only supported type). |
|
Value |
The value of the variable as generated by the last run. Run the action at least once to see the current values. |
| Default value |
If relevant, provide a default value. For example, you can specify main as the default for a variable called branch. Consider the following: |
| Description | A description of the variable. For example, outline its purpose or provide other meaningful information. |
Run a process with variables
Available in versions: 16.2.100 and later
You can run a process that is comprised of a series of auto actions, where later actions use values from previous ones. You do this by passing variables as parameters between the actions. For example, you can use the output property Build Number of a Run Jenkins Job auto action and store it in a variable. For a subsequent action, you can use the build number as an input parameter to notify users about the status of a specific build.
Note: Variables are only supported for auto actions, not manual actions.
You can use variables in list fields and in text fields, such as message and comments, located within the Input properties section of your auto actions.
Input variables
To add variables to your input properties:
-
Define variables as described in Create process variables.
- In your release process, select the Process Flow tab and select the auto action to which you want to assign the variables.
- In the auto action's Details tab, go to the Input properties section.
-
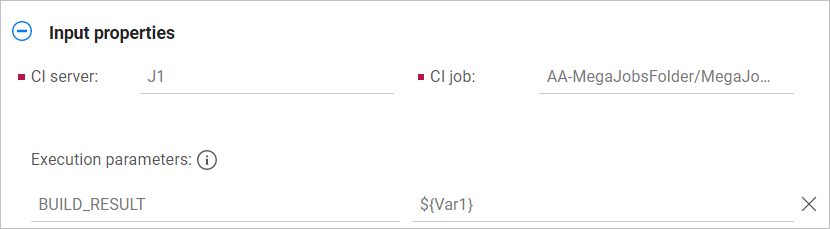
List fields. In list fields, choose a parameter. In the right column, type ${ to open a list of the available variables. Select a variable.
The example below shows a variable selected in the Execution parameters section.
- Text fields. In text fields, such as Comment or Message, type ${ (curly bracket) to open a list of the available variables. Select a variable. Include other text around the variables. For example, if you defined the variables team and build_num variables in your template, type the following in an email Message field:
Well done ${team}! Build ${build_num} succeeded.
Advanced output processing
Certain auto actions, such as CI jobs, generate output properties. You can assign these properties to variables for use in subsequent actions. For example:
-
if you have an email auto action following a CI job action, you can add a message which includes the current Build Number and Build Status values.
-
A Document report action generates a URL, which you can share with your team.
-
A PulseUno action generates a build number, which you can include in emails.
This section describes advanced output processing, where you use automatically generated output properties, such as build number and version, to set variable values.
To use output properties as variable values:
-
Define variables as described in Create process variables. It is advisable to use names that reflect the output property, such as build_num or build_status.
-
In your release process, select the Process Flow tab and select the auto action from which you want to use the output properties, such as a CI job.
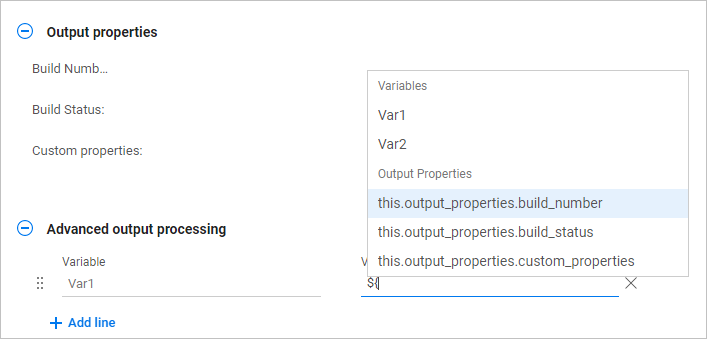
- In the auto action's Details tab, go to the Output properties section. The output property values are generated during the run.
- In the Advanced output processing section, click the list dropdown and select a variable.
-
In the Value area, type ${ to open a list of the available properties. Automatically generated properties have the following prefix: this.output_properties.
-
Save the auto action.
-
In subsequent auto actions, use the variable that you assigned to the output property. For example, for a Send email auto action, you can type the following in the Message field:
Build Number ${Var1} finished with a ${Var2} status.
 Next steps: