
Share this page


Related items
You can define connections between items by creating relations or dependencies between them.
Related items
Related items are items that have a defined connection between them. The Relations tab of an item lets you define connections between the item and any other workspace item. Some relations are created automatically, such as the links between a test and its runs, or a test and defects detected during its run.
There are several types of relations that can exist between items. Some types of relations are listed in the table below. Depending on the type of item, other relations may also be available.
| Relation | Details |
|---|---|
| Covering test |
A test that covers the item. You can define a test as covering one or more items, such as features or user stories, and then track the quality of the items by analyzing the results of the covering tests. For details, see Build the backlog. You can also define an automated test as covering a manual or Gherkin test, to synchronize the tests' status and details. For details, see Link manual tests to automated tests. |
| Covering requirement document | A requirement document that describes requirements for the item. For details, see Requirements. |
| Dependency |
A relationship where one item must be completed before another item. If Item A must be completed before Item B, Item A is defined as an upstream dependency of Item B. Item B is a downstream dependency of Item A. For details, see Dependencies. |
| Linked item | A relationship between two different types of items. |
| Parent/child | The relationship between an item and the item above it (parent), or below it (child), in the backlog hierarchy. For details, see Backlog. |
| Pull request |
Pull requests related to the item. For details on linking pull requests to your backlog items, see Track pull requests in your SCM system. |
| Specified by BDD Specifications | BDD specifications related to the item. For details, see BDD testing framework. |
| Trace to/from | A relationship between two of the same type of item. |

Create a relationship
Some relationships are created automatically. For example, when you create a test for a feature, a Covering Test relationship is created between the test and its feature.
You can also manually add relationships between items from the Relations or Details tab.
To create a relationship from the Relations tab:
-
Open an item in details view and select the Relations tab.
-
Click the Chart button
 .
. -
Click the Add Relation button
 and select the type of relationship you want to create.
 -
In the dialog box, select one or more items to which you want to create relationships.
-
Click Add. The relationships between the items are created. Each of the items shows the relationship in its Relations tab.
To create a relationship from the Details tab:
-
Open an item in details view.
-
Click the More button
 , select Add Relation, and then select the type of relationship you want to create.
 -
In the dialog box, select one or more items to which you want to create relationships.
-
Click Add. The relationships between the items are created. Each of the items shows the relationship in its Relations tab.
To manage an item's relationships:
-
Open the item's Relations tab.
-
Click the Viewer button
 .
. -
Select a relationship type to view the items connected by that type of relationship.
Tip: For each relationship type, a number indicator shows how many items are connected to the current item.
-
Use the Add Relation button
and the Remove Relation button  to manually add or remove related items.
You can view and manage relations in the Chart layout or in the Viewer layout .
| Layout | Details |
|---|---|
| Chart |
The following describes the chart behaviors:
|
| Viewer |
The following describes the viewer behaviors:
|
Dependencies
Dependencies are items related by the Upstream dependency and Downstream dependency relationships. Dependency relationships determine the order in which activities must be performed. The activities of an upstream dependency must be performed before the activities of a downstream dependency.
You can create dependencies between features, user stories, quality stories, and defects.
To create a dependency:
-
Open a downstream item in details view and select the Relations tab.
-
Click the Chart button
. -
Click the Add Relation button
and select Upstream Dependency. -
In the dialog box, select one or more items on which the downstream item is dependent.
After the first dependency is defined, you can add more dependencies from the dependencies map.
Manage dependencies
An item's dependencies are displayed in the item's Relations tab, and in a dedicated dependencies map.
To view the dependencies map, open an item's Details tab and click the View Dependencies button  in the toolbar. If the button is not displayed, the item does not have any upstream or downstream dependencies.
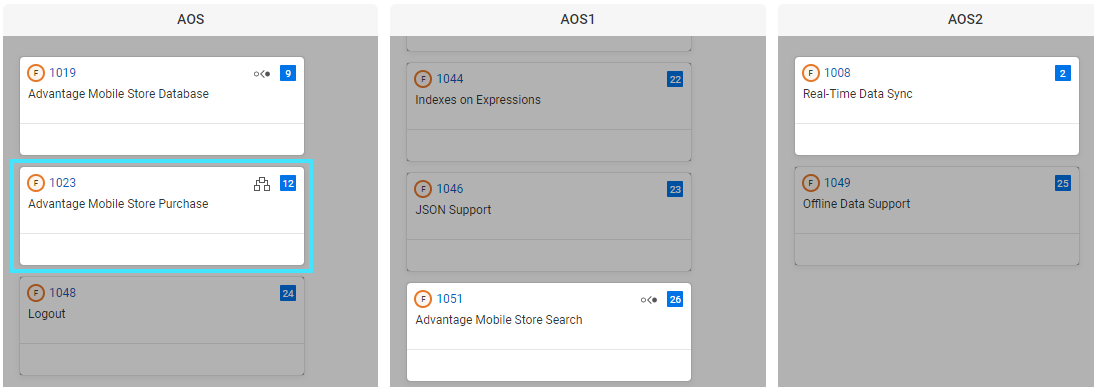
In the feature Planning board, features with dependencies are marked Dependencies exist  . For details, see Board view.
To keep track of items with dependencies, you can add dependency fields to a grid using Choose columns. For details, see Grids and views.
The following example shows the dependency relationships for feature 1023. Upstream and downstream dependencies are labeled accordingly.
Problematic dependencies are when an upstream dependency activity does not finish before its downstream dependency activity. For details on dependencies, see Dependencies. In case of problematic dependencies, Problematic dependencies exist is displayed.
The dependencies map provides a comprehensive view of a feature's dependencies. While the Planning board is limited to the context of features and a specific sprint or release and displays only direct dependencies, the map displays all dependencies, regardless of the item type, sprint or release.
To open the dependencies map:
-
Click the Dependencies exist button
to display the dependencies on the Planning board. -
Click the Dependencies map button
to display the feature's dependencies map.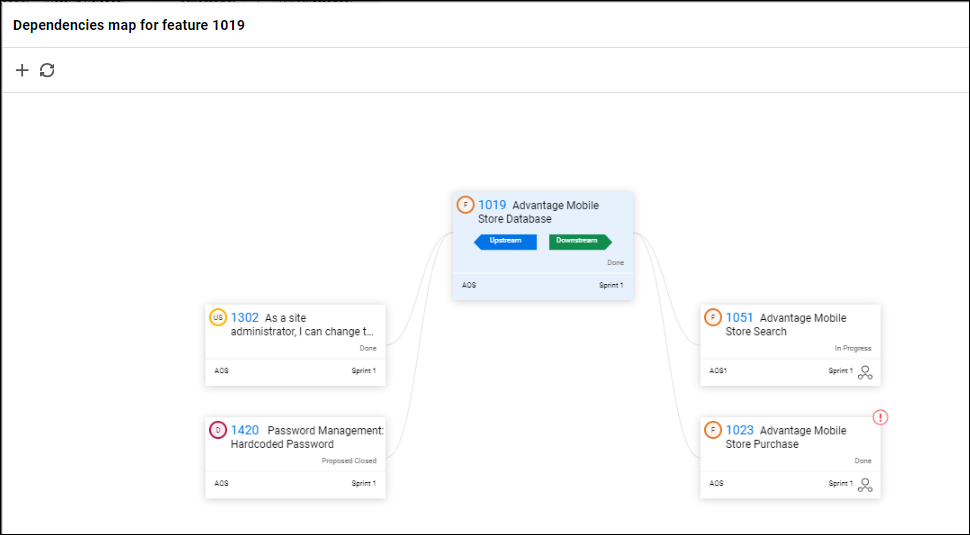
-
In the dependencies map you can perform the following actions.
Action Description Add dependencies Select the item to which you want to add an upstream dependency, and then click Add Upstream Dependency.
Note: When you add a dependency to an item in the map, it does not immediately display potential issues. Click Refresh to see problematic dependencies. This may take a few seconds
Focus on different items Click the Dependencies exist button
to switch the focus to different items to see their dependencies.Dependencies are linked by lines.
-
A faded
 line indicates the branch of this dependency is not in focus.
 -
A colored line
 indicates the branches of this dependency that are problematic.
  indicates that an item has problematic dependencies.
Collapse a branch Click the Collapse button
 to collapse a dependency branch.
 -
 See also:


