
Share this page


Multi-tenancy
This topic describes how to use Site Management to create and manage multiple shared spaces (tenants) on a single LoadRunner Enterprise server.
Tip: See the LoadRunner Enterprise video gallery for a video on tenant administration.
Site Management overview
Site Management is the console where you run LoadRunner Enterprise's multi-tenancy feature that enables you to create and manage multiple shared spaces (tenants) on a single LoadRunner Enterprise server.
A tenant can be one company, or a division within one company. Each tenant's data is isolated and is not visible to other tenants. The multi-tenancy feature is useful for SaaS providers and where separation may be required between different domains and products in an organization.
Multi-tenancy is enabled automatically when more than one tenant is created. When using a multi-tenant system, the tenant UID must be passed as a query parameter in the URL in order to log on to the LoadRunner Enterprise and LoadRunner Enterprise Administration pages. For example:
http://localhost/admin?tenant= fa128c06-5436-413d-9cfa-9f04bb738df3
Multi-tenancy architecture
The LoadRunner Enterprise database server stores four types of schemas: LAB, Admin, Site Management, and Project schemas. Each tenant has its own LAB and Admin database schema, and a reference in the Site Management schema for each tenant that is created.
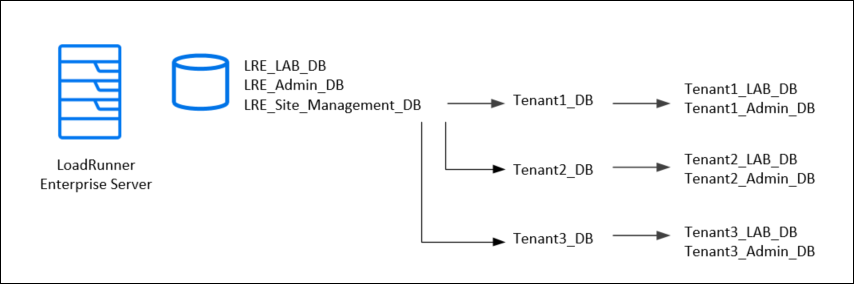
When LoadRunner Enterprise is installed, the Site Management schema and default LRE tenant schema are created.
If no additional tenants are created, users work with LoadRunner Enterprise in a single-tenant environment using the default tenant.
Licenses
When using tenants in LoadRunner Enterprise, each tenant requires its own license. The same license cannot be reused in more than one tenant, unless you split the licenses accordingly. For example, if you own a license for 5,000 Web Vusers, you can use 2,500 Vusers in Tenant A and 2,500 Vusers in Tenant B.
Note: If an existing license has already been loaded into the LoadRunner Enterprise server, you cannot remove it and split it between tenants.

User roles
The table below describes the user roles created from Site Management.
| User Roles | Description |
|---|---|
|
Site Management Users |
Site Management users are created and used in the Site Management console only. They are a separate entity from LoadRunner Enterprise users and cannot log onto LoadRunner Enterprise. Note:
|
|
Initial Tenant Admin user |
When you create a new tenant in Site Management, you assign an administrator for managing that tenant. When the tenant is created, this user is automatically created for you in LoadRunner Enterprise Administration with a Tenant Admin role. You need this user to log onto LoadRunner Enterprise Administration for the first time. Note:
|
Multi-tenancy workflow
Below is an overview of the process for setting up a multi-tenancy environment.
-
Install LoadRunner Enterprise
-
Install and configure LoadRunner Enterprise as described in the LoadRunner Enterprise Installation Guide (available from Installation).
-
During the installation, enter a schema name for the Site Management database in the DB Schema Configuration page of the Configuration wizard.
-
-
Perform initial tenancy set up tasks (in Site Management)
When you install LoadRunner Enterprise, a default tenant is automatically created. The user defined during installation is assigned as the default Site Management administrator.
-
Log onto the Site Management console as the default Site Management administrator. For details, see Log on to Site Management.
-
Create a tenant and assign an administrator for managing that tenant.
When you create a tenant in Site Management, provide credentials for the initial Tenant Admin user. This user is automatically created for you in LoadRunner Enterprise Administration when the tenant is created, and is required to log on to LoadRunner Enterprise Administration (for the specific tenant) for the first time. For details, see Manage tenants.
-
(Optional) Define additional Site Management users and perform other management tasks. For details, see Create and manage Site Management users, Manage tenant host resources, Check the tenant server, and Check tenant log files.
-
-
Configure lab resources for the tenant (in LoadRunner Enterprise Administration)
Log onto LoadRunner Enterprise Administration as a Site Admin user or as the user defined during installation, and configure the hosts and lab resources for the tenant. For details, see Host resources and lab management.
-
Define additional users to manage the tenant (in LoadRunner Enterprise Administration) - Optional
-
Log on to LoadRunner Enterprise Administration using the initial Tenant Admin user you assigned when creating the tenant (see step 2b above).
-
Define additional Tenant Admin users to manage the tenant as required. For details, see Define additional Tenant Admin users.
-
-
Configure test resources and create users (in LoadRunner Enterprise Administration)
A Tenant Admin user can then log into their respective tenants in LoadRunner Enterprise Administration and start configuring them. This includes creating and managing users, user roles and permission, and assigning projects. For details, see Manage users in a project.
Note: A Tenant Admin user has restricted access to LoadRunner Enterprise Administration. For details, see Predefined admin roles.
-
Provide users with the tenant URL
After configuring the tenant, provide the relevant users with a tenant-specific link to the LoadRunner Enterprise application, so that they can plan and run performance tests. For details, see Design a performance test - workflow.
Notes and limitations
The following are notes and limitations when creating and managing tenants:
|
Browser issues |
There is no tenant separation available when using LoadRunner Enterprise on a Chrome browser. This means that if you have an open browser with one tenant, and you open a new browser with another tenant, you get the data from the first tenant. Solution: Use separate profiles for each tenant. |
| Alerts |
Alerts are supported when using a multi-tenancy or SaaS environment. For details, see Alerts in a multi-tenant environment. |
 Next steps:


