
Share this page


Define test workloads
This section describes how to define a performance test workload.
Select a workload
You select a workload depending on the type of schedule and schedule run mode you want to use to run your test, and depending on how you want to distribute the Vusers among the Vuser groups in your test.
Note: You already selected a workload type for the performance test when you created a test in the Create New Performance Test dialog box. The following explains how to change these settings from the Performance Test Designer.
-
Create a performance test. For details, see Design a test.
-
In the LoadRunner Enterprise masthead, click the module name or the dropdown arrow and select Test Management (under Testing). Select a performance test in the test management tree and click Edit Test.
-
In the Performance Test Designer window, select the Groups and Workload tab.
-
Click the dropdown adjacent to the Workload type box, and select a type of workload for the test. The type of workload you choose determines the type of schedule by which the test runs, and how the Vusers are distributed at runtime.
For details on distributing Vusers in a performance test among the Vuser groups, see Distribute Vusers among Vuser groups.
For details about the workload types, see Vuser distribution methods.

Select a Controller
To select a host to act as the Controller for the test:
-
In the Performance Test Designer window, select the Groups and Workload tab.
-
In the Summary pane at the top of the page, click the dropdown arrow adjacent to the Controller box.
-
Select a host type:
Automatch: Dedicated Controller At runtime, an available Controller host in the host pool of the project is allocated for the test run, and is dedicated for Controller functionality. Because it is a dedicated Controller, it cannot be allocated as a load generator as well.
For details about host allocation, see Allocate hosts.
Specific Select this option if you want a specific Controller host. The grid lists the specific Controller hosts available in the project's host pool.
Note: If a host is marked with a red asterisk (*), it is already assigned to a Vuser group as a load generator. Due to possible heavy load on the Controller and load generator hosts during a performance test, if a host is assigned to a Vuser group, it is best practice not to select it as a Controller as well.
-
Select a host to act as the Controller for the test.
Note:
-
You select only one Controller for a performance test.
-
Due to possible heavy load on the Controller and load generator hosts during a performance test, it is best practice not to assign a Controller as a load generator as well.
-
Create groups and distribute Vusers
You create a Vuser group by selecting a script or a script folders, and then distributing Vusers to the group.
-
In the Performance Test Designer window, select the Groups and Workload tab.
-
In the Groups pane, click
 Add Group. The Add Group dialog box opens, displaying the Scripts tree, enabling you to select scripts to run in your test. It lists all the scripts that have been uploaded to the project.
-
In the Scripts tab, select a script or script folder to add to your test.
You can also upload scripts to use in your tests. For details, see Upload a script to LoadRunner Enterprise.
-
To add Noise Generator scripts, select the Noise tab, click
and specify the URL of the server you want to access. For details, see Create noise generator scripts.
-
-
Click Add. For each selected script, a Vuser group is created in the Groups grid and is given, by default, the same name as the selected script. You can rename a group by clicking the group name and changing the name as necessary. To view script details or edit script parameters, click the Script Name link. For details, see View script details.
Note: Non-English national characters are not supported in group names.
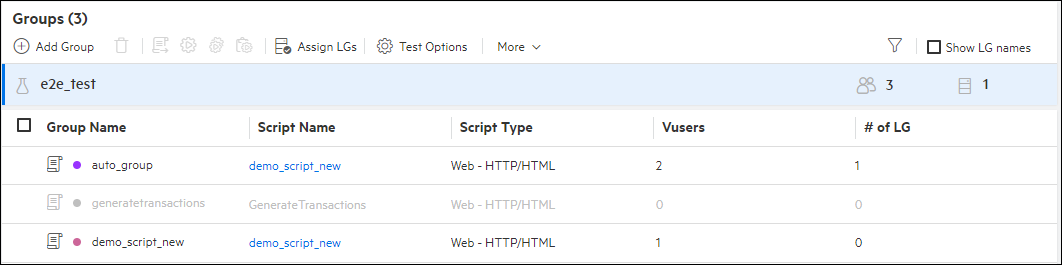
The Groups grid also includes:
Script Type The Vuser script type.
Vusers (By Number mode, for Basic or Real-World Schedule) The number of Vusers distributed to the Vuser group. The default value is 1 Vuser.
% of Target. (For Goal-Oriented Schedule) The percentage of the overall target number of Vusers, hits per second, or transactions per second that is automatically distributed to each Vuser script.
Vusers-100% (By Percentage mode) The percentage of Vusers distributed to the Vuser group. The sum of all the groups' percentages must not exceed 100
# of LG The number of load generators assigned to the Vuser group. Select Show LG names in the toolbar to display the names of load generators assigned to the each group.
Note: While hosts from older installations of LoadRunner Enterprise (up to two versions earlier) are still supported and are colored orange, we recommend upgrading them to the current LoadRunner Enterprise version before using them. Versions displayed in red are no longer supported and cannot be used to run tests.
-
If you want to replace the script assigned to the group with a different script, select the script and click
 Replace script for existing group. Select a script to replace the existing one assigned to the group, and click Replace & Close.
 -
Distribute Vusers among the Vuser groups according to the Vuser distribution method you selected in the workload type. For details, see Distribute Vusers among Vuser groups.
Distribute load generators among groups
Specify which load generators to distribute to which groups. For details, see Distribute load generators among Vuser groups.
Define a test schedule
Schedule how the Vuser groups are to run in the test. For details, see Define a schedule for the test.
Configure test settings
You can configure the following optional settings for your test:
|
Action |
Description |
|---|---|
|
Configure runtime settings |
You can configure the runtime settings of uploaded Vuser scripts. Runtime settings are applied to Vusers when the script runs. To open the Runtime Settings dialog box, in the Groups pane toolbar, click Runtime Settings For details, see Configure runtime settings. |
|
Duplicate runtime settings |
You can copy runtime settings from one script in the test to other scripts of the same script type.
|
|
Sending command line arguments enables you to configure test settings and instruct the Controller how to behave without the need to manually define them in the UI.
|
|
|
Set rendezvous points |
When you add Vuser groups to the test, their associated scripts are scanned for rendezvous points. To view and manage the rendezvous points, select More > View Rendezvous. For user interface details, see Set rendezvous policies. |
| Use relative distribution |
You can use relative distribution to provide a ratio by which LoadRunner Enterprise calculates the percentage of Vusers to distribute to each Vuser group. In the Groups pane toolbar, click More > Relative Distribution. For details, see Distribute Vusers by percentage (relative distribution). Note: Enabled in percentage mode only. |
|
Enable network virtualization |
Network Virtualization enables you to emulate probable network effects over your network and include an NV Insights report, thereby creating a more realistic performance test. To use Network Virtualization, select More > Virtual Location Editor. For details, see the Integrate NV into a performance test. Note: Available only if Network Virtualization has been installed on your machine. |
 .
.  .
.  .
.Assign a test set
You can assign a test set or change the test set assigned to the test by clicking the dropdown arrow adjacent to Assigned Test Set box. For details, see Create, edit, or assign a test set.
Enable trending reports (optional)
You can enable LoadRunner Enterprise to automatically publish trend results for the test by clicking the dropdown arrow adjacent to Trending box. For details, see Configure automatic trending.
Deactivate or activate Vuser groups
You can deactivate and activate Vuser groups in a performance test.
When you deactivate a Vuser group, the following occurs:
-
The group name is grayed out in the Groups list and the group is unavailable for selection.
-
The number of Vusers is set to 0 and load generators are unassigned.
-
A deactivated group is not deleted from the server and its runtime settings are saved.
Activated groups are indicated by a colored dot  ; deactivated groups are indicated by a gray dot
  .
.
Note: You cannot deactivate a group if it has more than one Start action. For details, see Scheduler actions.
To deactivate a Vuser group:
-
In the Performance Test Designer window, select the Groups and Workload tab.
-
In the Groups pane, right-click a group you want to deactivate, and select Deactivate Group.
-
The selected group is deactivated and is unavailable for selection in the Groups list.
To activate a Vuser group:
-
In the Performance Test Designer window, select the Groups and Workload tab.
-
In the Groups pane, right-click a group you want to activate, and select Activate Group.
-
The selected group is activated and is available for selection in the Groups list.


