Share this page


Create requests
This topic provides the details of how to create requests.
Create a new request from Create menu
The most common way to create a request is by using the Create New Request page opened from the Create > Request menu.
Caution: If your PPM instance supports multiple languages, note that when you create a new request type, its definition language is automatically set to your current session language. For more information, see the Multilingual User Interface Guide.
To create a request from the Create menu:
-
Log on to PPM.
-
Do one of the following:
-
If it is your first time to create a request, on the Create menu, click Request to open the Create New Request page.
-
To create a request with a recently used request type, on the Create menu, click Request > <Request Type>, and skip to step 5.
The Create Request submenu lists the five most recently used request types, same as the request types listed in the Create Based on Desired Action section of the Create New Request page. If you delete all requests of a request type (including closed requests), that request type is removed from the Create Request submenu. The Create Request submenu disappears when all recently used request types are removed.
-
To use a request type other than the most recently used ones, on the Create menu, click Request > Other types to open the Create New Request page.
-
-
From the Request Type list, select the type of request you want to create.
The request type you can select depends on your licenses and access grants, and on the security groups to which you are assigned. To save you time, the Create Based on Desired Action section lists the most recently used request types.
-
Click Create to open the Create New <Request Type> page.
The fields displayed on the request details page vary depending on the request type you selected.
-
In the header section, complete the required fields, and provide any useful optional information about the request.
Make sure not to include any HTML related characters in a request's description. If a request contains HTML related characters in its description, the request is not displayed in the My Requests portlet.
-
In the details section, complete the required fields, and provide any useful optional information about the request.
The details section can have none, one, or many subsections. For information about a specific field, click the Help icon (if available) next to the field.
-
In the Notes section, enter additional information about the request that you want to make available to other users.
-
Use the References section to add references to the request.
For details on how to add references, see Add references to requests.
-
Click Submit.
The Request Creation Confirmed page opens and displays the number assigned to the new request, and the request description.
-
If you do not want to submit the request yet but want to save the request, click Save Draft. This button is available only if your administrator has enabled it by setting the parameter ALLOW_SAVE_REQUEST_DRAFT to
true. For details, see Server parameters.Note: If your administrator configures PPM to skip the confirmation page, you can skip the Request Creation Confirmed page and directly go to the request details page. For details, see the SKIP_REQUEST_CREATE_CONFIRMATION_PAGE parameter in Server parameters .
However, the Finish Execution before displaying the request page to the user option does not work for request creation. Therefore, when you select this option and skip the request creation confirmation, the request page opens before the execution finishes and the request status may be incorrect.
-
To open the details page for a submitted request, click Request #.
After you submit a new request, Demand Management assigns it an initial status, such as New, and then routes it along a standard business process of approvals, decisions, and actions, depending on the associated workflow. For details, see Move a request through workflow.

Create a new request from the Requests page
Available in version: 24.2 and later
You can add a request from the Requests page.
Prerequisite:
The Enable Requests Page feature toggle is enabled. For details, see Use feature toggles to turn on/off features.
To create a request:
-
From the menu, click Open > Requests to open the Requests page.
-
At the top-left corner above the request list, do one of the following:
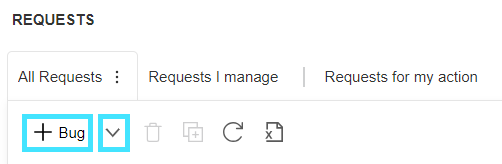
- To create a request with the last used request type, click the Add button
 . The UI string on the button may vary depending on the request type last used.
 - To use another request type, click the More button
 next to the Add button and then select the target request type from the list.
The Add - <Request Type> dialog box opens to the right.
- To create a request with the last used request type, click the Add button
-
Complete the fields for the request and then click Submit.
For details, see Create a new request from Create menu.
Copy a request
You can create a request by copying an existing one. This saves your time by avoiding filling in the common information for both requests. You can copy a request from either the request details page or the Requests page.
Note: If your PPM instance supports multiple languages and you create a request by copying an existing one, note that the new request uses your current session language as its definition language, regardless of the original entity's definition language. For more information, see the Multilingual User Interface Guide.
To copy from the request details page:
-
Open the details page of a request. For details, see Search for requests by generic request field values.
-
In the top-right corner of the request details page, click Copy.
-
To add the notes associated with the original request to the new request, select the Copy Request Notes check box.
The Copy Request Notes check box is available only when the COPY_REQUEST_SHOW_COPY_NOTES parameter is set to true.
-
To add the references associated with the original request to the new request, select the Copy Request References check box.
The Copy Request References check box is available only when the COPY_REQUEST_SHOW_COPY_REFERENCES parameter is set to true.
-
Click Copy.
All the field values in the header and details sections of the existing request are copied to the new request.
-
Modify the field values as required, and then click Submit.
To copy a request from the Requests page:
Available in version: 24.2 and later
Prerequisite:
The Enable Requests Page feature toggle is enabled. For details, see Use feature toggles to turn on/off features.
- From the menu, click Open > Requests to open the Requests page.
-
Select the check box of the request to copy, and then click the Copy button
 .
. Note: The Copy button is disabled when:
- The selected request is of a project or program request type.
- The request is disabled for copy by its request type.
Import requests from XML files
You can use the menu option Import Request from XML to import XML files as requests. The web page takes an XML file and the XSL template as input, and imports the specified XML file to create a new request or update an existing request.
To import requests from XML files:
-
Prerequisite: You must have the Demand Mgmt: Import Request access grant.
-
Log on to PPM.
-
From the PPM menu, click Open > Demand Management > Import Request From XML.
-
In the XML File to Import field, click Choose File to select the XML file you want to import.
-
In the XSL Template field, select the XSL template you want to associate with the imported XML file.
XSL templates are configured in the PPM Workbench by administrators. For information about configuring XSL templates, see the Demand Management Configuration Guide.
-
To import the XSL template to create a new request, select Create a new request.
-
To import the XSL template to update an existing request, select Updating an existing request and in the Request ID field, provide the ID for the request that you want to update.
-
(Optional) If it is your first time to import an XML file, you may want to run a test before importing the XML file. In this case, click Test.
PPM tests if the XML file can be imported successfully.
-
If the test result page shows "
Test completed successfully", proceed to the next step. -
If the test result page shows "
Error parsing the incoming xml file...", troubleshoot the cause and make sure the XML is ready for import.
-
-
Click Import.
-
Check the import result and the ID of the new request created.
Note: A "
Test/Import completed successfully" message is displayed even when the imported XML file does not match the selected XSL template, but no corresponding request ID is generated and the log shows "pass:0". -
Click Back to return to the Import Request from XML page.
Additional options for creating requests
You can create requests from the following locations:
-
The References section (tab) of a request details page. See Add new requests.
-
The Quick Edit page. See Create a request from Quick Edit page.
-
A Project Management project. See Integrate requests and projects.
-
A Project Management task. See Integrate requests and projects.
-
A Deployment Management package. See
-
A Deployment Management release. See
 See also: