
Share this page


Move a request through workflow
Act on a request and update request information to process the request through its workflow steps.
In this topic:
- Move a request through workflow
- View a request's associated workflow steps
- View workflow step details
- View execution log for commands executed at workflow steps
- Reopen a closed request
Move a request through workflow
After submitting a request, you act on the request to move it through its workflow steps.
To move a request through workflow steps:
-
Open a request.
The toolbar of the request lists action buttons that you have permission to perform.
Tip: The number of workflow steps displayed on the toolbar depends on your screen resolution. To see more workflow steps, you can:
-
Select a higher screen resolution from the Control Panel.
-
Maximize your browser.
-
Press
ctrland-to zoom out your browser.
Note: When the initial step of a workflow involves immediate execution, there is currently no visual clue indicating whether the execution is ongoing or completed. We recommend that after you submit a request using such a workflow, wait until the step completes. If you open a request and find that it is not updated, refresh or reopen the request details page after the step completes.
-
-
To act on the request, from the toolbar, click an available action.
-
Some actions, such as Accept and Reject, move the request to the next workflow step without additional input.
-
Other actions, like Assign Resource or Delegate Decision, require more information. If an action needs extra details, a request "look-ahead" page opens. Complete the required fields to finish the action. If you cannot provide all information immediately, click Save on the look-ahead page.
-
Some actions change the status of a field. For example, a disabled field may become enabled or required. Check the header and details sections for newly enabled or required fields.
-
A request can have UI rules that make some request fields invisible. If all the fields in a request section are made invisible by UI rules, admins can hide the section by setting the HIDE_SECTION_WHEN_ITS_FIELDS_ARE_HIDDEN_BY_UI_RULES to true.
-
A request may have a dependency relationship that places it on hold until the dependent request or entity is completed. When such a relationship exists, users meeting the specific requirements can use the Override button to bypass the dependency relationship and proceed with the request.
By default, the Override button is available to users with the Edit Dependent References access grant, or those who create all the dependent entities. In 24.3 and later versions, if the OVERRIDE_PENDING_REFERENCES_ONLY_WITH_ACCESSGRANT parameter is set to true, the Override button is available only to users with the Edit Dependent References access grant. For details about the access grant and the server parameter, see Access grants and Server parameters.
-

View a request's associated workflow steps
The Status section (tab) lists the request's associated workflow steps in the hierarchical order.
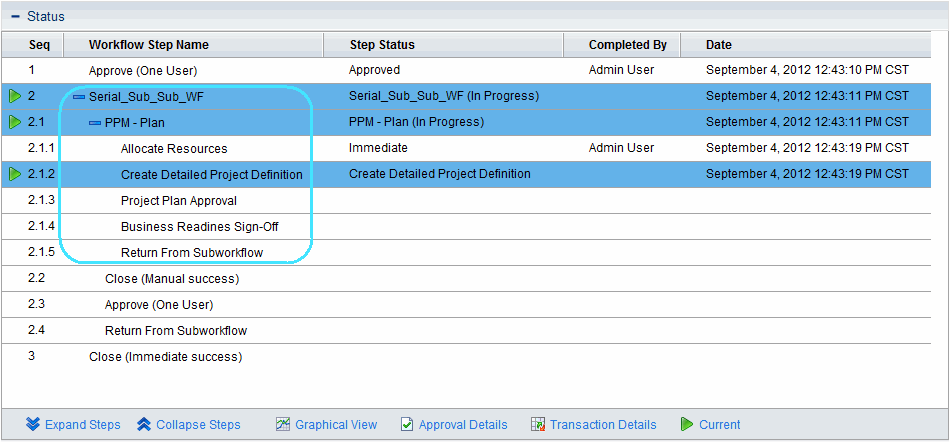
Some workflows include subworkflows. Subworkflow steps are displayed sequentially with the other workflow steps, and are numbered with additional decimal numbers, corresponding to the workflow level, for example, 3.1, 3.2, and 3.3.
If a workflow step has been acted on, the status of the workflow step and the resource who completed the step are also listed. The active workflow step is highlighted.
View workflow step details
From the Status section (tab) of a request, you can view details of the request's associated workflow steps. The details can be accessed from the bottom of the Status section.
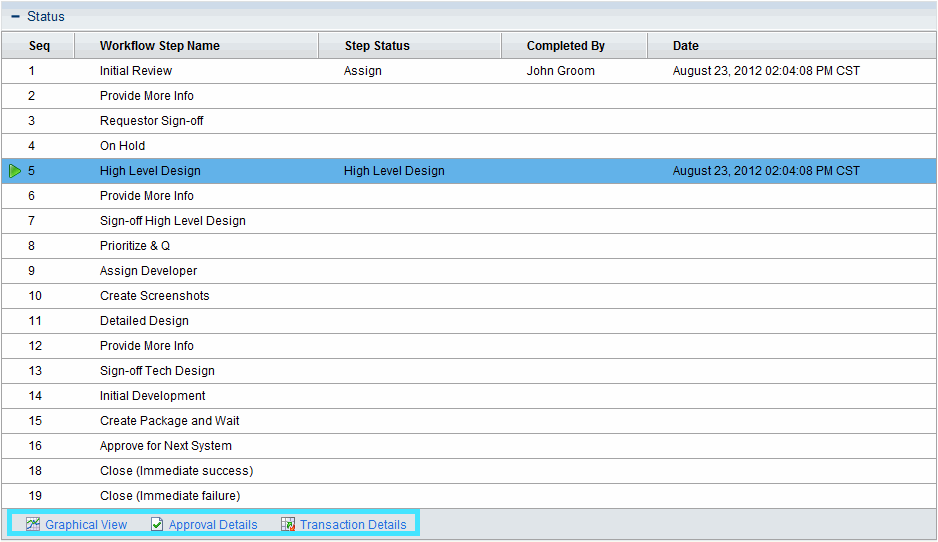
| Link | Details |
|---|---|
| Graphical View
|
Opens the Graphical Workflow window, which displays a graphical representation of the workflow applied to the request. The graphical workflow shows which workflow steps have been visited and which workflow step is the current workflow step. The Legend section describes the colors and symbols used to illustrate the workflow steps and transitions. To see a summary description of a workflow step, move your cursor over the step to view the tooltip text. Your administrator can assign a Current %Complete value to individual workflow steps. As the request moves along the workflow, the percent completed is updated according to the value configured for each step. |
| Approval Details |
Opens the Approval Details window, which displays a detailed view of approved active and completed workflow steps.
|
| Transaction Details |
Opens the Transaction Details window, which lists information for each completed workflow step transaction. |
View execution log for commands executed at workflow steps
You can view the details related to the execution workflow step for a request from the Request Execution Log page.
To view the request execution log for a workflow step:
-
Go to the Status section of a request.
-
In the Step Status column for an execution step, click log.
The Request Execution Log page opens and displays the details of the request execution.
Reopen a closed request
You can reopen a request at a preconfigured step in the workflow. For example, if a defect request is closed and the defect recurs, you can reopen the request.
To reopen a request:
-
Log on to PPM.
-
Search for and open the request.
Note: For information about how to open a request, see Search for requests by generic request field values.
The request detail page opens.
-
From the Jump To navigation panel, click Status.
-
Click Reopen Request.
The request reopens.
 See also:

