
Share this page


Working on Your Task
If you are assigned by the project managers to work on a task, when the task begins, you may want to view the project information, report work progress on your task, and update your task.
This section describes how to perform these actions.
In this topic:
- Locating Your Task
- Viewing Project Information
- Logging Actual Effort on Your Task
- Adding Notes and References to Your Task
Locating Your Task
Use the My Tasks portlet to locate your task
Prerequisite:
- You have the Project Management or Time Management license.
- You have the View Projects, Update Tasks, or Edit Projects access grant.
-
Add the My Tasks portlet to your dashboard page.
The portlet list all the tasks that you are currently assigned to.
- Click a task name link to open the Task page for details.

Use the Task Search page to locate your task
Prerequisite:
- You have the Project Management license.
- You have the View Projects or Edit Projects access grant.
- From the main menu, select Search > Tasks.
- Provide the search criteria, and click Search.
- Click a task name link to open the Task page for details.
Use email notifications to locate your task
Prerequisite:
- Your project manager has configured email notifications for your task.
If you have received an email containing a link to a task, click on it, and it will open to that task's Details page in your Web browser. If your email client doesn't handle HTML links directly, copy and paste it into your Web browser.

Viewing Project Information
You might want to view the project you are part of, as a way of setting context for your own tasks, checking on other dependent tasks, or keeping track of deadlines.
What you can view from the project overview page depends on the access grants you have. To open the project you are working for, you should at least have the View Projects access grant. With this access grant, you are able to view the following project information:
| What to view | Where to view |
|---|---|
| Project healths |
From the project header. See Project Healths. |
| Project work plan | Click the View Work Plan button from the Work Plan portlet in the Summary tab. |
| Project details | The Details tab. |
| Project exceptions | The Exceptions tab. See View exceptions and warnings. |
| Project references | The References tab. |
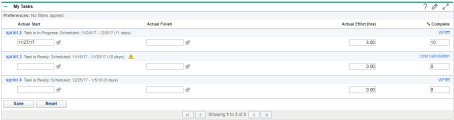
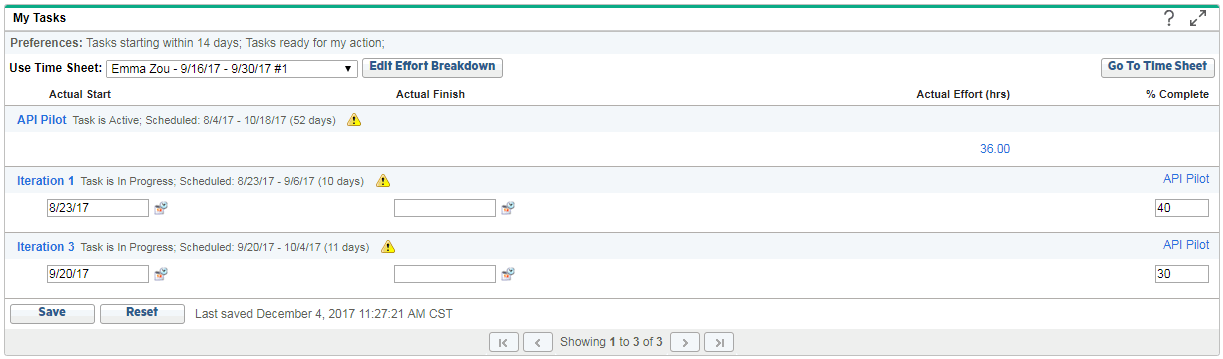
Logging Actual Effort on Your Task
- Open the My Tasks portlet.
-
Locate the task you want to log actual effort.
-
Provide the values in the Actual Start, Actual Finish (only if your work on the task is finished), and Actual Effort columns.
For the Actual Effort column:
-
If the project your are working for has enabled Time Management and you have the Time Management license, the Actual Effort column for the project tasks are not editable. You have to use the Use Time Sheet field to log actual effort in time sheets from the My Tasks portlet.
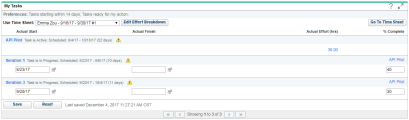
Time can be tracked in the project level, summary tasks level, and tasks level, depending on the project settings. If time is tracked in the summary tasks level, the individual tasks are visible in the My Tasks portlet, however, you can only log actual effort for the summary tasks. If time is tracked in the project level, you can only log actual effort for the project.
To log actual effort for a task, summary task, or the project:
- Select a time period from the Use Time Sheet field, and click Edit Effort Breakdown.
- Enter your effort per day in the time sheet, and click Save.
-
The total hours is updated to the Actual Effort column of the portlet.
Note: You can also use Time Management time sheets to log time on your task. For details, see .
-
If the project you are working for does not enable Time Management, the Actual Effort column for the project tasks are editable. You directly enter your total effort on a task in this column.
-
- Enter a value in the % Complete column if the project with actual effort requires non-empty % complete.
- Click Save in the portlet.
Adding Notes and References to Your Task
To add references:
- Locate your task.
-
In the Task page > References section, select a reference type in the New Reference field.
The reference types you can select depend on the access grants you have. For example, if you only have the Update Tasks access grant, you can only add URLs and files as references to your task.
- Click Add, and specify the reference (URL, file, or others).
- Click Save in the Task page.
To add notes:
- Locate your task.
- In the Task page > Notes section, enter your notes.
- Click Save in the Task page.

