Plan Area
The Plan area enables you to create, open, and save tests and components.
My Tests lists pane
This area display all of the tests and components that are active.
The following table describes the user interface elements:
|
UI Element |
Description |
|---|---|
| Create |
Creates a new test or component and adds it to the Tests and Components list. Drop-down options for an ALM connection :
|
| Open |
Adds an existing test or component to the Tests and Components list. Drop-down options for ALM connections:
|
| Create Run | Enables you to start a new test from Sprinter, without having to first add a test instance in ALM. You can create the run in ALM or the local file system. |
| Save |
Enables you to save the items in the My Tests List list. Shortcut key: Drop-down options:
Note: The save options are disabled when more than one test or component is selected. |
| Versions |
Enables you to manage versions of tests and components. Drop-down options:
Notes:
Important:
|
| My Tests List |
The list of open tests and components. Note:
|
| <Context menu (right-click) options> |
The following options are available from the context menu, when you select a test or component from the list.
|
| < > |
Hide/Show. Hides or shows the Plan area. |
Details section (Plan mode)
The Details section displays the test
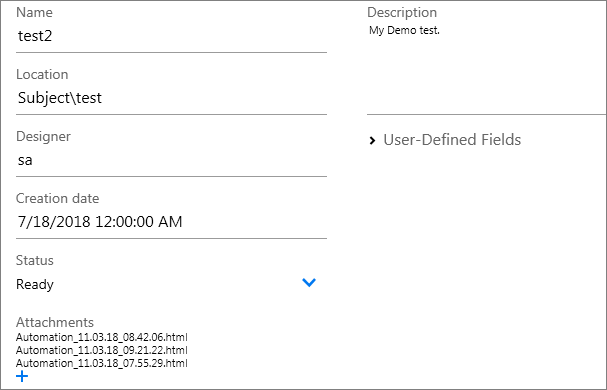
The following image shows the Details pane for tests.

These guidelines apply:
- The only editable fields are Description and in ALM, User-Defined Fields if they were defined in your project.
- The Details pane for components has a read-only Created by field.
- Use the Status dropdown to set the test's current status: Design, Imported, Ready, or Repair.
-
You can save tests and components only after you enter information in mandatory user-defined fields (marked with an asterisk), if they were defined for the project.
Descriptions of the user interface elements are available when you hover over them.
Steps tab (Plan mode)
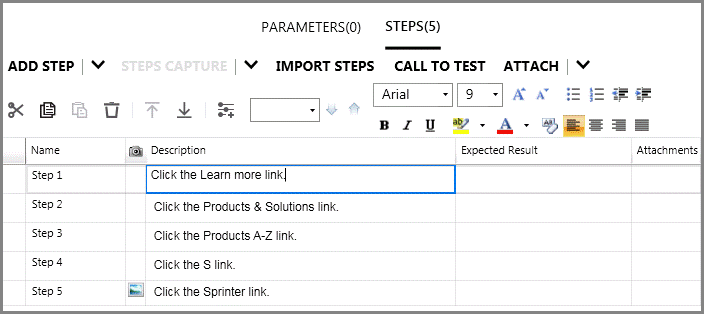
This Steps tab displays the steps in your test

For details, see Steps tab (Plan mode).
Parameters tab (Plan mode)
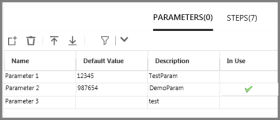
This pane enables you to create parameters and edit their details. It displays existing parameters and allows you to edit their values.
For tests, only input parameters are supported. For components, both input and output parameters are supported.

Click thumbnail to view full size image.
User interface elements

|
Add New Parameter. Prompts you to enter a name, description and default value for the new parameter. |

|
Delete Parameter. Deletes the selected parameter. (only visible from the Parameters tab in the Plan mode.) |

|
Move up/down. Allows you to reorder the listed parameters. (only visible from the Parameters tab in the Plan mode.) |
|
|
Filter. Filter the parameter list. When you click the filter button, your are prompted to enter the text by which to filter the parameter names. The wildcard symbol "*" is supported. If a filter is active, select Filter > Clear Filter to remove the filter. |
Parameter grid
| Name |
The name of the parameter. |
| Default Value |
The default value for an input parameter. |
| Description |
A description of the parameter and its purpose. |
| In Use |
Indicates whether the parameter is used by the test |
| Value |
The value of the parameter. Available only for: output parameters in components |
| Is Encrypted |
Indicates whether to encrypt the parameter. This option is automatically selected if the parameter is already encrypted in ALM. Available only for: input parameters defined for components |
 See also:


 next to a test or component indicates a problem with the definitions of the test or component or in the Steps tab. Select the node and review the displayed definitions for any warning messages. For details, see the
  next to a test or component indicates that it may be edited.
 next to a test or component indicates that it is currently locked (in a non-versioned project) or checked-out to another user (in a versioned project).


