Share this page


DevWeb Proxy Recorder
The DevWeb Proxy Recorder enables you to record your business process from your chosen browser and export it to a HAR file. You can then generate a DevWeb script from the HAR file using the Offline Script Generator tool.
The Proxy Recorder is also supported in VuGen.
Generate and install a unique CA certificate
Note: If you are using the default CA certificate supplied with earlier versions, we recommend that you replace it with the unique CA certificate.
To securely record HTTPS traffic, a Certification Authority (CA) certificate must be installed before using the DevWeb Proxy Recorder for the first time. The certificate is installed into your certificate repository on the Proxy Recorder machine, as a Trusted Root Certificate.
The Proxy Recorder can automatically generate and import a unique DevWeb CA certificate, called DevWebCertDoNotTrust. Alternatively, you can generate and import it using the DevWebUtils executable, without activating the Proxy Recorder.
You need to generate and import the certificate once, on each machine that OpenText Performance Engineering for Developers is installed on. The imported certificate is then valid for one year.
When the certificate is generated, the cert directory is added to the DevWeb root folder (if it doesn't exist already), containing the following certificate and CA PEM files:
-
devweb_cert.cer
-
mitmproxy-ca.pem
-
mitmproxy-dhparam.pem (this file is created by mitmproxy and might not be included in the folder)
Limitations for import:
-
Administrator privileges are required to install to the trusted root. Import will fail if you do not have administrator privileges.
-
The automatic generation works on all platforms, but automatic import is supported only on Windows. For Linux and macOS, you need to install the certificate manually.
For details on installing manually, see Manually install a CA certificate.
To generate and install a unique CA certificate using the Proxy Recorder:
-
In the local.recorder_config.yml, set provide_certificate to true. (By default, it is set to false.)
Tip: For details on creating the local.recorder_config.yml, see Custom configuration for the Proxy Recorder.
-
Run the Proxy Recorder from a terminal window (for details, see Run the DevWeb Proxy Recorder). The Proxy Recorder checks the <DevWeb root folder>\cert folder and the trusted root to see if a CA certificate already exists:
-
If the cert folder already contains an existing CA certificate and the CA PEM file, then a new certificate is not generated.
-
If a CA certificate does not already exist, the Proxy Recorder generates a new certificate under the cert folder.
-
-
The Proxy Recorder then tries to import the devweb_cert.cer certificate to the trusted root. This can be the newly generated certificate, or the existing certificate described above:
-
Existing certificate. If the existing certificate is not already installed in the trusted root, then the Proxy Recorder tries to import it.
-
Newly generated certificate.The Proxy Recorder tries to import the certificate, even if there is already a certificate with the same name in the trusted root.
-
-
After successful installation of the CA certificate, the Proxy Recorder launch continues, and you can begin recording.
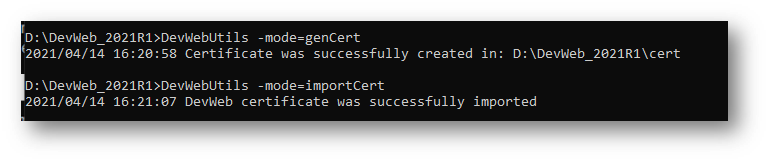
To generate and install a unique CA certificate using DevWebUtils executable:
-
To generate the certificate, from a terminal window change to the <DevWeb root> directory and run the following:
DevWebUtils.exe -mode=genCert -certPath=<output_dir_path>
The flag -certPath is optional. If it is not provided, the default is <DevWeb root folder>\cert.
-
To import the certificate, make sure the terminal window is open with administrator privileges. Run the following:
DevWebUtils.exe -mode=importCert -certPath=<path to .cer file>
The flag -certPath is optional. If it is not provided, the default is <DevWeb root folder>\cert\devweb_cert.cer

Manually install a CA certificate
You can manually install the CA certificate, if automatic installation, or installation with DevWebUtils executable, are unavailable. Administrator permissions are required to install to the trusted root.
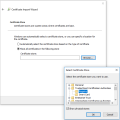
To install the CA certificate on Windows using the Import Wizard:
-
In File Explorer, browse to the certificate file and double-click it: <DevWeb root folder>\cert\devweb_cert.cer
- The Certificate Import Wizard opens. Follow the on-screen instructions.
- If installing a PFX file, on the Private key protection page, leave empty the Password field for the private key.
-
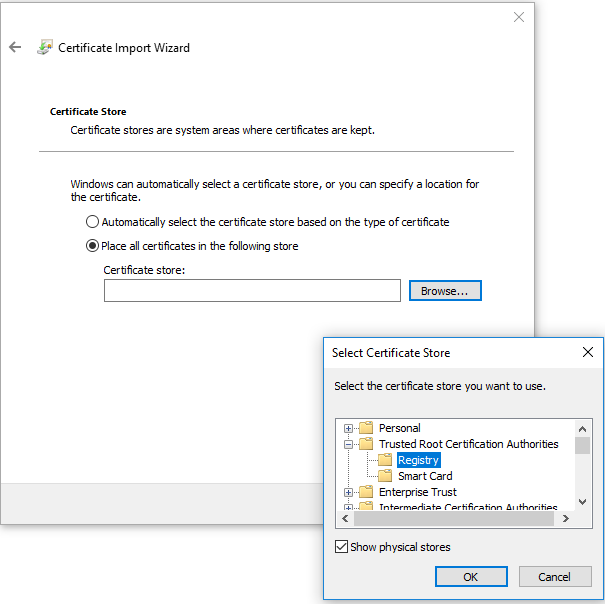
On the Certificate Store page:
- Select Place all certificates in the following store and click Browse.
- In the Select Certificate Store dialog box, select Show physical stores, then browse to Trusted Root Certification Authorities > Registry.
-
Click OK.
- Complete the wizard to import the certificate.
To install the CA certificate on MacOS:
From a terminal window (open with administrator privileges), change to the <DevWeb root>/cert directory and run the following:
sudo security add-trusted-cert –d –r trustRoot –k /Library/Keychains/System.keychain cert/devweb_cert.cer
Run the DevWeb Proxy Recorder
The Proxy Recorder is ready to use, using default configuration settings.
If you want to customize the configuration settings, define the changes in the local.recorder_config.yml file before running the Proxy Recorder. For example, you can use your own CA certificate, change proxy server settings, or set remote usage. For details, see Custom configuration for the Proxy Recorder.
Tip: Check out the video: Tutorial #3: Recording using the Proxy Recorder.
To run the Proxy Recorder:
-
From your chosen browser, configure the proxy server settings for your internet connection. Set the host address and port to the ones used in the configuration file. The default values are:
- Default host: localhost
- Default port: 8156
The proxy must be set to be used for all addresses. For example, make sure that Don’t use the proxy server for local (intranet) addresses is not selected in the proxy setup.
-
Open a terminal window and change to the DevWeb directory.
-
Start the Proxy Recorder by running the appropriate command from the command line. Include a name for the HAR result file, where the recorded traffic will be saved.
-
When using the default configuration file:
ProxyRecorder.exe <har result file name>
-
When using a custom configuration file:
ProxyRecorder.exe -c <path to local.recorder_config.yml> <har result file name>
The Proxy Recorder window opens.
-
-
Perform your business flow in your web browser. Make sure to:
-
Open a new instance of the browser before each run.
-
Work in private browsing mode (for example, Incognito Mode in Chrome).
-
-
In the Proxy Recorder window, click Enter to finish recording and create the HAR file.
Log information for the recording is available in the console and in a log file (according to the configuration file settings.)
Note: Make sure that the process is complete before using the HAR file.
- Use the Offline Script Generator tool to generate a DevWeb script from the HAR file.
Custom configuration for the Proxy Recorder
The DevWeb Proxy Recorder configuration is contained in the <DevWeb root>\recorder_config.yml file. This file contains the default configurations needed to run the Proxy Recorder and must not be modified.
If you want to customize any configuration setting, you should do so in the local.recorder_config.yml file, located in the same folder. If this file does not exist, copy the config.yml file and name it local.recorder_config.yml. The settings in this file override the default settings in config.yml.
For example, you may need to customize settings for the following:
| Item | Description |
|---|---|
| Logger settings |
Logging information for each Proxy Recorder run is saved to a log file and displayed in the console. You can change the default settings and log level. |
|
CA certificate |
|
|
Client-side certificate |
For HTTPS requests that require a certificate, you can specify the path to the client-side certificate and key file in the client_certs field. The file must be in PEM format, and should contain both the unencrypted private key and the certificate. |
| HTTP/2 support | By default, HTTP/2 support is enabled, and PRIORITY forwarding for HTTP/2 connections is disabled. |
| Proxy host | By default, the Proxy Recorder listens for connections on localhost. To use a different host, customize the proxy_host field. |
| Remote usage or proxy recording | To enable remote use of the Proxy Recorder instance, set the allow_remote setting to true. |
| Ignore hosts | Use regular expressions to filter requests by host patterns, for example, .*google.com, so that the relevant hosts are ignored when recording. |
| Proxy settings for recording |
The proxy settings you can define include the following:
|
| Automatic browser launch |
To enable automatic launch of the Chrome or Chromium browser when you start the Proxy Recorder, define it in the launchBrowser field. Note:
|
| Configure delimiter | You can define the delimiter that is used for HTTP query string parsing. Set the url_encoding_separator field to "&" (default) or ";" . |
Known issues
-
The Chrome browser cannot be launched when recording scripts on Linux under a root user session and using the launchBrowser argument. Chrome does not support this configuration.
Workaround: Log in as a different user, or manually launch the browser.
-
The Proxy Recorder does not support HTTP in regular browsing mode.
Workaround:
-
Start recording using about:blank as the URL address for the private browsing/Incognito mode window.
-
After the browser is launched, open the browser menu and select New window.

-
Enter the HTTP URL and continue recording.
-
 See also: