Share this page


Run tests on LRC from your IDE
You can use LoadRunner Developer to run DevWeb load tests on LoadRunner Cloud (LRC). This enables you to scale up the number of Vusers. The load tests are executed from your IDE.
Tip: Check out the videos:
Working with LoadRunner Developer and LRC
You must have an LRC license to execute a load test on LRC, and to obtain information on available cloud locations and OPLG machines.
Refer to the following information sources to help you work with LoadRunner Developer and LRC:
-
To get information within your IDE on LRC usage, available flags, and examples, run a command in the IDE using the following argument:
ScaLRD lrc--help
-
Review the frequently asked questions section: Scale LoadRunner Developer tests on LRC - FAQ
-
LRC documentation: LoadRunner Cloud Help Center

Run LRC load tests from your IDE
In your IDE, you define and run the task to execute the load test.
For an example of running the task from Visual Studio Code, see Scale your test from VS Code
Note: The ScaLRD tool uses the system environment variable for http_proxy, https_proxy, or no_proxy, if defined.
- Create your DevWeb script, and test it in LoadRunner Developer.
- Configure the required settings in the lrc_uploader.yml file. For details, see Configure the lrc_uploader.yml file.
- Open the script in your IDE.
-
Set up a task for the ScaLRD tool to run the test.
When setting up the task in your IDE, configure the arguments and flags for the command line using the following format.
Windows %DEVWEB_PATH%\ScaLRD.exe lrc <flags> run <DevWeb script folder path>Linux or macOS $DEVWEB_PATH/ScaLRD lrc <flags> run <DevWeb script folder path>The following flags are available:
-host= The LRC host name with http/https protocol. -user= The user name or client ID to use to log into LRC. -password= The password or secret key to use to log into LRC. -tenantId= The tenant ID of the user. -projectId= The ID of the project on which the tests are run. -keyLocation= The full path to a key file used to decrypt encrypted strings in the configuration file. -report= The relative or root path to the location for the results report. If a path is not specified, then it is saved by default to the script folder. All flags apart from report can be configured in the lrc_uploader.yml file. If you add them in the command line, the flag definitions override the YAML file definitions.
For example, you might add to the command line:
-report=<report location> -user=KimW
Note: We recommend that you do not add sensitive information like passwords in plain text. For details, see Mask and encrypt data.
-
Run the task in the IDE.
If this is the first run for the test using ScaLRD, the DevWeb script folder is uploaded to LRC, and the test is given the label Autogenerated_<script name>. If a test with the same name already exists in LRC, the script is updated and used for the test run.
If relevant, the email addresses for the result report are added in LRC.
-
The load test is executed, using the configuration settings in the relevant uploader configuration file.
When the test is run, any SLA attached to the test is disabled. (The SLA is disabled for the test, not just for the current run.) The test run is given an ID number, for example, #184.
The ID can be used together with the test name to identify the run in LRC.
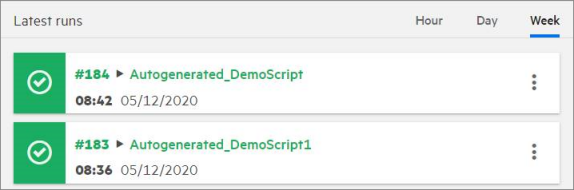
You can watch the run progress from the LRC UI.
-
When the test is complete, LoadRunner Developer displays the summary report. If email notification is configured, the results are emailed.
You do not need to wait for the task to complete. You can close it locally in your IDE, or LoadRunner Developer exits after reaching the timeout. In both these cases, the test continues to run on LRC. You can later return to the test in your IDE to see if the run is complete and to get the results. For details, see Get LRC test run results.
Get LRC test run results
You can run a task in your IDE to check the results of the load test on LRC. This option enables you to get the test results after LoadRunner Developer exited (before test execution was complete and results were available).
Tip:
-
If you want the ScaLRD tool to continue to run until the test is finished, configure the value -1 in waitForRunTimeout in the YAML file. For details, see Configure the lrc_uploader.yml file.
-
In Visual Studio Code, you can use the Get test run results from LoadRunner Cloud task to get the results.
To get test run results:
-
Configure the arguments for the command line to get the test run results. The following options are available (on Windows OS):
Purpose Command Print a table with all the test run IDs for the test. %DEVWEB_PATH%\Scalrd.exe lrc <flags> getResults <script folder path>Results for the specified run ID.
The applied login information is taken from the lrc_uploader.yml file located in the same folder as ScaLRD.exe.
%DEVWEB_PATH%\ScaLRD.exe lrc <flags> getResults <test run ID in LRC>Results for the specified run ID.
The lrc_uploader.yml file located in the specified script directory overrides the one located with ScaLRD.exe.
%DEVWEB_PATH%\ScaLRD.exe lrc <flags> getResults <test run ID in LRC> <script folder path>Note: On Linux or macOS, use
$DEVWEB_PATH/ScaLRDinstead of%DEVWEB_PATH%\ScaLRD.exe. - Run the task. The progress pane indicates if the load test is still running, or shows the summary report if it has finished.
- If the test is still running, you can return later and run the getResults task again.
Configure the lrc_uploader.yml file
The settings in the master lrc_uploader.yml configuration file (located in the same directory as the ScaLRD executable) apply for all scripts that you execute on LRC.
For local configuration, you can copy the lrc_uploader.yml file to a specific script directory, and customize the file settings for use with that specific script. During the script run, the settings in the local lrc_uploader.yml file override the settings in the original (master) file.
The lrc_uploader.yml file contain customizable default values for the script run, with explanations for each parameter. These settings include:
| tenant settings |
These are required values for communication with the LRC machine. These settings can be defined in the lrc_uploader.yml file, or in the command line flags. (For details, see Run LRC load tests from your IDE.)
Note: We recommend that you do not add sensitive information like passwords in plain text. For details, see Mask and encrypt data. |
| sendEmail | When set to true, the results report for the script run is emailed at the end of the run to the logged-in user. To email to additional recipients, enter one or more email addresses for the emailAddresses property. |
| location | Define whether the test is run on LRC cloud locations (default) or on-premises load generators. You then define the specific locations/machines to use. For details, see Define distribution parameters for LRC tests. |
| encryption | For encrypted data, define the key location. For details, see Mask and encrypt data. |
| Scenario and general settings | These include parameters for the number of Vusers to run, ramp up time, duration, and logging. |
| waitForRunTimeout |
Define the number of seconds for LoadRunner Developer to wait while checking the status of the test run. After the time elapses, LoadRunner Developer exits, but the test continues to run on LRC. The default is 10 seconds. You can use -1 to wait continuously until the run is complete. You can later check status again. For details, see Get LRC test run results. |
| Script exclude | This is a list of regular expressions, defining files to exclude from the script when it is uploaded to LRC. |
Define distribution parameters for LRC tests
You can define whether your load tests should be run from LRC cloud locations, or using on-premises load generators (OPLG). For cloud locations, you can also define the percentage of Vusers that you want to distribute to each location. You define this information in the lrc_uploader.yml file.
To define cloud location distribution for LRC tests:
-
To obtain a list of the cloud locations available for the test, in your IDE run a command using the following arguments:
Windows: %DEVWEB_PATH%\ScaLRD.exe lrc info locations <script folder path>Linux or macOS: $DEVWEB_PATH/ScaLRD lrc info locations <script folder path>Alternatively, if you are working with Visual Studio Code, select Run Task > Get distribution list from LoadRunner Cloud.
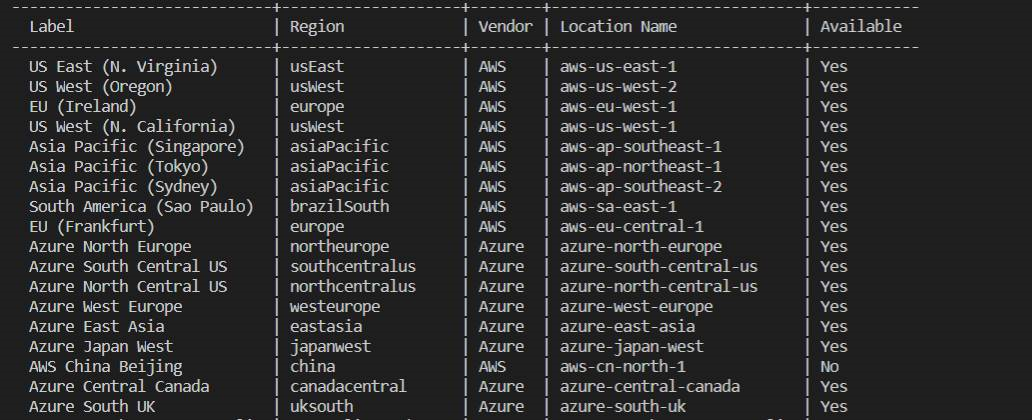
After running the command, a table of LRC locations is displayed in the terminal window.
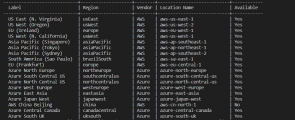
- From the list of available locations (marked as Yes in the Available column), identify the locations that you want to use for the test.
- In the lrc_uploader.yml file for the script, make sure the loadTest > location parameter is defined as cloud.
-
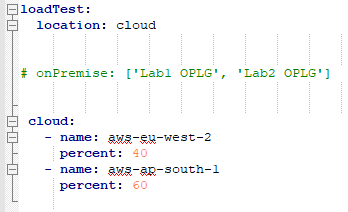
In the cloud section, define the required locations and the distribution using the following format:
- name: <location name> The name of the location, as provided in the locations table. For example: aws-us-east-1 percent: <percentage of Vusers> An integer defining the percentage of Vusers to run on this location. For example: 40
The sum of the percent values distributed across all locations must equal 100%.
For example:
- When you run the test again from LoadRunner Developer, any locations and Vuser distributions defined for the test within LRC are overwritten by the lrc_uploader.yml settings.
To define OPLG machines for LRC tests:
-
To obtain a list of the OPLG machines available for the test, in your IDE run a command using the following arguments:
Windows: %DEVWEB_PATH%\ScaLRD.exe lrc info loadGenerators <script folder path>Linux or macOS: $DEVWEB_PATH/ScaLRD lrc info loadGenerators <script folder path>Alternatively, if you are working with Visual Studio Code, select Run Task > Get load generators list from LoadRunner Cloud.
After running the command, a table of OPLG machines is displayed in the terminal window:
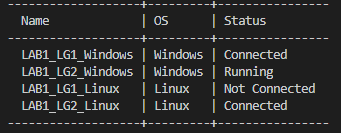
- From the list of connected or running machines, identify the ones that you want to use for the test.
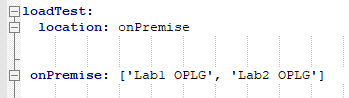
- In the lrc_uploader.yml file for the script, make sure the loadTest > location parameter is defined as onPremise.
-
In the onPremise section, define the required machines (each machine name in single quotes, and separated by commas).
For example:
Note:
-
The Vuser distribution is according to an internal algorithm in LRC, so not every machine is necessarily used.
-
If a machine is allocated to another test at runtime, then it is not used for your test.
-
- When you run the test again from LoadRunner Developer, any OPLG machines defined for the test within LRC are overwritten by the lrc_uploader.yml settings.
Scale LoadRunner Developer tests on LRC - FAQ
Review the frequently asked questions before running your load test.
| Is a load test run from the LoadRunner Developer integration the same as a test run from the LRC UI? |
Yes—when a load test is executed for the LoadRunner Developer integration using the ScaLRD tool, it is run like any other LRC test. |
| How is my load test created in LRC the first time I run the test? |
When you execute your test, LoadRunner Developer uploads the script to LRC, and creates a load test using the label Autogenerated_<scriptname>. |
| What happens if I make changes to the test in LRC? | You can make configuration changes to the test in the LRC UI. When you execute the test again from LoadRunner Developer, some of your configuration items might be overwritten. |
| How can I change the script schedule settings? | You can change schedule settings, for example, for number of Vusers or duration, in the scenario section of the lrc_uploader.yml configuration file. When you execute the load test from LoadRunner Developer, these settings overwrite the settings in the LRC UI. |
| How can I add additional assets to my load test? | Whenever you execute a test from LoadRunner Developer, only the uploaded script asset is used for the test. You cannot run multiple assets. |
| How can I change distribution for my load test? | You can configure distribution across locations for your test in the lrc_uploader.yml file. For details, see Define distribution parameters for LRC tests. |
| How can I define monitors for my load test? | You can set up monitors for the test in the LRC UI. When you execute the test again from LoadRunner Developer, it uses the latest configuration in the LRC. |
| How can I change general settings for my load test? | You can change some general settings using the LRC UI. Note that the email report address is overwritten whenever the test is executed from LoadRunner Developer. |
| How can I edit the SLA setting for my load test? |
When you execute the test from LoadRunner Developer, the SLA for the test transactions in LRC is disabled. You can enable it again if you run the test from the LRC UI. |
 See also: