
Share this page


Run your UFT One tests from ALM
If you store your test in ALM, use ALM to also store the device settings for your test and change them between test runs.
Prerequisites
Do the following before you start:
| Update your UFT One testing options |
In Test Runs pane of the Options dialog, select the Allow other Micro Focus products to run tests and components option. (Tools > Options > GUI Testing tab > Test Runs node) |
| Verify DCOM permission settings |
DCOM permissions are set automatically if Configure DCOM settings for ALM Integration is selected during the UFT One installation. For more details, see the section on modifying DCOM permissions in the UFT One Installation Guide. |

Set the device ID for the test device
Do the following:
-
In UFT One, connect to your ALM project (ALM > ALM Connection).
-
Open the test you want to save in ALM.
-
Set the description properties of the device used in the test.
Do the following:
-
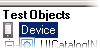
In the test's object repository, in the Test Objects tree, select Device.
-
On the right, click the Add description properties
 button.
 -
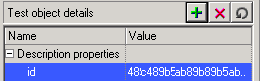
In the Add Properties dialog box, select id. The id property is added to the list of Description properties.
Note: If you do not specify the device description properties, then the device and application settings set in ALM are used to run the test, even if you have selected a specific device and app in the Record and Run Settings in UFT One.
-
-
Convert the value of the id property to a data table parameter.
Do the following:
- In the Test object details area, click in the Value cell for the id property.
- Click the parameterization icon to the right of the value.
- In the Value Configuration Options dialog box, select Parameter, and then select DataTable from the list.
- Select to store the data table content in the global sheet, or in the current action sheet.
The id parameter is added to the Data pane.
-
Save the test in the ALM Test Plan (File > Save <testname> As). The test opens from ALM.
-
Continue with Add your test data to your ALM Test Resources.
Add your test data to your ALM Test Resources
To add your test data to ALM, first export your UFT One data table. Right click in a data table cell, and select File > Export.
In ALM, add the Excel file you just created to the Test Resources module:
-
On the left, expand the ALM Testing module, and select Test Resources.
-
In the Resources tree, right-click a relevant folder and select New Resource.
In the New Resource dialog box, enter the exact name of the Excel file you exported earlier (without the extension), and set the Type to Data table.
-
In the Resources tree, select your new resource.
-
In the Resource Viewer tab on the right, click Upload File
 .
. -
Browse to and select the Excel file that contains your exported UFT One data table content.
The data table content is now available for use in ALM.
Add your test data to your ALM test
- In ALM's Testing module, select Test Plan.
- Browse to and open your test, or create a new test configuration. Click the ID link to open the Test Configuration Details dialog box.
- In the Test Configuration Details dialog box, select Data on the left, then select Override test data resource.
- From the Data Resource drop-down, select the data table resource you uploaded earlier.
-
In UFT One, reopen the test, and set the data table to the data table resource now saved in ALM.
Do the following:
-
Select File > Settings > Resources.
-
In the Data Table area, select Other location and browse to and select your table.
You'll find it by selecting ALM Resources in the Open dialog box.
The data source is added to the Data Table area of the Resources pane.
-
Run your UFT One tests from ALM with the ALM Extension
Use the ALM Extension for Digital Lab (UFT Mobile) to set device, app, and test definitions settings directly from ALM, without opening UFT One.
When you use the ALM Extension for Digital Lab (UFT Mobile), test results for test runs are automatically saved in ALM.
To do this, you must first do the following:
| Configure ALM to work with Digital Lab (UFT Mobile) |
For more details, see Software Self-solve knowledge base article KM02519815. |
| Verify your proxy settings |
When running a test remotely via ALM, UFT One uses the UFT One proxy setting information for connection to the Digital Lab (UFT Mobile), even if the settings in ALM are different. Ensure that the settings for the current run are the same in UFT One as the test in ALM when running a test. For details, see Connect to Digital Lab or local mobile devices. |
 See also:


