
Share this page


This lesson describes how to create and run a GUI test that calls an API test. This enables you to test both layers of the MyFlights app in a single, unified test run.
Add a copy of the original MyFlights test to your solution, where you can add a call to an API test.
Do the following:
-
Start with UFT One and the MyFlight Application solution open.
For more details, see Plan your test and create a solution.
- In the Solution Explorer, right-click the original MyFlight test, and select Save As.
-
Save the test as the MyFlightUnified test, in the C:%HOMEPATH%\My Documents\UFT One directory.
Tip: To display both of your tests at the same time, add the MyFlight test back to your solution.
In the Solution Explorer, right click the solution node, and select Add > Add Existing Test. Select the MyFlight test.
-
Create a new action in the MyFlightUnified test to call an API test, running the API test in its entirety as part of the GUI test.
Do the following:
-
In the Solution Explorer, double-click the MyFlightUnified test to display it in the canvas.
-
Right-click anywhere in the canvas, and select Call to New Action.
-
In the Insert Call to New Action dialog, name the new action CallAPITest, and select the At the end of the test option.
Click OK to add the new action to the end of your test.
-
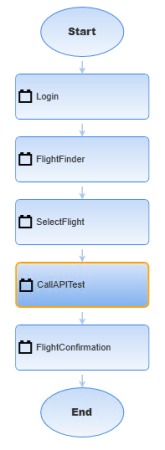
Right-click the new CallAPITest action, and select Move Up to move it up above the FlightConfirmation action.
-
-
Double-click the CallAPITest action to open it in a separate tab.
Then, right-click the Editor and select Action > Call to Existing API Test/Action.
-
In the Call to API Test/Action dialog, click browse
 , and browse to and select the MyFlightWebService test you created earlier in this tutorial.
 If UFT One asks whether to convert the path to this test to a relative path, click No.
Click OK to add the call to the API test to your GUI test. For more details, see Create and run a Web service API test.
View the call to the API test in the Editor
In the Editor, the step to call the API test reads as follows:
RunAPITest "MyFlightWebService"
View the call to the API test in the Keyword View
In the Keyword View
 , the step to call the API test looks as follows:
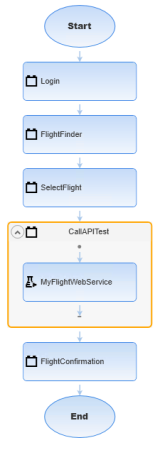
View the call to the API test in the canvas
Back in the canvas, expand the CallAPITest to view the additional, embedded call to the MyFlightWebService test.
- Save your test, and continue with Run a GUI test that calls an API test.


This exercise describes how to run your MyFlightUnified test, which includes both GUI steps, and a call to an API test.
Running a test like this enables you to test both the GUI and API layers of your application in a single test run.
Do the following:
-
Start with UFT One and the MyFlightsUnified test open.
Ensure that the MyFlight GUI sample application is closed, but that the MyFlight API window is open.
-
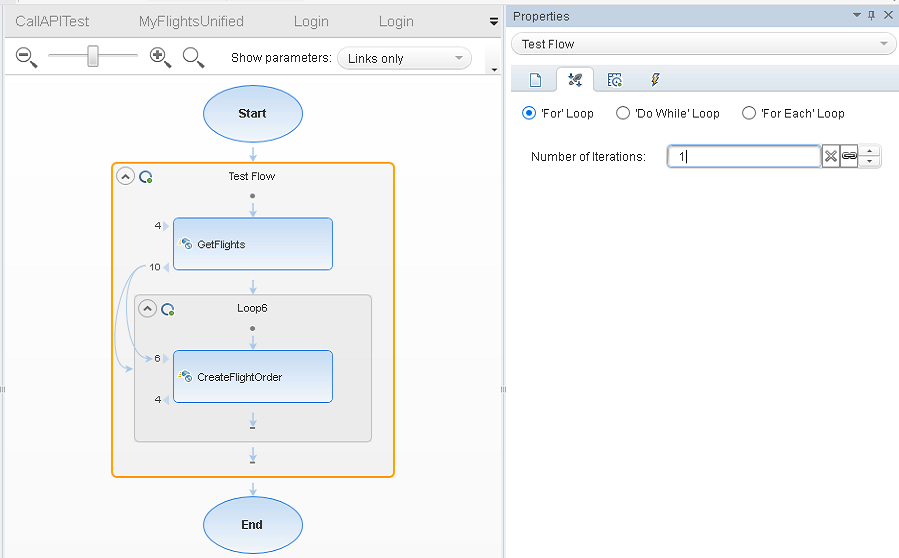
In the Solution Explorer, browse to and double-click the MyFlightWebService > Flow node to display the test flow in the canvas.
-
In the canvas, select the Test Flow box to display the properties pane.
-
In the Input tab
 in the Properties pane, select the 'For' Loop, and set the Number of Iterations to 1.
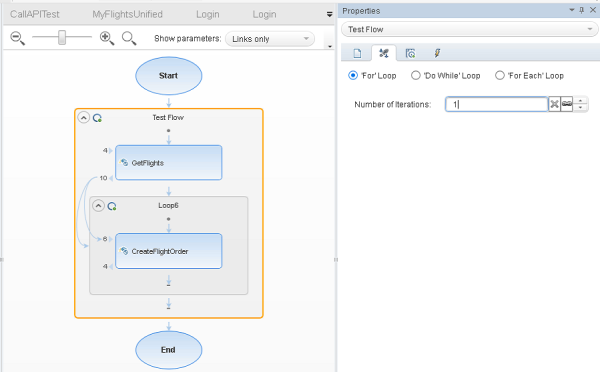
-
Save your test, and click back to select the MyFlightsUnited test tab.
-
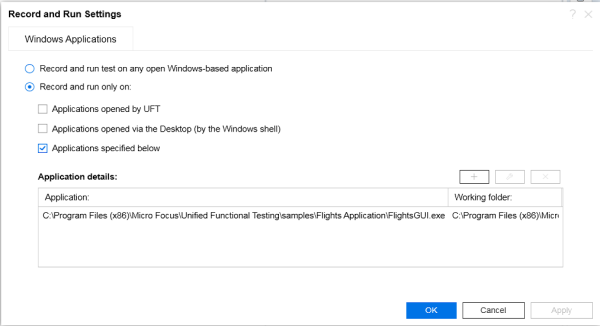
Select Record > Record and Run Settings.
In the Windows Applications tab, ensure that the settings are defined to Record and run only on: Applications specified below.
The application details should be saved from earlier in this tutorial. For more details, see Define UFT One Record and Run settings.
-
Click OK to close the dialog, and then click Run
 .
. -
In the Run dialog, select the New run results folder option, keeping the default folder name.
-
Click Run to start running the test.
UFT One opens the MyFlight GUI sample application, and performs the steps in the GUI test. When it comes to the call to the API test, the GUI test pauses, and the API test comes into focus.
When the API test is complete, UFT One returns to the GUI test steps to complete the test.
-
When the test is completed, UFT One displays the combined run results.
Navigate down in the Test Flow to view the API test results.

This step concludes the UFT One GUI and API testing tutorial. Continue by applying the concepts and procedures you've learned to test your own apps. For more details, browse through and search in the Help Center.
 See also:


