Share this page


This exercise describes how to add steps to your test directly in the Editor using VBScript code. If you're comfortable with VBscript syntax and familiar with the details of your test objects, the Editor may be a convenient way to build your test steps.
This exercise requires that you've added the relevant object repositories and test objects to your test. For details, see Create object repositories.
Add steps to the FlightConfirmation action
This procedure describes how to add steps to the FlightConfirmation action directly in the Editor.
Find your test object properties:
-
Start with the MyFlightApplication solution and MyFlight test open to the FlightConfirmation action, and the Editor displayed.
- If you've already performed Add steps using the Step Generator, delete those steps to add them again in this exercise.
-
In the Solution Explorer, expand the FlightConfirmation node, and open the FlightConfirmation.tsr object repository.
-
In the Object Repository Manager window, select the OpenText MyFlight Sample object, which is the parent object for all other objects on the FLIGHT DETAILS page. The object's properties are displayed on the right.
Make a note of the object's name and class, as you'll need to enter these manually in the Editor.

-
Repeat the previous step for the passengerName and ORDER objects, making note of their names and classes.
Create your step in the Editor:
Back in UFT One's Editor, create a statement to enter a passenger name for the flight. Include your test objects' hierarchy, names, and the method details. Separate each section of the statement with periods (full-stops).
To create steps:
-
On the first line, enter the parent object hierarchy for your first step, using the following syntax:
<object class>("<object name>").
In this case, the parent object is the OpenText MyFlight Sample app window. Start by entering WpfWindow(, and the rest of the object name will auto-complete.
Add a closing parentheses and a period after the object name to continue with a child object.
WpfWindow("OpenText MyFlight Sample").
A dropdown appears, displaying all the methods and child objects available to you.
-
Scroll down and double-click WpfEdit.
Then, enter an open parenthesis, and UFT One autocompletes with the passengerName text.
Add a closing parenthesis and a period to continue with the method.
WpfEdit("passengerName").
A dropdown appears, displaying all the methods available to you.
-
Double-click the Set method to add it to your step.
Then enter a space, and the passenger name you want to use, in quotes.
WpfWindow("OpenText MyFlight Sample").WpfEdit("passengerName").Set "Mary Sanchez" -
Press ENTER to start a new line, and then use the same procedure to add another step to click the ORDER button.
Add the object hierarchy and names:
WpfWindow("OpenText MyFlight Sample").WpfButton("ORDER").
Then add the Click method:
WpfWindow("OpenText MyFlight Sample").WpfButton("ORDER").Click
The Click method has no mandatory parameters, so you don't need to add any more code to this step.
-
Press ENTER again to start a new line, and add another step to click the NEW SEARCH button.
Add the object hierarchy and names:
WpfWindow("OpenText MyFlight Sample").WpfButton("ORDER").
Then add the Click method:
WpfWindow("OpenText MyFlight Sample").WpfButton("NEW SEARCH").Click
The Click method has no mandatory parameters, so you don't need to add any more code to this step.
- Save your test, and continue with Run and analyze your GUI test.

View your steps in the Editor
In the Editor, the FlightConfirmation action should look like this:
WpfWindow("OpenText MyFlight Sample").WpfEdit("passengerName").Set "Mary Sanchez"
WpfWindow("OpenText MyFlight Sample").WpfButton("ORDER").Click
WpfWindow("OpenText MyFlight Sample").WpfButton("NEW SEARCH").ClickView your steps in the Keyword View
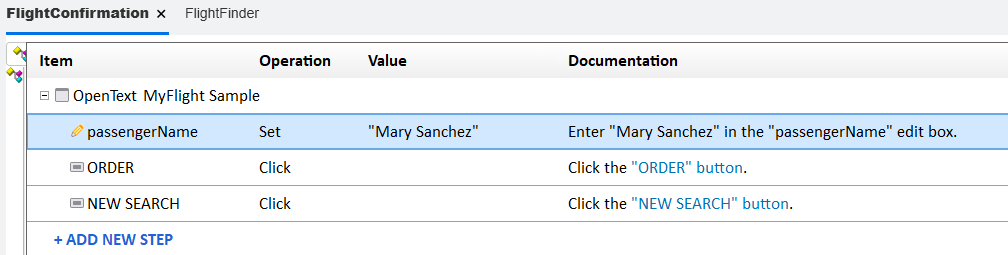
In the Keyword View, the FlightConfirmation action should look like this:
 Next steps: