Before creating steps to test your application's GUI, you must first create a test and create the actions that provide the test structure.
Each UFT One GUI test consists of calls to actions. Actions are units (within the test) that divide your test into logical sections. By dividing your tests into multiple actions, you can design more modular, understandable, and efficient tests.
Your test can contain a number of different types of actions:
| Internal and External Actions |
For example, if you have an action that you want to use in multiple tests, you would store the action as an internal action in one test and insert calls to that action from other tests. In the other tests which call the action, the action is available as an external action. |
| Reusable actions |
When you insert a call to a new action, it is reusable by default, enabling you to call the action from any test. When you use reusable actions, you only need to update the existing action stored with the original test. When you modify that original action, all tests containing calls to the action are updated. These reusable actions are read-only in the tests that call the reusable action. Reusable actions can be useful if:
If you want to prevent an action from being used in other tests, you can make the action non-reusable. |
| Copied actions | You can also insert a copy of an action in a test if you want to modify the action steps. When you copy the action, it becomes an internal action of the test into which it is copied. These copies are not linked to the source test, so any changes in the original action are not updated in the copy. |
Tip: If you plan to use the same or similar actions in many tests, you might consider creating a repository test to store your reusable actions. Then, you can insert calls to these existing actions from other tests.
You add actions to a test in the following ways:
- Calls to new actions. This inserts a new, empty action in your test. The action is an internal action of the test containing it.
- Calls to a copy of an action. This inserts a copy of an existing action in your test.
- Calls to an existing action. This inserts a call to an existing action (an action external to the current test).
-
 Create a new test and add it to the solution.
- In the toolbar, click the New button down arrow
 and select New Test.
 - In the New Test dialog box, select GUI Test.
-
Enter the following details:
-
Name: Book Flights
-
Location: By default, UFT One saves documents at C:%HOMEPATH%\My Documents\UFT One. For this lesson, you do not need to modify this path.
-
-
Click Create.
A blank test opens in the canvas, with one tab for the test flow (name Book Flights), and another tab for the action (name Action 1).
This test is also displayed as a subnode of the Flight Reservation Application solution node in the Solution Explorer pane.
- In the toolbar, click the New button down arrow
-
 Rename Action 1 so that it has a logical name.
- In the canvas, right-click the Action1 box and select Action Properties.
- In the General tab of the Action Properties dialog box, rename Action1 to Login and click OK.
-
In the warning that opens, click Yes.
The action block in the canvas should now be displayed with the name Login.
-
 Create a new action named Flight Finder.
-
Right-click anywhere in the canvas and select Call to New Action.
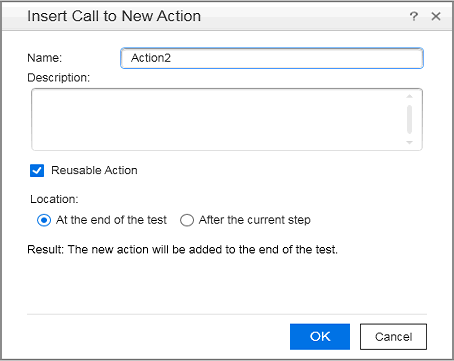
The Insert Call to New Action dialog box opens:

- In the Name box, enter Flight Finder.
- Ensure that the Reusable action and At the end of the test options are selected.
-
Click OK.
An additional block is added in the canvas with the name Flight Finder.
-
-
 Add an additional action to your test.
- In the toolbar, click the Insert Call to New Action button
 .
. - In the Insert Call to New Action dialog box, in the Name box, enter Select Flight.
- Ensure that the Reusable action and At the end of the test options are selected.
-
Click OK to add the action to the test.
Another block is added in the canvas with the name Select Flight.
- In the toolbar, click the Insert Call to New Action button
-
 Create a final action.
Using either of the methods used above, add another action to your test named Flight Confirmation.
Your test now contains all the actions necessary to test your application.
-
 Save your test.
In the toolbar, click the Save button
 .
.You may have noticed that before you clicked Save, an asterisk (*) was displayed in the Book Flights tab in the document pane and the Book Flights node in the Solution Explorer. These asterisks are displayed to indicate that a document has unsaved content. When you save a test, all changes in action tabs are also saved.
Now that you have your test structure, you can begin creating object repositories for the test.
 Next steps:


