Relevant for: GUI tests and components
The custom comparer must be installed and registered on any computer that runs a test or component with a bitmap checkpoint using the custom comparer.
This task describes how to install the custom comparer on a UFT One computer and register it to UFT One.
-
When you develop a custom comparer, you can create a program that automatically performs the steps in this task. If you choose not to create an installation program, review these steps and make sure to provide your users with all of the required files and information.
-
When you install a custom comparer that you did not develop, you may need additional information from the developer to perform the steps in this task. Alternatively, you may receive an installation program from the developer that performs this task automatically.
Note: This task is part of a higher-level task. For details, see Develop a custom comparer.
Prerequisites
-
More than one custom comparer can be installed and registered on the same UFT One computer.
However, before installing and registering a new version of a specific custom comparer, unregister the existing comparer.
-
A custom comparer .dll is created using a specific development environment version. Make sure that the computer on which this .dll runs has the corresponding runtime environment installed.
Install the custom comparer COM object on the UFT One computer
For example, you can do this by double-clicking the .dll or running the .dll using the regsvr32.exe program.
Register the custom comparer to the component category for UFT One bitmap comparers
Register the component category ID for UFT One bitmap comparers, CATID_QTPBitmapComparers, as a registry key under the COM object's HKEY_CLASSES_ROOT\CLSID\<Object's CLSID>\Implemented Categories key.
Note: When UFT One is installed, it adds this component category ID as a registry key under the HKEY_CLASSES_ROOT\Component Categories key. The component category ID is defined in <UFT_One_installdir>\dat\BitmapCPCustomization\ComponentCategory.h.
Place the custom comparer documentation in the correct location
The Bitmap Checkpoint Properties dialog box in UFT One can display documentation about the custom comparer, if such documentation is provided.
Place the custom comparer documentation in the location specified in the custom comparer object's GetHelpFilename method.
Set the Custom Comparer Name - Optional
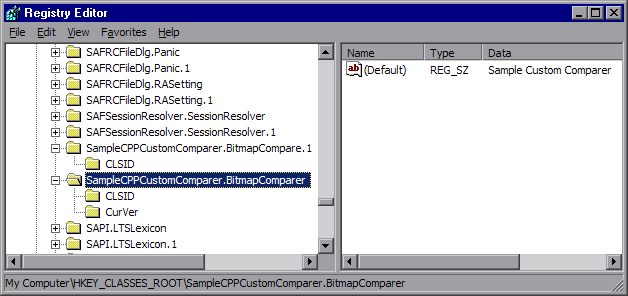
UFT One displays the name of the custom comparer in the advanced settings in the Bitmap Checkpoint Properties dialog box and in the run results. The name that UFT One uses is the value (in the registry) of the default property of the custom comparer ProgID key under the HKEY_CLASSES_ROOT key. For example, in the image below, the name of the custom comparer is Sample Custom Comparer.

-
In some environments you set the name while developing the object. For example if the custom comparer is developed in C++ using Microsoft Visual Studio, this name can be specified during development in the Type box in the ATL Simple Object Wizard.
-
In other environments, you can set or customize the name as part of the installation or registration process on each computer. For example, if the custom comparer is developed in Visual Basic, this registry value is automatically set to the COM object's ProgID. If you want to modify the custom comparer name, you can edit it manually in the registry after the comparer is installed, or design the program that performs the installation and registration to edit this value as well.
Results
In the advanced settings in the Bitmap Checkpoint Properties dialog box, UFT One displays the comparer you installed and registered, along with all of the available custom comparers, and the UFT One default comparer. You can then select the appropriate comparer to use for each bitmap checkpoint.


