Planning Support for the AllLights Control
In this section, you analyze the current UFT One support of the AllLights control, determine the answers to the questions in the Understanding the Custom Class Support Planning Checklist, and fill in the Custom Class Support Planning Checklist , accordingly.
The best way to do this is to run the application containing the custom control, and analyze it from a UFT One perspective using the Object Spy, Keyword View, and Record option:
Run the AllLights application and open UFT One.
If the AllLights application is already running, select Applet > Restart from the application toolbar so the application looks like the image shown above. Otherwise, right-click AllLights.Java in the Eclipse Package Explorer tab, and select Run As > Java Applet to run it.
Open UFT One and load the Java Add-in.
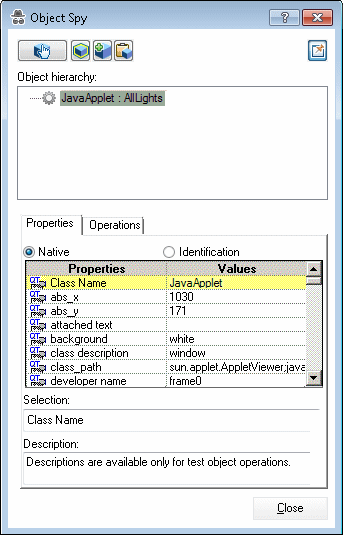
Use the Object Spy to view the AllLights properties and methods.
In UFT One, open a GUI test and select Tools > Object Spy or click the Object Spy toolbar button
 to open the Object Spy dialog box. Click the Properties tab.
 In the Object Spy dialog box, click the pointing hand
 , then click the AllLights application.
The AllLights control extends JavaApplet, for which UFT One support is built in, therefore it recognizes the application as a JavaApplet, named AllLights. The icon shown is the standard JavaApplet class icon:

Close the Object Spy.
Record operations on the AllLights control.
In UFT One, select Record > Record and Run Settings to open the Record and Run Settings dialog box. In the Java tab, select Record and run test on any open Java application. If the Web Add-in is also loaded, click the Web tab and select Record and run test on any open browser. Click OK.
Click the Record button or select Record > Record. Click on different locations in the AllLights application: the grid, the RESTART button, and one of the counters.
With each click, a new step is added to the test:

Click the Stop button or select Record > Stop to end the recording session.
The Click operation on the AllLights JavaApplet is a generic click, with arguments indicating the low-level recording details (x and y coordinates and the mouse button that performed the click).
Determine the custom toolkit to which the AllLights control belongs.
When you extend UFT One support for a control you always do so in the context of a toolkit. For the purpose of this tutorial, three classes that extend AWT are grouped to form the custom toolkit named Javaboutique: AllLights, AwtCalc, and ETextField.
In this lesson you create support for the Javaboutique toolkit, initially supporting only the AllLights class.
Complete the custom class support planning checklist.
In this step you plan the required support for the AllLights control and summarize the information in the support planning checklist.
Decide which custom class to support:
The AllLights custom class extends the Applet class, supported on UFT One by AppletCS.
You want UFT One to treat the AllLights as a special kind of Applet. You want it to support the special operations it performs, and to recognize its properties. Therefore it makes sense to create Extensibility support for this control.
Map a test object class to the custom control:
The JavaApplet test object class provides basic support for the AllLights control, but does not support all of the necessary identification properties and test object methods. Therefore you create a new test object class extending JavaApplet, named AllLights and map it to the AllLights custom control.
Decide the details for the new test object class:
The new test object class is represented by the icon file: <UFT One Java Add-in Extensibility SDK Installation folder>\samples\Javaboutique\AllLights_icon.ico
The identification properties used by default to uniquely define the test object (label, class, and index) are sufficient.
The default test object method is ClickLight.
The new identification properties to support are: OnCount, OnList, and GameOver. They should all be selected by default in the UFT One Checkpoint Properties dialog box.
Determine whether the control is a top-level object or a wrapper, and decide how to name the test objects:
AllLights controls are top-level objects, but not wrappers.
The name of the test object itself should be Lights.
Determine the identification properties that need to be supported:
OnCount. Specifies the number of lights that are on, at the given moment.
OnList. Lists the location of the lights that are on, at the given moment. The lights are numbered 0 through 24, starting from the upper left corner and numbering row by row. The list contains the numbers of the lights that are on, each preceded by a space.
GameOver. A Yes or No string, indicating whether all lights are on or not.
Determine the test object methods that need to be supported:
ClickLight. Simulates clicking a specific light in the grid. This method requires two arguments, Row and Column, specifying the location of the light to click.
Restart. Simulates clicking the Restart button.
Determine how to support recording:
Override low-level mouse event recording.
Listen for mouse events. Based on the location of the click, send a record message to record ClickLight or Restart operations.
 Next steps:


