Setting up the .NET Project
Set up a .NET project in Microsoft Visual Studio using the Custom Server C# Project Template or the Custom Server Visual Basic Project Template. (This template is installed automatically during the installation, as described in Installing the OpenText Functional Testing .NET Add-in Extensibility SDK).
When you set up the .NET project, the Custom Server Project template does the following:
Creates the project files necessary for the build of the .DLL file.
Sets up a C# or Visual Basic file (depending on which template you selected) with commented code that contains the definitions of methods that you can override when you implement Test Record or Test Run.
Provides sample code that demonstrates some Test Record and Test Run implementation techniques.
Creates an XML file segment with definitions for the Custom Server that you can copy into the .NET Add-in Extensibility configuration file (SwfConfig.xml).
Caution: To use the Custom Server Project template to create a .NET project, you must have either administrator privileges or full read and write access to the following folder and all of its sub-folders: <Microsoft_Visual_Studio_installdir>\VC#\VC#Wizards
Start Microsoft Visual Studio.
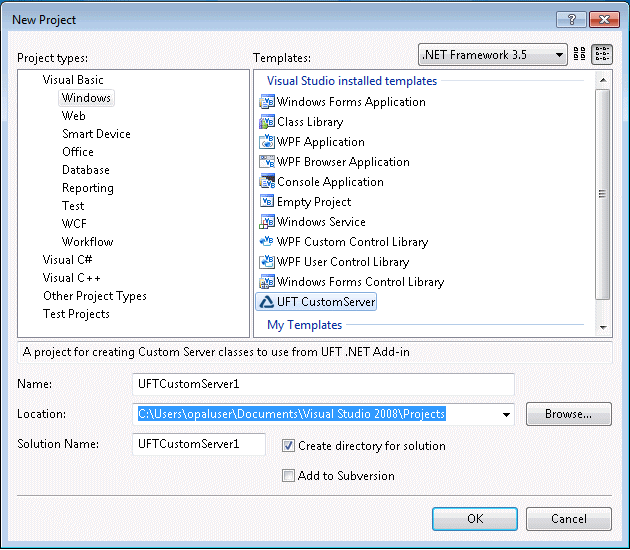
Select File > New > Project to open the New Project dialog box, or press Ctrl + Shift + N. The New Project dialog box opens.
Select the Visual C# > Windows or Visual Basic > Windows node in the Project types tree.

Note: In Microsoft Visual Studio versions other than 2008, the dialog box may differ slightly in appearance and the UFT CustomServer template may be located in a slightly different node in the tree.
Select the UFT CustomServer template in the Templates pane. Enter the name of your new project and the location in which you want to save the project. Click OK. The OpenText Functional Testing Custom Server Settings wizard opens.

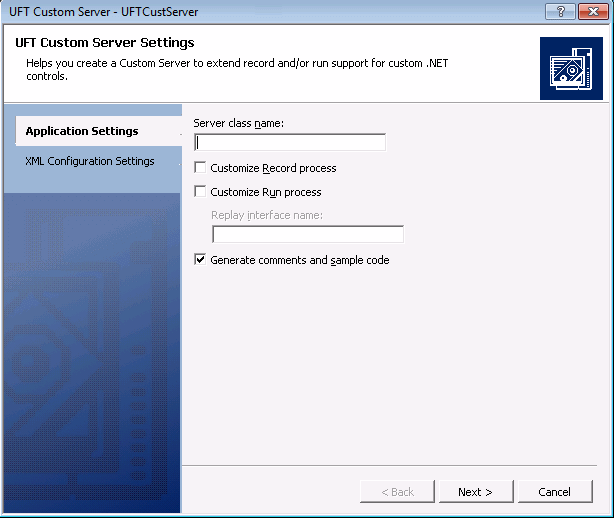
Determine whether your Custom Server will extend Test Record support, Test Run support, or both, by making selections in the Application Settings page of the wizard.
In the Server class name box, provide a descriptive name for your Custom Server class.
Select the Customize Record process check box if you intend to implement the Test Record process in OpenText Functional Testing.
If you select the Customize Record process check box, the wizard creates a framework of code for the implementation of recording steps.
Do not select this check box if you are going to create the test manually in OpenText Functional Testing, or if you are going to use the Test Record functions of the existing test object to which this control will be mapped. Your Test Record implementation does not inherit from the existing test object to which the custom control is mapped. It replaces the existing object's Test Record implementation entirely. Therefore, if you need any of the existing object's functionality, code it explicitly.
Select the Customize Run process check box if you intend to implement Test Run functions for the custom control (meaning, if you are going to override any of the existing test object's methods, or extend the test object with new methods). Enter a name for the replay interface you will create in the Replay interface name box.
If you select the Customize Run process check box, the wizard creates a framework of code to implement Test Run support.
Select the Generate comments and sample code check box if you want the wizard to add comments and samples in the code that it generates.
Click Next. The XML Configuration Settings page of the wizard opens:

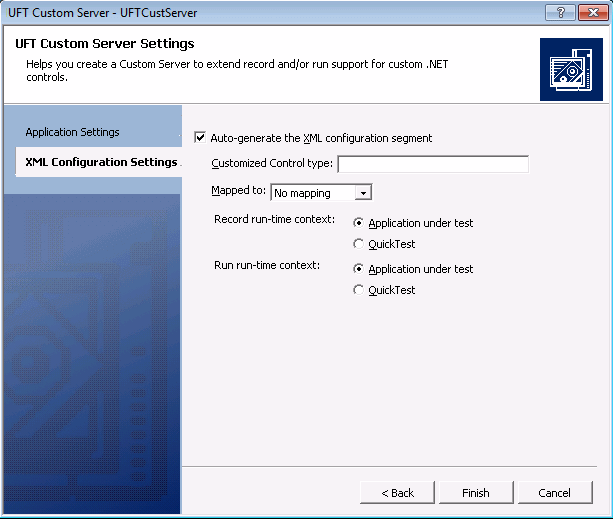
Using the XML Configuration Settings page of the wizard, you can generate a segment of XML code that can be copied into the .NET Add-in Extensibility configuration file (SwfConfig.xml). This file maps the custom control to the test object, and provides OpenText Functional Testing with the location of the test object's Custom Server. (If you choose not to generate the XML configuration segment, you can manually edit the .NET Add-in Extensibility configuration file later.) For instructions on copying this segment into the SwfConfig.xml file, see Copying Configuration Information Generated by the OpenText Functional Testing Custom Server Settings Wizard.
Select the Auto-generate the XML configuration segment check box to instruct the wizard to create the configuration segment, which is saved in the Configuration.xml file.
In the Customized Control type box, enter the full type name of the control for which you are creating the Custom Server, including all wrapping namespaces, for example,
System.Windows.Forms.CustCheckBox.Note: If you want to specify a control type that is included in more than one assembly you can include the name of the assembly, or other information that fully qualifies the type. For example, you could enter values similar to these:
-System.Windows.Forms.CustCheckBox, System2.Windows.Forms.v8.5-System.Windows.Forms.CustCheckBox, System2.Windows.Forms.v8.5, Version=8.5.20072.1093, Culture=neutral, PublicKeyToken=8aa4d5436b5ad4cdThis can be useful, for example, if you have different versions of the control in your application.In the Mapped to box, select the test object to which you want to map the Custom Server. If you select No mapping, the Custom Server is automatically mapped to the SwfObject test object.
For more information, see Map the Custom Controls to the Relevant Test Objects .
Select the run-time context for Test Record and/or Test Run: the context of the application that is being tested (Application under test) or the context of OpenText Functional Testing (QuickTest).
For more information, see Create Custom Servers.
Click Finish. The wizard closes and the new project opens, ready for coding.
When you click Finish in the wizard, the Configuration.xml segment file is created and added to the project. Update and modify the configuration segment file as required. For more information about using the segment file, see Copying Configuration Information Generated by the OpenText Functional Testing Custom Server Settings Wizard.)


