Installing the .NET Add-in Extensibility SDK
Use the OpenText Functional Testing Setup program to install the .NET Add-in Extensibility SDK on your computer.
Note: You must be logged on with Administrator privileges to perform the installation.
To install the SDK
Close all instances of Microsoft Visual Studio.
Run the setup.exe file from your OpenText Functional Testing installation files folder. The Setup window opens.
Click Add-in Extensibility and Web 2.0 Toolkits. The OpenText Functional Testing Add-in Extensibility and Web 2.0 Toolkit Support screen opens.
Click OpenText Functional Testing .NET Add-in Extensibility SDK Setup. The OpenText Functional Testing .NET Add-in Extensibility SDK Setup wizard opens.
Note: If the wizard screen that enables you to select whether to repair or remove the SDK installation opens, the OpenText Functional Testing .NET Add-in Extensibility SDK is already installed on your computer. Before you can install a new version, you must first uninstall the existing one.
Follow the instructions in the wizard to complete the installation.
In the final screen of the Setup wizard, if you select the Show Readme check box, the OpenText Functional Testing .NET Add-in Extensibility Readme file opens after you click Close.
The Readme file contains the latest technical and troubleshooting information. You can always find the latest version online: OpenText Functional Testing Add-in Extensibility
Click Close to exit the Setup wizard.
If you use a non-English edition of Visual Studio, do the following to apply the installed UFT CustomServer project templates to your Visual Studio edition:
Note: The following instructions apply to Visual Studio 2008 installed on a 32-bit operating system. The folder and file names are slightly different if you are working with Visual Studio 2010, or on a 64-bit operating system.
Copy the QuickTestCustomServerVB.zip file from: %ProgramFiles%\Microsoft Visual Studio 9.0\Common7\IDE\ProjectTemplates\VisualBasic\Windows\1033 (English language setting folder) to the folder relevant to the language you use (for example, use 1036 for French).
Run the PostCustomVizard.exe program from the %ProgramFiles%\Microsoft Visual Studio 9.0\Common7\IDE folder.
Repeat this process for the C# template, copying the QuickTestCustomServer.zip file from: %ProgramFiles%\Microsoft Visual Studio 9.0\Common7\IDE\
ProjectTemplates\CSharp\Windows\1033
To confirm that the installation was successful
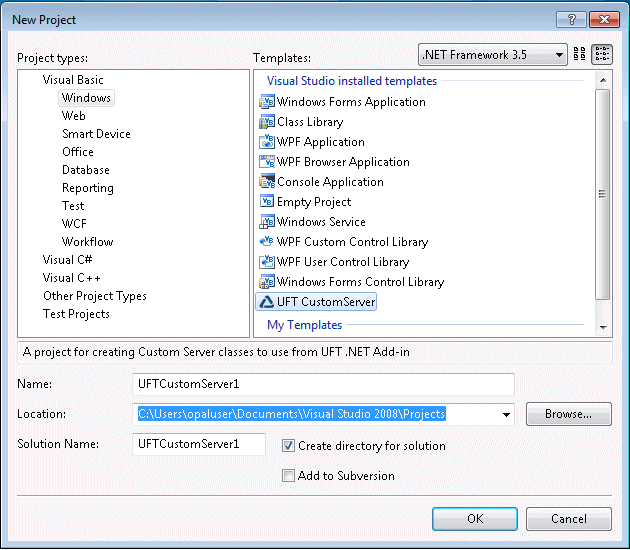
Note: The Microsoft Visual Studio dialog box illustration and the instructions in this procedure refer to Microsoft Visual Studio 2008. If you use a different Microsoft Visual Studio version, the dialog box may differ slightly in appearance and the UFT CustomServer template may be located in a slightly different node in the tree.
Open a supported version of Microsoft Visual Studio.
For a list of supported Microsoft Visual Studio versions, see the OpenText Functional Testing Support Matrix .
Select File > New > Project to open the New Project dialog box.
Select the Visual Basic > Windows node in the Project types tree.
Confirm that the UFT CustomServer template icon is displayed in the Templates pane:

Select the Visual C# > Windows node in the Project types tree.
Confirm that the UFT CustomServer template icon is displayed in the Templates pane.
Note: If you upgrade to a new version of Microsoft Visual Studio, you must uninstall and reinstall the .NET Add-in Extensibility SDK to be able to access the UFT CustomServer template.


