
Share this page


Setting Up the WPF Add-in Extensibility Project for the WPF Calendar Control
Supported on versions 2021 R1 and earlier
A WPF Add-in Extensibility support set consists of the following mandatory files:
A Test Object Configuration XML File. In this file, new test object types are defined. For details, see The Test Object Configuration XML File.
A toolkit configuration file. In this file WPF control types are mapped to test object types and to the custom servers implementing their record and run logic. For details of the schema, see the Toolkit Configuration Schema.
.Net DLLs containing the implementation of custom servers. For details, see Custom Servers (Version 2021 R1 or earlier).
The WPF and Silverlight Add-in Extensibility SDK installs a project template and a setup dialog box in Microsoft Visual Studio that assist you in setting up the files that you need to create the toolkit support set.
Use the template for each control you want to support. The template sets up both the XML files and the Microsoft Visual Studio solution that you need to create the custom server DLL. When you create support for more than one control in a toolkit, you have to combine the XML content created for each control into one toolkit configuration file and one test object configuration file for the toolkit.
In this tutorial, because you are creating a toolkit support for only one control, you can use the XML files created by the project template, as-is.
Note: The Microsoft Visual Studio dialog box images in this section are taken from Microsoft Visual Studio 2008. If you use a different version, the dialog boxes may differ slightly in appearance.
Create a WPF Add-in Extensibility Project in Microsoft Visual Studio
Open Microsoft Visual Studio and click New Project. The New Project dialog box opens:
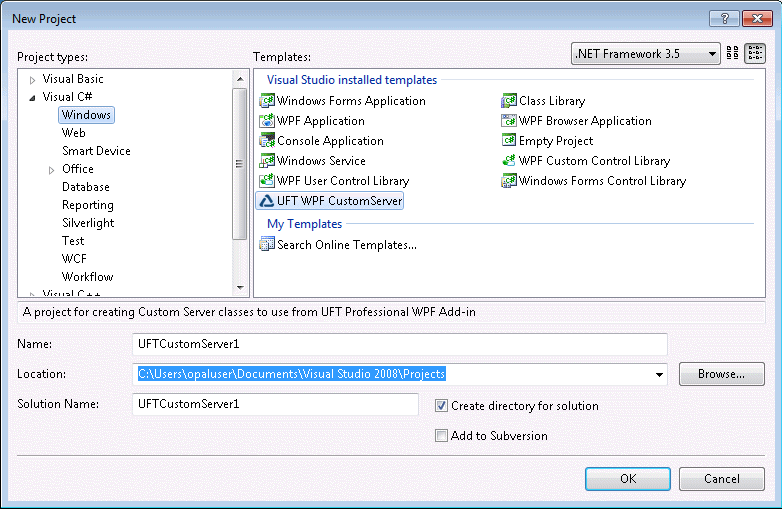
Select the Visual C# Windows project type and the OpenText Functional Testing WPF CustomServer template, and click OK.
Note: If you were developing support for a Silverlight control, you would select the Visual C# Silverlight project type and the OpenText Functional Testing Silverlight CustomServer template.
Enter
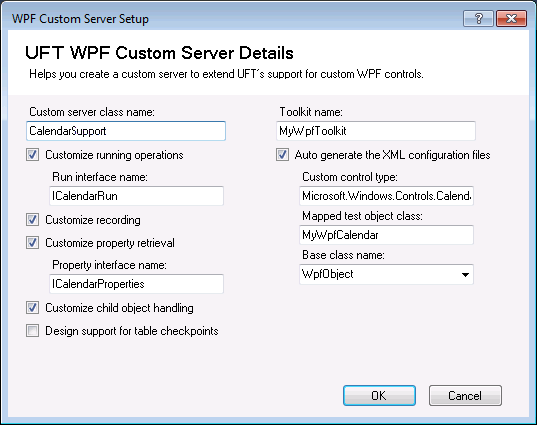
CalendarSrvas the project Name, and click OK. The WPF/Silverlight Custom Server Setup dialog box opens.In this dialog box, you provide specifications that describe the support that you want to create, and the files required to create this support are created accordingly.
In this tutorial:
You create support for the MyWpfToolkit toolkit.
Within this toolkit you create support for Microsoft.Windows.Controls.Calendar WPF controls.
You create a MyWpfCalendar test object class, based on the standard OpenText Functional TestingWpfObject class, to represent the Calendar controls in OpenText Functional Testing.
You create a CalendarSrv custom server class, to provide support for the controls. Within the CalendarSrv custom server class, you customize running operations, retrieving properties, recording, and child object handling.
Specify these details in the WPF Custom Server Setup dialog box, as shown in the image below, selecting also the options for automatically generating XML files, comments, and sample code.
Make sure to enter the Run interface name and the Property interface name shown below, as this tutorial does not use the default names provided in the dialog box.
If you want more information on this dialog box, see WPF Custom Support Setup Dialog Box (Version 2022 or later).
Click OK.
The CalendarSrv solution is created with the relevant files and references. The solution includes a toolkit configuration file (MyWpfToolkit.cfg), a test object configuration file (MyWpfToolkitTestObjects.xml), and the C# file for the custom server class (CalendarSrv.cs).
It also includes the reference to the Mercury.QTP.WpfAgent.dll file, that contains the WPF Add-in Extensibility API.
Note: If you use the OpenText Functional Testing Silverlight CustomServer template, the solution created includes a reference to the Mercury.QTP.Slv.CustomServer.dll file, that contains the Silverlight Add-in Extensibility API.


