Share this page


Create a testing project in IntelliJ IDEA or Eclipse
In IntelliJ IDEA and Eclipse (including also Spring Tool Suite and JBoss Developer Studio), you can create a JUnit or TestNG testing project.
In this topic:
- Overview
- Prerequisites
- Create a Java test project
- Eclipse/IntelliJ template content
- Java files and UTF-8 encoding
- Move external .jar files
Overview
You can create the following types of projects using the installed templates:
JUnit and TestNG
These projects can be:
- Maven-based: Include resources for running your tests with Maven.
- Selenium-based: Include resources for integrating with Selenium.
Cucumber
The Cucumber template is based on the Java testing framework (JUnit) and is Maven-based. For details on creating a Cucumber project, see Testing with Cucumber.

Prerequisites
Before you create a Java project, review the following prerequisites:
-
If you are creating a Selenium project, review Prerequisites for Selenium projects.
-
If you are creating a Maven-based project, review Prerequisites for Maven-based projects.
-
If you are using Eclipse, Spring Tool Suite, or JBoss Developer Studio, do the following:
To create or work with... Download and deploy or install... JUnit projects The JUnit framework.
A TestNG project The TestNG plugin.
Maven-based projects using Eclipse Kepler Standard Edition The M2Eclipse plugin.
-
If you plan create a project that is based on the JUnit 5 template, make sure that you have the following installed:
Java 8
IntelliJ IDEA 2017.2.5 or higher If you are working with IntelliJ. Eclipse Oxygen 4.7.1a or higher If you are working with Eclipse.
Create a Java test project
-
In your IDE, create a new project.
In the New Project wizard:
-
Create a UFT Developer > Testing project.
IntelliJ IDEA users: Ensure that the correct Project SDK is selected.
-
Follow the wizard, selecting the relevant options for your project:
All projects Provide the project name and location.
Eclipse users, using Java 9 or later: When creating the project, clear the option Create module-info.java file. Otherwise, after the project is created, manually move the OpenText external .jar files in the Java Build Path, from Classpath to Modulepath. For details, see Move external .jar files.
Selenium - Select Selenium.
- Non-Maven based project: Provide the location of your Selenium JAR files.
Non-Maven-based project Provide the package name (Eclipse)/base package (IntelliJ IDEA), for example: com.microfocus.lft.
Maven-based project Provide the Group ID and Artifact ID, and the Maven version.
IntelliJ IDEA users: If you are creating a Maven-based project, a message appears prompting you to Add as Maven project. Click the link to create the Maven-based project.
JUnit Select the JUnit version.
-
-
If you are using a JUnit 5 framework, note that the JUnit 5 libraries are not distributed automatically by OpenText Functional Testing for Developers or by the IDE.
- In Eclipse, the JUnit jars are automatically downloaded when the project is created.
-
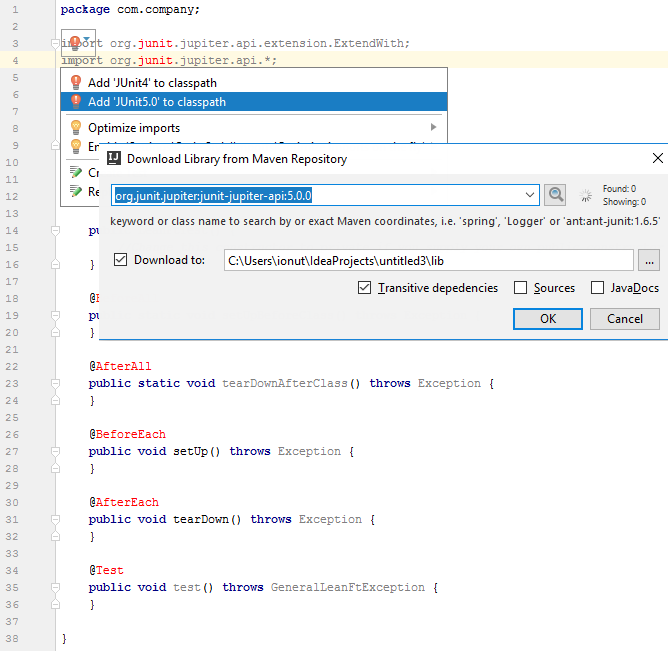
In IntelliJ IDEA, for Non Maven-based projects: After your project is created, you need to reconcile this issue by adding them manually:
Expand the imports section, click the IDE suggestion, and then select Add JUnit5.0 to classpath.
On the Download Library from Maven Repository, dialog box, click OK.

-
Eclipse, Spring Tool Suite, and JBoss Developer Studio users: Add test cases using the New UFT Developer Test Case wizard (New > Other > UFT Developer > UFT Developer Test Case), selecting the relevant options for your test case.
-
Maven-based project: The project is created with a pom.xml file. Open this file in a text editor and configure your organization's Maven repository details:
<repository>
	<id>MyMVNrepo_ID</id>
	<name>MyMVNrepo_name</name>
	<url>http://MyMVNrepo_URL</url>
</repository>
Note: To run the Maven-based test using Maven, there are some additional configurations you need to apply to the pom.xml file. For details, see Run tests.
Eclipse/IntelliJ template content
The JUnit/TestNG UFT Developer project templates include the following:
-
A basic UFTDeveloperTest.java template where you write your tests. The exact structure of this template depends on whether you are writing a JUnit or TestNG script. In both cases, it includes attributes where you can define:
Attributes for defining Description Setup code Runs once at the start of the class Setup code Runs once at the start of each test Individual test units - The template includes a single
@Testannotation containing an emptytest()method. You can rename this method to whatever you want to call your test. - You can add multiple
@Testannotations if you want to include several tests in your class. - Each
@Testannotation should declare a void test method that contains the main code for that test.
Cleanup code Runs at the conclusion of each test Cleanup code Runs once at the end of the class - The template includes a single
-
UnitTestClassBase, which controls what happens during the different phases of your run, including running and closing the runtime engine.
-
References to the respective JUnit/TestNG jar files.
-
The resources\leanft.properties file, which enables you to customize some test settings. For details, see Customize test settings.
-
References to the com.hp.lft.sdk, com.hp.lft.report, com.hp.lft.unittesting, com.hp.lft.verifications, and com.hp.lft.reportbuilder-standalone libraries.
- TestNG: Includes a TestNG.xml configuration file. For more details about setting up this file, see the TestNG documentation.
- Maven-based: Includes the pom.xml file that provides all the information that Maven needs to build the project.
- Selenium: Includes the Selenium JARS and the OpenText Functional Testing for Developers (Selenium) Java SDK.
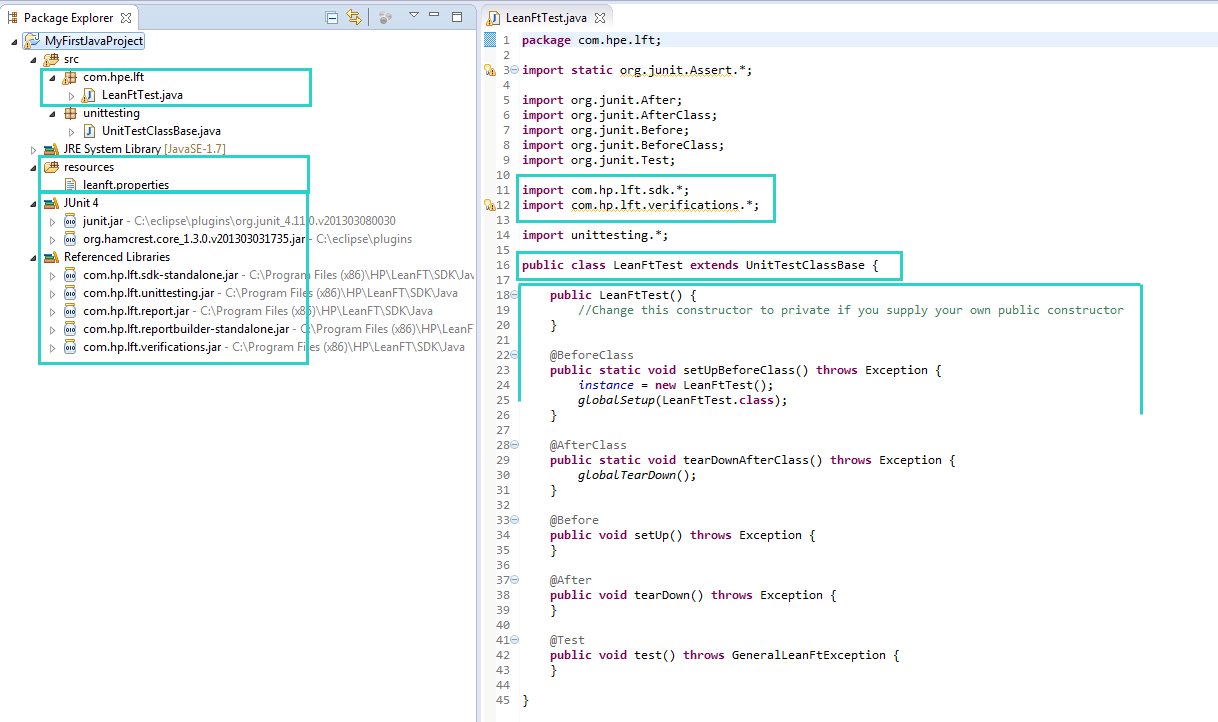
Example: A new OpenText Functional Testing for Developers JUnit project in Eclipse:
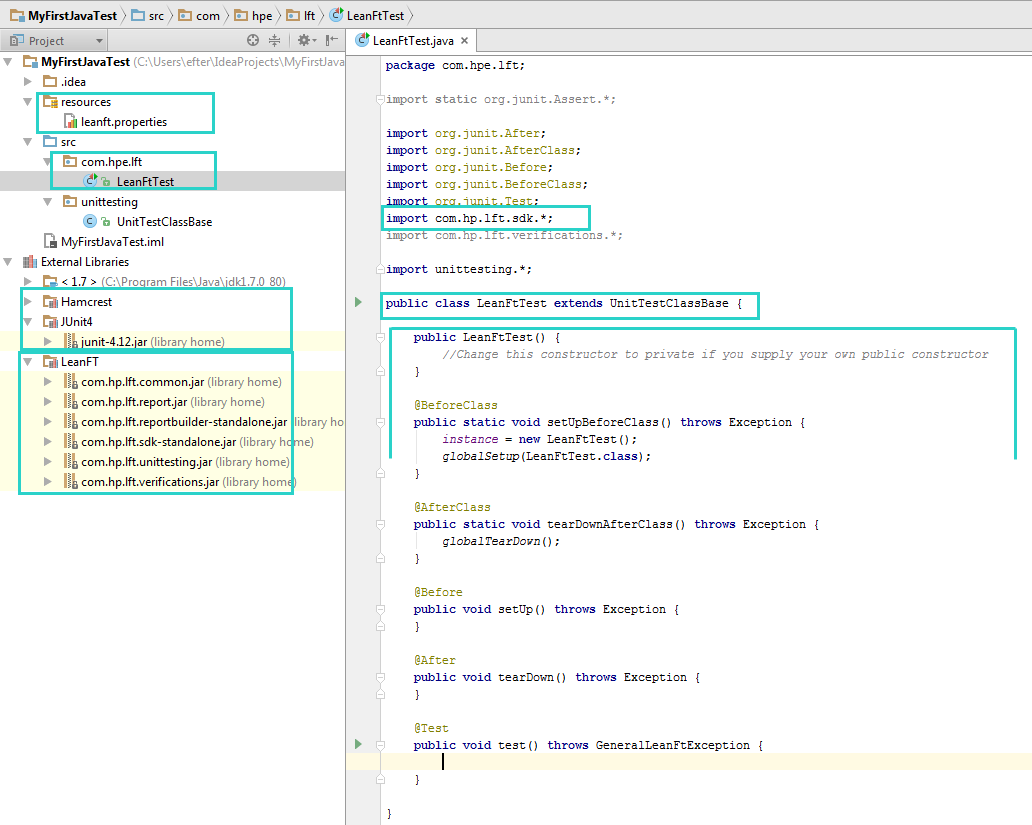
Example: A new JUnit project in IntelliJ IDEA:
Java files and UTF-8 encoding
OpenText Functional Testing for Developers Java files use UTF-8 encoding, so you must make sure that any Java files you use in your project are also UTF-8 or UTF-8 compatible.
Maven users: To compile your Java projects using Maven, you must specify the encoding either in the pom.xml or in the Maven command line.
-
To add the encoding to the pom.xml, add the following:
<properties>
   <project.build.sourceEncoding>UTF-8</project.build.sourceEncoding>
</properties>
-
To specify the encoding in the command line, use:
mvn clean install -Dproject.build.sourceEncoding=UTF-8
For details on using the JUnit framework, see the JUnit documentation.
Move external .jar files
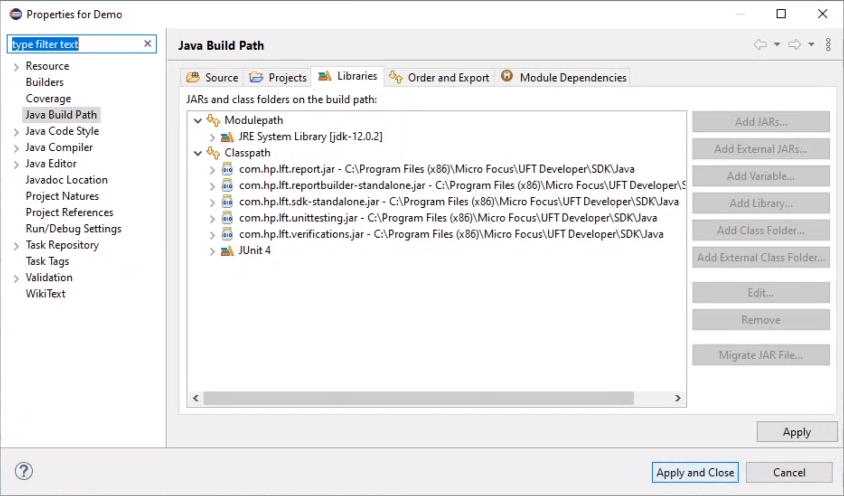
When working in Eclipse with Java 9 or later, if you created a module-info.java file when creating a new project, manually move the OpenText external .jar files in the Java Build Path from Classpath to the Modulepath:
-
In Eclipse, in the Package Explorer, right-click your project, select Build Path > Configure Build Path.
-
Select the Java Build Path pane and the Libraries tab.
-
Move the .jar files shown below from the Classpath library to the Modulepath library.
 Next steps: