Share this page


Create a Java project in Visual Studio Code
In Visual Studio Code, on Windows, macOS, and Linux, you can create JUnit or TestNG testing projects using the installed templates.
Overview
You can create the following types of projects using the installed templates:
JUnit and TestNG
These projects can be:
- Maven-based: Include resources for running your tests with Maven.
- Selenium-based: Include resources for integrating with Selenium.
Prerequisites
Before you create a Java project, review the following prerequisites:
- Internet connectivity is required when creating projects.
-
If you are creating a Selenium project, review Prerequisites for Selenium projects.
-
We recommend that you use language-specific extensions such as Extension Pack for Java, to add test project development capabilities to Visual Studio Code.
Create a project
You can create a new project in VS Code using Functional Testing for Developers extension GUI or the Command Palette.
To create a project:
-
Do one of the following:
-
Select the Functional Testing for Developers extension in the Activity Bar and expand the Templates > Javamenu.
-
Open the Command Palette (Ctrl + Shift + P) and type >FTD: Create Java Project.
-
-
Select the relevant template type (JUnit or TestNG).
-
Enter a name for the new project.
-
Enter a package name (for example, com.company.project).
-
Select a project location. By default, Visual Studio Code suggests the user's Documents folder if there is no open workspace. Otherwise, it suggests the open workspace.
-
Optionally, choose to create a Maven project. Otherwise, the default will be a plain Java project.
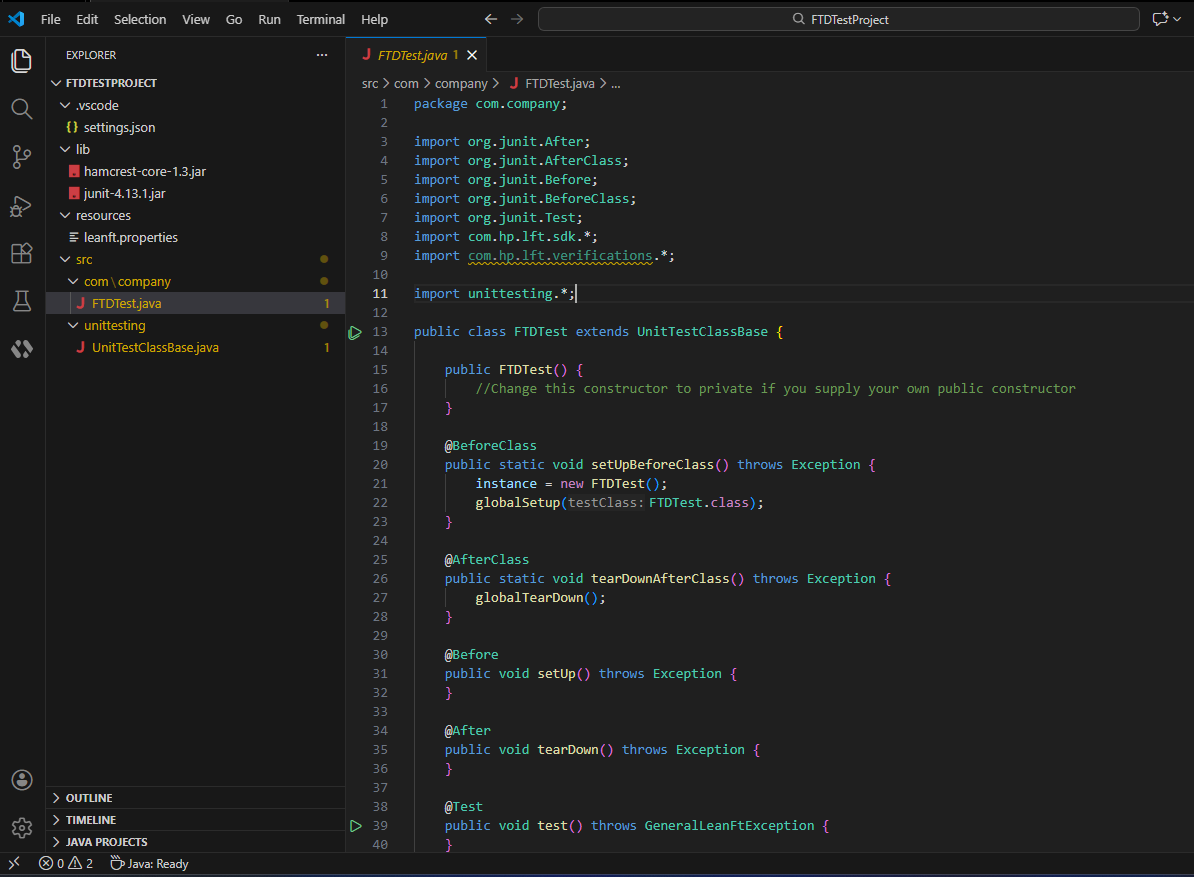
Visual Studio Code template content
The JUnit/TestNG FTD project templates include the following:
-
A basic FTDTest.java template where you write your tests. The exact structure of this template depends on whether you are writing a JUnit or TestNG script. In both cases, it includes attributes where you can define:
Attribute Description Setup code Runs once at the start of the class Setup code Runs once at the start of each test Individual test units - The template includes a single
@Testannotation containing an emptytest()method. You can rename this method to whatever you want to call your test. - You can add multiple
@Testannotations if you want to include several tests in your class. - Each
@Testannotation should declare a void test method that contains the main code for that test.
Cleanup code Runs at the conclusion of each test Cleanup code Runs once at the end of the class You can include multiple tests in one class, and you can use the Object Identification Center or Test Recorder to help generate the code.
- The template includes a single
-
UnitTestClassBase.java, which controls what happens during the different phases of your run, including running and closing the runtime engine.
-
References to the respective JUnit/TestNG jar files.
-
The resources\leanft.properties file, which enables you to customize some test settings. For details, see Customize test settings.
-
References to the com.hp.lft.sdk, com.hp.lft.report, com.hp.lft.unittesting, com.hp.lft.verifications, and com.hp.lft.reportbuilder-standalone libraries.
- TestNG: Includes a TestNG.xml configuration file. For more details about setting up this file, see the TestNG documentation.
- Maven-based: Includes the pom.xml file that provides all the information that Maven needs to build the project.
Example: A new OpenText Functional Testing for Developers Java project in Visual Studio Code:
- For details on using the JUnit framework, see the JUnit documentation.
- For details on using the TestNG framework, see the TestNG documentation.