Share this page


View and manage devices
In this topic:
Device display
Click Device Lab > Devices to display the devices in the Lab.
- Shared space administrators will see all the devices that have been connected to UFT Mobile. A shared space admin user will also have full control over the devices and the workspaces to which they belong.
- Other users will see all UFT Mobile shared devices (devices in Shared assets), as well as devices assigned to the workspace in which they are working.
In the top right-hand corner, you can see the number of devices that match the current filter, out of the total number of connected devices.
You can also view the devices in a list. Click the List  and Card view
  buttons to toggle between the views.
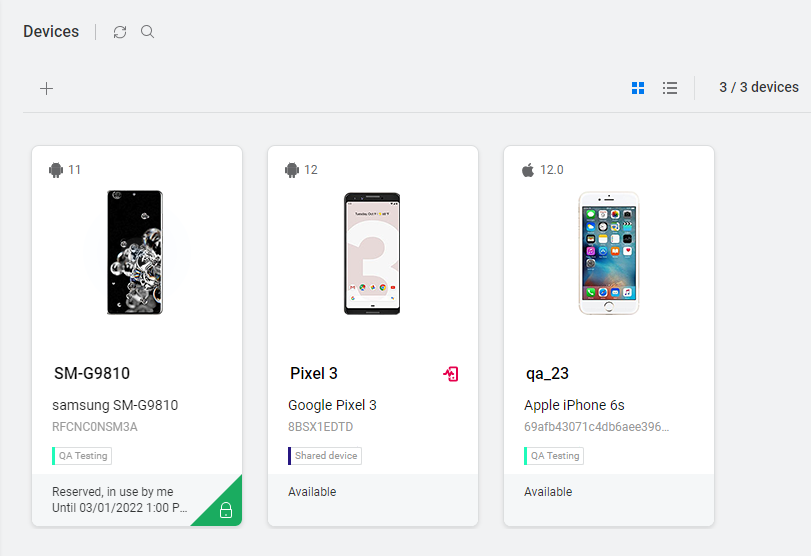
The following details are displayed for devices:
| Device lab information |
There is no icon for on-premises devices. Cloud device labs are indicated as follows: In the Filter pane on the left, use the options to filter by device type such as physical or emulator, or by lab, such as on-premises, Micro Focus, or AWS.
|
| Settings app blocked |
If your administrator has not granted permission to change the settings on the device, the settings app blocked icon  will be displayed. Note that while you can still interact with the Settings app, replay will fail with a 2700 error. will be displayed. Note that while you can still interact with the Settings app, replay will fail with a 2700 error.
|
| Public device | When the device is a public device, such as a public Micro Focus hosted device or an AWS public device, the public device icon  is displayed. is displayed. |
| Connection time | For cloud device labs, hover over the clock icon  to view the date and time that the device was connected. to view the date and time that the device was connected. |
| Emulator/ Simulator | When the device is not a physical device, the emulator/simulator icon  is displayed. is displayed. |
| Operating system and version | A read-only field. |
| Device name | In card view, click the name to edit it. The default is the model number of the device. Note: If your administrator has not granted you permission to update this field, you will not be able to edit the device name. |
| Manufacturer, model, and ID | A read-only field indicating the device information. |
| Workspace name | The workspace to which the device is assigned. |
| Device health status |
The  icon indicates an issue with the device health. It is only displayed if one of the metrics exceeds the defined threshold. Hover over the icon to see details about the exceeded threshold. Shared space admin users can configure thresholds for all device health indicators in the Administration settings. icon indicates an issue with the device health. It is only displayed if one of the metrics exceeds the defined threshold. Hover over the icon to see details about the exceeded threshold. Shared space admin users can configure thresholds for all device health indicators in the Administration settings.
|
| Maintenance mode | The  icon indicates that the device is in maintenance mode. Only shared space admin users can access devices that are in maintenance mode. icon indicates that the device is in maintenance mode. Only shared space admin users can access devices that are in maintenance mode. |
| Availability | Availability and reservations for the device. For example, Available or Reserved by... Until. Click this section to view and create reservations. In card view, a triangular emblem at the bottom right of the device indicates the reservation status. In list view, you can see the reservation status in the availability column. For details, see View and manage device reservations. |
 Micro Focus hosted devices
Note: To use iOS devices with UFT Mobile you must re-sign the Agent apps with a development certificate of an Apple Developer account. For details, see Re-sign the Agent apps. This is not required when using UFT Mobile hosted devices.

Finding specific devices
Find a specific device in one of the following ways:
- Search. Click the Search button at the top of the Devices screen. In the text box, specify the name, device ID, model, or manufacturer of the device.
-
Filter. To focus on what is important to you, use the filter in the left panel to limit what items are displayed. Using the filter panel, you can specify your criteria in areas including the following:
OS Operating System: Android or iOS. Use the slider to select an OS version. Form factor The type of device - phone or tablet. Manufacturer A list of the manufacturers of the devices in the UFT Mobile lab. Physical/ Emulator or Simulator The type of device - physical device or emulator/ simulator. Availability You can filter devices according to the following availability options:
- Available. Available devices
- Reserved for me. Devices reserved for you or that are currently in use by you.
- Reserved for others. Devices that have been reserved for someone else or are currently in use by someone else.
- Disconnected. Devices that are not connected. The thumbnails of disconnected devices are faded. Hover over the icon to view the issues that were detected when trying to connect the device.
Maintenance - In maintenance. Devices on which maintenance mode has been activated. Non shared space admin users are not able to access these devices.
- Not in maintenance. Devices on which maintenance mode has not been activated. Because non shared space admin users are not able to access devices in maintenance, this option is useful to filter out devices that temporarily cannot be used.
Lab On-premises, Micro Focus hosted devices, AWS devices, Genymotion. Workspace Display devices assigned to a specific workspace. Connector Display devices connected to a specific connector. Tip: Use the Clear link in the upper right corner of the filter panel to remove all your device filters.
Device management
When you hover over a device in Card view, or select it in List view, the device management options are displayed.
In card view, the following options are displayed on the device card:
Note: The icons in List view are similar but not identical to those shown below. The options are displayed in the toolbar above the device list.
| Option | Use this to ... |
|---|---|

|
For Available or Reserved for me devices, access the device remotely. This reserves the device for 30 minutes or uses an existing reservation, allowing you to interact with the device If the device is Reserved and In Use By Me, the interaction with the device in the remote session will be limited. Most options in the control panel will not be available. However, this option is useful when you want to remotely connect to a device while an unattended test (such as an Appium test) is running. If the device is Reserved for or In use by others, or if you do not have the adequate license capacity, this button will be disabled. For more details of device states, see View and manage device reservations.
When you are finished working with the device, click the For information about exploratory testing and interacting with the device, see Device access window. Note:
|

|
Remove device. Remove a Disconnected device. To remove a device with another status, it must first be disconnected from UFT Mobile. |

|
Unlock device. Release a device that is locked. For example, if a device was not automatically unlocked when the test finished, or if another user needs to perform some urgent validation of an app on a specific device model, the administrator may need to unlock a device. |

|
Download Dev Access.
Dev Access enables you to connect devices in the UFT Mobile lab from within your developer IDE. For details, see Dev Access and Dev Access CLI tool. Note that Dev Access is not supported on ADF devices and on emulators. |
|
|
Opens the Device Information window. The top section contains general information about the device: its ID; name; workspace; and availability. This window has four tabs: Details, Metrics, Reservations and Actions. Tip: Access the Device Information window by clicking the lower section of a device card (for example, where it says "Available"). |
| More > Details |
Share a specific device with testers by using the device's URL string. They can access the device directly with the URL string, without having to open the UFT Mobile lab and manually navigate to the device. |
| More > Metrics |
Provides admins and users with additional information to help understand device health and if a device is ready for running tests. Metrics include details such as:
You can also get an alert when a device metric such as WiFi connectivity, thermal state, or device temperature deviates from a configured threshold value. For details, see the section on device health settings in Administration settings. |
| More > Reservations | A list of current reservations for the device, and an option to create a new reservation. |
| More > Actions |
Interact with the device:
|
 button in the top right-hand corner of the remote window. This closes the session and deletes the device reservation.
View and manage connectors
Shared space admin users can click
You can perform the following actions in the Connectors tab:
| View device and Agent details |
To view the devices associated with a specific connector, click the X Devices link in the row of the desired connector. The Devices view opens with the devices filtered for the selected connector. If you enabled the Micro Focus Hosted Device Lab integration in the Administration settings, you will see the hosted device lab connectors too. You can also see when the Agent apps were last distributed to connectors, and by hovering over the |
| Add a new connector |
Click Download Connector. If you are a non-admin user, you need your administrator to provide you with an access key before you can install connectors and connect devices. For details, see Access key management. For more details on installing connectors, see Install the connector on a Windows machine, Install the connector on a Linux machine or Install the connector on a Mac machine. |
| Distribute the Agents | Distribute the Agents to selected connectors:
|
| Reconnect Devices |
Click the Reconnect devices  button at the top of the grid. This step is required after the Agent app distribution status is complete. Select multiple rows to perform this action on several connectors at once. button at the top of the grid. This step is required after the Agent app distribution status is complete. Select multiple rows to perform this action on several connectors at once.
|
| Remove a connector | This can only be done for a disconnected connector. The button only removes the connector from the list of connectors; it does not delete the physical connector installed on a remote machine. When a connector that has been removed is restarted, it will be displayed again in the grid |
 icon, the versions of the Agent apps that were last distributed.
  button at the top of the grid.
 Tip: You can select multiple connectors and apply an action to all the selected connectors.
View and manage device reservations
Click

To create a reservation:
-
Click + New Reservation to open the Create Reservation window.
-
Select a device or several devices.
Note: You can make a reservation for a specific device, provided that you have access to the workspace to which it is assigned. Your administrator can set up workspaces and assign you to one or more of them.
-
Select the date and time for starting and ending the reservation.
Your administrator may have set limits for device reservations. These may impact the number of reservations that you can make and the total time that you can reserve devices from a specific workspace or from Shared assets.

After you reserve a device, it will be locked for you at that time. The Reservations screen indicates that you reserved it, and shows the start and end times.
The reservation status of a device is also displayed in the Devices screen. In card view, a triangular emblem at the bottom right of the device indicates its status. In list view, the status is indicated in the availability column.
| Card | List | Reservation status |
|---|---|---|

|

|
Reserved for you |

|

|
Reserved and in use by you |

|

|
Reserved for someone else |

|

|
Reserved and in use by someone else |
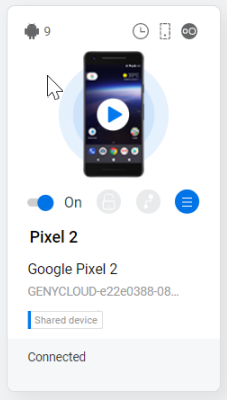
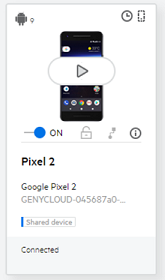
Connect a Genymotion Cloud emulator
Emulated devices are indicated by the Emulator icon  . Genymotion cloud devices are indicated by the Genymotion device icon
  .
.
To connect a Genymotion Cloud emulator to UFT Mobile:
In card view, move the On/Off toggle to On. Wait for the card to show the Connected status. The emulator is now ready to be used for automated or manual testing. The clock icon lets you see when the emulator was connected.
To stop using an emulated device, move the On/Off toggle on the device card to Off.
To add more emulators, see Genymotion Cloud integration. To remove the emulated devices, disable the integration in the Administration settings.
Connect AWS Device Farm devices
You can use Amazon Device Farm (ADF) devices in all your testing scenarios:
| UFTM Lab console | You can add an ADF device from the UFT Mobile lab. For details, see Add an ADF device to the lab below. |
| Micro Focus testing tools |
To select ADF devices with Micro Focus testing tools, open the UFT Mobile wizard. With this option, the device is connected at the beginning of a test and disconnected at the end. We do not recommend using this if you want to use a device for more than one test because you will need to wait for the device to connect for each test. |
| CI (Continuous integration) | To use an ADF device in CI (Continuous integration) testing, connect it using REST API calls. For details, see Using ADF devices with CI below. |
- Note:
-
Test duration on AWS is limited to 150 minutes. To extend this time, contact Amazon.
-
Amazon Fire devices are not supported.
-
If you choose a device based on capabilities, but do not specify an exact operating system, the device will not appear in the UFT Mobile lab console until after the device initialization is complete.
To add an ADF device from the UFT Mobile lab console:
- Set up the AWS Device Farm integration.
- In the Device Lab tab, click + and choose Connect an AWS device from the dropdown. This option will only be enabled if the AWS Device Farm integration is valid.
If no devices are connected to the lab, click Connect Device under the AWS device farm option on the initial Devices page. The connect ADF device wizard is displayed. - In the Device tab of the wizard, select a device to connect.
- You can use capabilities to filter devices. Set the capabilities in the filter pane on the left. You can select a device by OS, OS version, manufacturer, model , fleet type: public or private, and availability. The list of matching devices, and their availability, are displayed.
- You can set the filter selections according to the characteristics of a specific device, by clicking the
 icon next to the device. To clear the filter, click Clear at the top of the filter section.
- In the Apps tab of the wizard, you can choose the apps to install on the device. The apps available are determined by the device that you selected. For example, if you selected an iOS device in t the Device tab of the wizard, only iOS apps will be available in the Apps tab.
Note: For public iOS devices, the ADF signing service can only be used while setting up the device. You will not be able to install apps on public iOS devices at a later time. For private ADF devices, provided that you add the device ID to your provisioning profile, you can install apps on a private ADF device using the app interactions in the control panel. For details, see Device access window.
- Click Connect device.
-
When the device is connected, the device's card shows an
 icon indicating that it is an ADF device, and the icon if the device is a public device. A clock icon lets you see when the ADF device was connected. The device will remain connected until selecting Remove, or until the ADF project execution timeout is reached. When the ADF device reaches its maximum usage time, its status will indicate that it is disconnected.
 ADF devices will no longer be displayed in the lab if the following cases:
- The ADF connector is disabled
- AWS settings become invalid
Use ADF devices with CI
You can use an ADF device in CI (Continuous integration) testing using REST API calls. First make sure you have enabled AWS as described in AWS Device Farm integration.
To connect a device:
-
Obtain the device ID with one of the following API calls:
POST /rest/v2/awsDeviceCheck the response for the deviceID value. GET /rest/device/{deviceID}Use a temporary parameter deviceID. Continue to poll the status until the device becomes registered.
-
After you have the deviceID value, this indicates that the device is connected. Pass the parameter storing the device ID to your REST calls in your CI job.
- Note:
- Make sure the total expected duration of the tests you plan to run on a connected device does not exceed the ADF timeout.
- After the tests are complete, remove the ADF device from UFTM using the remove device API.
For details about using the REST API, see REST API reference for UFT Mobile.
Download a video recording of a test
After a test run, you can download a video recording of the test from the Video section of the page.
You can also download the connector log for the ADF host. For details, see Troubleshooting below.
Troubleshooting
Why can't I see all my devices?
Check the filter panel to see what options are selected. UFT Mobile displays only the items that fit the filter conditions. To display all items, select all the filter options and clear the search field of any text that you have entered.
To see a device, you need to have access to the workspace to which the device belongs. Make sure that your administrator has allowed you access to the devices you need to test.
Why is my device still locked after I closed the remote view?
If a device remains locked after you ended the remote device session, click Refresh in the Devices tab.
Why is the spinning icon still spinning?
If you use photo or video simulation after installing an app through the Control Panel's device interaction—if you click Install app  again, the spinning icon will remain. Workaround: End the remote device session and reopen it.
How can I download logs for ADF devices?
After a test run, download the connector log for the ADF host from the Amazon Device Farm test run page. In your ADF project Run & Sessions page, select the required test run. In the Files section, click Customer Artifacts to download a zip file with the logs. The connector logs are located in the Host_Machine_Files\$DEVICEFARM_LOG_DIR\log folder.
In this topic:
Device display
Click Device Lab > Devices to display the devices in the Lab.
- Shared space administrators will see all the devices that have been connected to UFT Mobile. A shared space admin user will also have full control over the devices and the workspaces to which they belong.
- Other users will see all UFT Mobile shared devices (devices in Shared Assets), as well as devices assigned to the workspace in which they are working.
In the top right-hand corner, you can see the number of devices that match the current filter, out of the total number of connected devices.
You can also view the devices in a list. Click the List and Card view buttons to toggle between the views. In list view, you can also change the sort order (ascending or descending) of a column.
The following details are displayed in the device card:
| Device Host |
The device host type, for example, for a hosted device or for an Amazon ADF device. For details about hosted devices, see UFT Mobile hosted device lab integration. In the Filter pane, use the Features options to filter by the type of device such Physical, Emulator, Hosted, or Amazon Device. for a hosted device or for an Amazon ADF device. For details about hosted devices, see UFT Mobile hosted device lab integration. In the Filter pane, use the Features options to filter by the type of device such Physical, Emulator, Hosted, or Amazon Device.
|
| Settings app blocked |
If your administrator has not granted permission to change the settings on the device, the settings app blocked icon will be displayed. Note that while you can still interact with the Settings app, replay will fail with a 2700 error.
|
| Operating System and version | A read-only field in the card's top left corner. |
| Device name | Click the name to edit it. The default is the model number of the device. Note that if your administrator has not granted you permission to update this field, you will not be able to edit the device name. |
| Manufacturer, model, and ID | A read-only field indicating the device information. |
| Workspace name | The workspace to which the device is assigned. |
| Device health |
The icon indicates an issue with the device health. It is only displayed if one of the metrics exceeds the defined threshold. Hover over the icon to see details about the exceeded threshold. Shared space admin users can configure thresholds for all device health indicators in the Administration settings.
|
| Maintenance mode | The icon indicates that the device is in maintenance mode. Only shared space admin users can access devices that are in maintenance mode. |
| Reservations | The reservations for the device. For example, Available or Reserved by... Until. Click this section to view and create reservations. A triangular emblem at the bottom right of the device indicates its status. For details, see View and manage device reservations. |
Note: To use iOS devices with UFT Mobile you must re-sign the Agent apps with a development certificate of an Apple Developer account. For details, see Re-sign the Agent apps. This is not required when using UFT Mobile hosted devices.
Finding specific devices
Find a specific device in one of the following ways:
- Search. In the right pane, click the Search button. In the text box, specify the name, device ID, model, or manufacturer of the device.
-
Filter. To focus on the information that is important to you, use the left panel filter in the Devices screen to limit what items are displayed. Using the filter panel, specify your criteria in the following areas:
OS Operating System: Android or iOS. Use the slider to select an OS version. Features The type of device: Physical or Emulator; Phone or Tablet Availability You can filter devices according to the following availability options:
- Available. Available devices
- Reserved for me. Devices reserved for you or that are currently in use by you.
- Reserved for others. Devices that have been reserved for someone else or are currently in use by someone else.
- Disconnected. Devices that are not connected. The thumbnails of disconnected devices are faded. Hover over the icon to view the issues that were detected when trying to connect the device.
- In maintenance. Devices on which maintenance mode has been activated. Non shared space admin users are not able to access these devices.
- Not in maintenance. Devices on which maintenance mode has not been activated. Because non shared space admin users are not able to access devices in maintenance, this option is useful to filter out devices that temporarily cannot be used.
Connector The connector whose devices you want to display. Workspace Display devices assigned to a specific workspace. Tip: Use the Clear link in the upper right corner of the filter panel to remove all your device filters.
Device management
When you hover over a specific device in Card view, or select it in List view, the device management options are displayed. In List view, the options are displayed in the toolbar above the device list.
| Option | Use this to ... |
|---|---|

|
Open device remotely. For Available or Reserved for me devices, access the device remotely. This reserves the device for 30 minutes or uses an existing reservation, allowing you to interact with the device If the device is Reserved and In Use By Me, the interaction with the device in the remote session will be limited. Most options in the control panel will not be available. However, this option is useful when you want to remotely connect to a device while an unattended test (such as an Appium test) is running. If the device is Reserved for or In use by others, or if you do not have the adequate license capacity, this button will be disabled. For more details of device states, see View and manage device reservations.
When you are finished working with the device, click END SESSION in the top right-hand corner of the remote window to close the session and delete the device reservation. For information about exploratory testing and interacting with the device, see Device access window. Note:
|
UFTM 2021:

|
Open the device remotely and start to record the session. Open the device remotely and record the steps that you perform to conduct exploratory testing. You can then download a file with the steps. For details, see Manual Testing. UFTM 2021 R1: The record option is available in the exploratory testing panel. For details, see Start a testing session. The ability to access and interact with the device depends on the availability status of the device, and works in a similar way as described in the Open device remotely option above. |

|
Remove device. Remove a Disconnected device. To remove a device with another status, it must first be disconnected from UFT Mobile. |

|
Unlock device. Release a device that is locked. |

|
Dev Access. Download Dev Access. |

|
Device Health. Hover over the icon to see details about the exceeded threshold. This indicator is only displayed if one of the metrics exceeds the defined threshold. Shared space admins can configure the thresholds for all device health alerts in the Administration settings. |
|
2021 R1: 2021: |
More/ More Information: Opens the Device Information window. The top section contains general information about the device: its ID; name; network connectivity level; workspace; and availability. The network connectivity level represents the latency between the client and connector to which the device is connected. Hover over the latency icon This window has four tabs: Details, Metrics, Reservations and Actions. Tip: Access the Device Information window by clicking the lower section of a device card (for example, where it says "Available"). |
| More > Details |
Share a specific device with your testers using the device's URL string. They can access the device directly with the URL string, without having to open the UFT Mobile lab and manually navigate to the device. |
| More > Device Metrics |
Provides admins and users with additional information to help understand the device health and if it is ready for running tests. Metrics include details such as:
You can also get an alert when a device metric such as WiFi connectivity, thermal state, or device temperature deviates from a configured threshold value. For details, see the section on device health settings in Administration settings. |
| More > Reservations | A list of current reservations for the device, and an option to create a new reservation. |
| More > Actions |
Interact with the device:
|


 to view its value, for example, Remote view latency: 18 ms. For optimal remote view performance, select a device with good latency. The latency is considered good if it is less than 100 ms (green), mediocre if it ranges between 100 and 200 ms (yellow), poor if it ranges between 200 and 300 ms (red), and bad if it exceeds 300 ms (gray).
 View and manage connectors
Shared space admin users can click
You can perform the following actions in the Connectors tab:
| View device and Agent details |
To view the devices associated with a specific connector, click the X Devices link in the row of the desired connector. The Devices view opens with the devices filtered for the selected connector. If you enabled the Micro Focus Hosted Device Lab integration in the Administration settings, you will see the hosted device lab connectors too. You can also see when the Agent apps were last distributed to connectors, and by hovering over the |
| Add a new connector |
Click Download Connector. If you are a non-admin user, you need your administrator to provide you with an access key before you can install connectors and connect devices. For details, see Access key management. For more details on installing connectors, see Install the connector on a Windows machine, Install the connector on a Linux machine or Install the connector on a Mac machine. |
| Distribute the Agents | Distribute the Agents to selected connectors:
|
| Reconnect Devices |
Click the Reconnect devices button at the top of the grid. This step is required after the Agent app distribution status is complete. Select multiple rows to perform this action on several connectors at once.
|
| Remove a connector | This can only be done for a disconnected connector. The button only removes the connector from the list of connectors; it does not delete the physical connector installed on a remote machine. When a connector that has been removed is restarted, it will be displayed again in the grid |
Tip: You can select multiple connectors and apply an action to all the selected connectors.
View and manage device reservations
Click
To create a reservation:
-
Click + NEW RESERVATION to open the Create Reservation window.
-
Select a device.
Note: You can make a reservation for a specific device, provided that you have access to the workspace to which it is assigned. Your administrator can set up workspaces and assign you to one or more of them.
-
Select the date and time for starting and ending the reservation.
Your administrator may have set limits for device reservations. These may impact the number of reservations that users and workspace admin users can make, and the total time that devices from a specific workspace can be reserved.
After you reserve a device, it will be locked for you at that time. The Reservations screen indicates that you reserved it, and shows the start and end times. A triangular emblem at the bottom right of the device indicates its status:
|
|
Reserved for you |
|
|
Reserved and in use by you |
|
|
Reserved for someone else |
|
|
Reserved and in use by someone else |
Working with Genymotion Cloud emulators
Emulated devices are indicated by the Emulator icon in the top corner of their cards.
To connect a Genymotion Cloud emulator to UFT Mobile:
In card view, move the ON/OFF toggle to ON. Wait for the card to show the Connected status. The emulator is now ready to be used for automated or manual testing. The clock icon lets you see when the emulator was connected.
To stop using an emulated device, move the ON/OFF toggle on the device to OFF.
To add more emulators, see Genymotion Cloud integration. To remove the emulated devices, disable the integration in the Administration settings.
Connect AWS Device Farm devices
You can use Amazon Device Farm (ADF) devices in all your testing scenarios:
| UFTM Lab console | You can add an ADF device from the UFT Mobile lab. For details, see Add an ADF device to the lab below. |
| Micro Focus testing tools |
To select ADF devices with Micro Focus testing tools, open the UFT Mobile wizard. With this option, the device is connected at the beginning of a test and disconnected at the end. We do not recommend using this if you want to use a device for more than one test because you will need to wait for the device to connect for each test. |
| CI (Continuous integration) | To use an ADF device in CI (Continuous integration) testing, connect it using REST API calls. For details, see Using ADF devices with CI below. |
- Note:
-
Test duration on AWS is limited to 150 minutes. To extend this time, contact Amazon.
-
Amazon Fire devices are not supported.
-
If you choose a device based on capabilities, but do not specify an exact operating system, the device will not appear in the UFT Mobile lab console until after the device initialization is complete.
Add an ADF device to the lab
To add an ADF device from the UFT Mobile lab console:
- Set up the AWS Device Farm integration.
- In the DEVICE LAB tab, click + Device. If no devices are connected to the lab, Click Connect Device on the initial Devices page.
- Choose Select a device from ADF from the dropdown. This option will only be enabled if the AWS Device Farm integration is valid.
- In the How To popup, click Connect Device to open the ADF device selection wizard.
- Connect a device to your lab according to the following guidelines:
You can use capabilities to select a device. Set the desired capabilities and choose an OS, an OS version, manufacturer, model and fleet type: public or private. The list of matching devices, and their availability, are displayed.
Tip: Populate the desired capabilities fields according to the characteristics of a specific device, by clicking the
 icon next to the device. To clear the set capabilities, click CLEAR at the top of the capabilities section.
Select a specific device from the list of matching devices or have UFT Mobile automatically select the device. When using automatic selection, the device with the best availability status will be allocated. - In the APPS tab of the wizard, select the apps to install on the device, and click CONNECT DEVICE.
For public iOS devices, the ADF signing service can only be used while setting up the device. You will not be able to install apps on public iOS devices at a later time. For private ADF devices, provided that you add the device id to your provisioning profile, you can install apps on a private ADF device using the app interactions in the control panel. For details, see Device access window.
-
When the device is connected, the device's card shows an
icon indicating that it is an ADF device. A clock icon lets you see when the ADF device was connected. The device will remain connected until selecting Remove, or until the ADF project execution timeout is reached. When the ADF device reaches its maximum usage time, its status will indicate that it is disconnected. ADF devices will no longer be displayed in the lab if the following cases:
- The ADF connector is disabled
- AWS settings become invalid
Use ADF devices with CI
You can use an ADF device in CI (Continuous integration) testing using REST API calls. First make sure you have enabled AWS as described in AWS Device Farm integration.
To connect a device:
-
Obtain the device ID with one of the following API calls:
POST /rest/v2/awsDeviceCheck the response for the deviceID value. GET /rest/device/{deviceID}Use a temporary parameter deviceID. Continue to poll the status until the device becomes registered.
-
After you have the deviceID value, this indicates that the device is connected. Pass the parameter storing the device ID to your REST calls in your CI job.
- Note:
- Make sure the total expected duration of the tests you plan to run on a connected device does not exceed the ADF timeout.
- After the tests are complete, remove the ADF device from UFTM using the remove device API.
For details about using the REST API, see REST API reference for UFT Mobile.
Download a video recording of a test
After a test run, you can download a video recording of the test from the Video section of the page.
You can also download the connector log for the ADF host. For details, see Troubleshooting below.
Troubleshooting
Why can't I see all my devices?
Check the filter panel to see what options are selected. UFT Mobile displays only the items that fit the filter conditions. To display all items, select all the filter options and clear the search field of any text that you have entered.
To see a device, you need to have access to the workspace to which the device belongs. Make sure that your administrator has allowed you access to the devices you need to test.
Why is my device still locked after I closed the remote view?
If a device remains locked after you ended the remote device session, click Refresh in the Devices tab.
Why is the spinning icon still spinning?
If you use photo or video simulation after installing an app through the Control Panel's device interaction—if you click Install app again, the spinning icon will remain. Workaround: End the remote device session and reopen it.
How can I download logs for ADF devices?
After a test run, download the connector log for the ADF host from the Amazon Device Farm test run page. In your ADF project Run & Sessions page, select the required test run. In the Files section, click Customer Artifacts to download a zip file with the logs. The connector logs are located in the Host_Machine_Files\$DEVICEFARM_LOG_DIR\log folder.