Share this page


Device access window
When opening a device remotely from the lab, you can interact with the device using the actions and features available in the device access window. You can also perform exploratory testing sessions on a device. These sessions can be recorded.
In this topic:
Open a device remotely
You can access a device remotely either from the Lab console, or using one of the testing tools that integrates with UFT Mobile.
To open a device remotely:
| UFT Mobile lab |
Hover over a device in card view and click When you open a device remotely from the mobile lab, you can also record an exploratory testing session, perform accessibility testing, and examine the live log. For more details, see Manual Testing. |
| Testing tools | With tools that integrate with UFT Mobile such as UFT One, Sprinter, and TruClient, access a device by beginning your record or replay session. |
 (2021 R2)/
  Open device remotely in the toolbar in List view. Click the List
 Interact with the device using the actions in the toolbar next to the device, and the options in the panels on the left and right-hand side of the device access window. You can collapse the panels, change the order of the tabs at the top of the panel, and drag and drop tabs from one panel to another.
Secure connection only (HTTPS): When using the default self-signed certificate, the browser displays a warning or error when you first try to access a device through a connector with a secure connection. For web browsers to trust the certificate, the SSL certificate must be issued by a recognized Certificate Authority (CA). The connector's self-signed certificate still encrypts data, however the warning is to inform you that the SSL certificate was self-signed and is not signed by a CA. To view the device, navigate to the URL of the connector and trust the self-signed SSL certificate.
Note: Depending on the tool that you are using and the testing state (idle, capturing, or running), certain options may not be available.
Device actions & simulations
Use the toolbar next to the device to interact with the device during the capture or replay session, or when idle. The simulation options enable you to perform common event simulations. Note that some simulations are not available when conducting exploratory testing from the Lab console, and are only available when accessing the device remotely with a supported testing tool.

|
Take screenshot. Saves a screenshot of the current screen as a <step_number>.png file to your default download folder. (Not supported when accessing the UFT Mobile Lab console through a Safari browser.)
|

|
Download device logs.
Downloads the device logs as a text file to your default download folder . For iOS devices, the time zone on the device must match the time zone on the connector machine. Note: Not supported when accessing the UFT Mobile Lab console through a Safari browser |

|
Send text to device. Send text for inputting to active field on the device. In the Send text to device window, enter the text you want to copy to an active input field on the device, and click Send. |

|
Device audio. Hear audio from a remote device on your local machine. In the device audio dialog, click the play button

|

|
Simulate incoming call. In the dialog box that opens, indicate the number calling, and how to handle the call. |

|
Simulate incoming SMS. In the dialog box that opens, indicate the number sending the message and the message text. Note: SMS simulations are not supported for Android 6 and above. |

|
Simulate sending app to background. In the dialog box that opens, indicate the duration for which the app should be sent to the background. |

|
Simulate photo. Enables you to replace the photo taken by the device's camera. In the dialog box that opens, specify an image file. For details, see Photo and video simulation. Note: Supported only for packaged apps. |

|
Simulate video. Enables you to replace the video taken by the device's camera. In the dialog box that opens, specify a video file. For details, see Photo and video simulation. Note: Supported only for packaged apps. |

|
QR code or barcode scan. Enables you to replace a scan of a QR code or barcode with an image. For details, see QR code and barcode simulation. |

|
Simulate GPS relocation. In the dialog box that opens, specify the latitude and longitude for the simulation. Note: For iOS, GPS simulation is only supported for packaged apps. For Android 6.0 and higher, you need to set the mock location app as follows: Developer options > Select mock location app and select UFTM Agent. |

|
Simulate authentication. Enables you to simulate Fingerprint or Face ID authentication on mobile devices. Authentication Simulation is active by default on packaged apps that require fingerprint or face ID authentication. Navigate to the screen in the app that uses authentication. When prompted, select an authentication result. For details, see Fingerprint and Face ID simulation. Note: Supported for packaged apps only. |
|
|
Network Virtualization. Simulate network conditions to test how various mobile networks affect your application's performance on different mobile devices. For details, see the Network Virtualization Help Center. (Disabled for Genymotion or AWS devices) |

|
Change orientation. Toggles the orientation of the device between portrait and landscape orientation (also available when idle, when you are not capturing or replaying a test). |

|
Home. Returns to the home page of the device. |

|
Back. (Android only) Opens the previous screen. |

|
Recent apps. (Android only) Switches back to previously used apps. |
 to start playing audio from the device. This option is enabled only for devices running on iOS 13.2 and later.
Device info
You can view device properties including the device type, name, and operating system (OS) details. To view device information, click the Device info button in the panel on the side of the device access window.
The device properties such as the device type, name, device ID, operating system (OS), and OS version are displayed at the top of the panel. The panel also includes the following:
Zoom
The current zoom level. Use the plus and minus signs to zoom in and out.
Image quality
Adjust the resolution of the images displayed on the device. You can scale down the image to the desired size. Scaling down an image lowers its quality, but improves the performance of your tests and other interactions with the device.
Your scaling preference is preserved per browser and machine.
Latency
The latency between the client and the connector to which the device is connected. The latency level is indicated as follows:
| Color | Rating | Value |
|---|---|---|
| Green | Good | Less than 100 ms |
| Yellow | Mediocre | From 100 - 200 ms |
| Red | Poor | From 200 - 300 ms |
| Gray | Bad |
Exceeding 300 ms |
More info
To learn more about the device and its reservations, or to perform an action on the device (such as Restart or Reconnect) click More info.
Device metrics
Device metrics are only available when accessing a device using a testing tool, not when interacting with a device from the lab console.
Note: For iOS devices, device metrics are supported for packaged apps only.
This section lets you view the device metrics collected during the test. You can only select which metrics to collect via your testing tool's options.
- CPU. CPU usage during the test run.
- Memory. The amount of memory used during the test run.
Note: Not supported for Android 10 and later. - Free Memory. The amount of free memory on the device, during the test run.
-
WiFi State. Enables both WiFi state (connected or disconnected) and signal strength (scale of 1-5)*.
-
Disk space. Includes space in use, and total space available*.
-
Thermal state. Supported only on iOS version 11 and above iOS 11 and later, and for Android 10 and later*.
For more details on the thermal states for iOS device, see the Apple Developer documentation. For more details on the thermal states for Android devices, see the Android open source project.* Available only when using UFT One 15.0.2 and later.
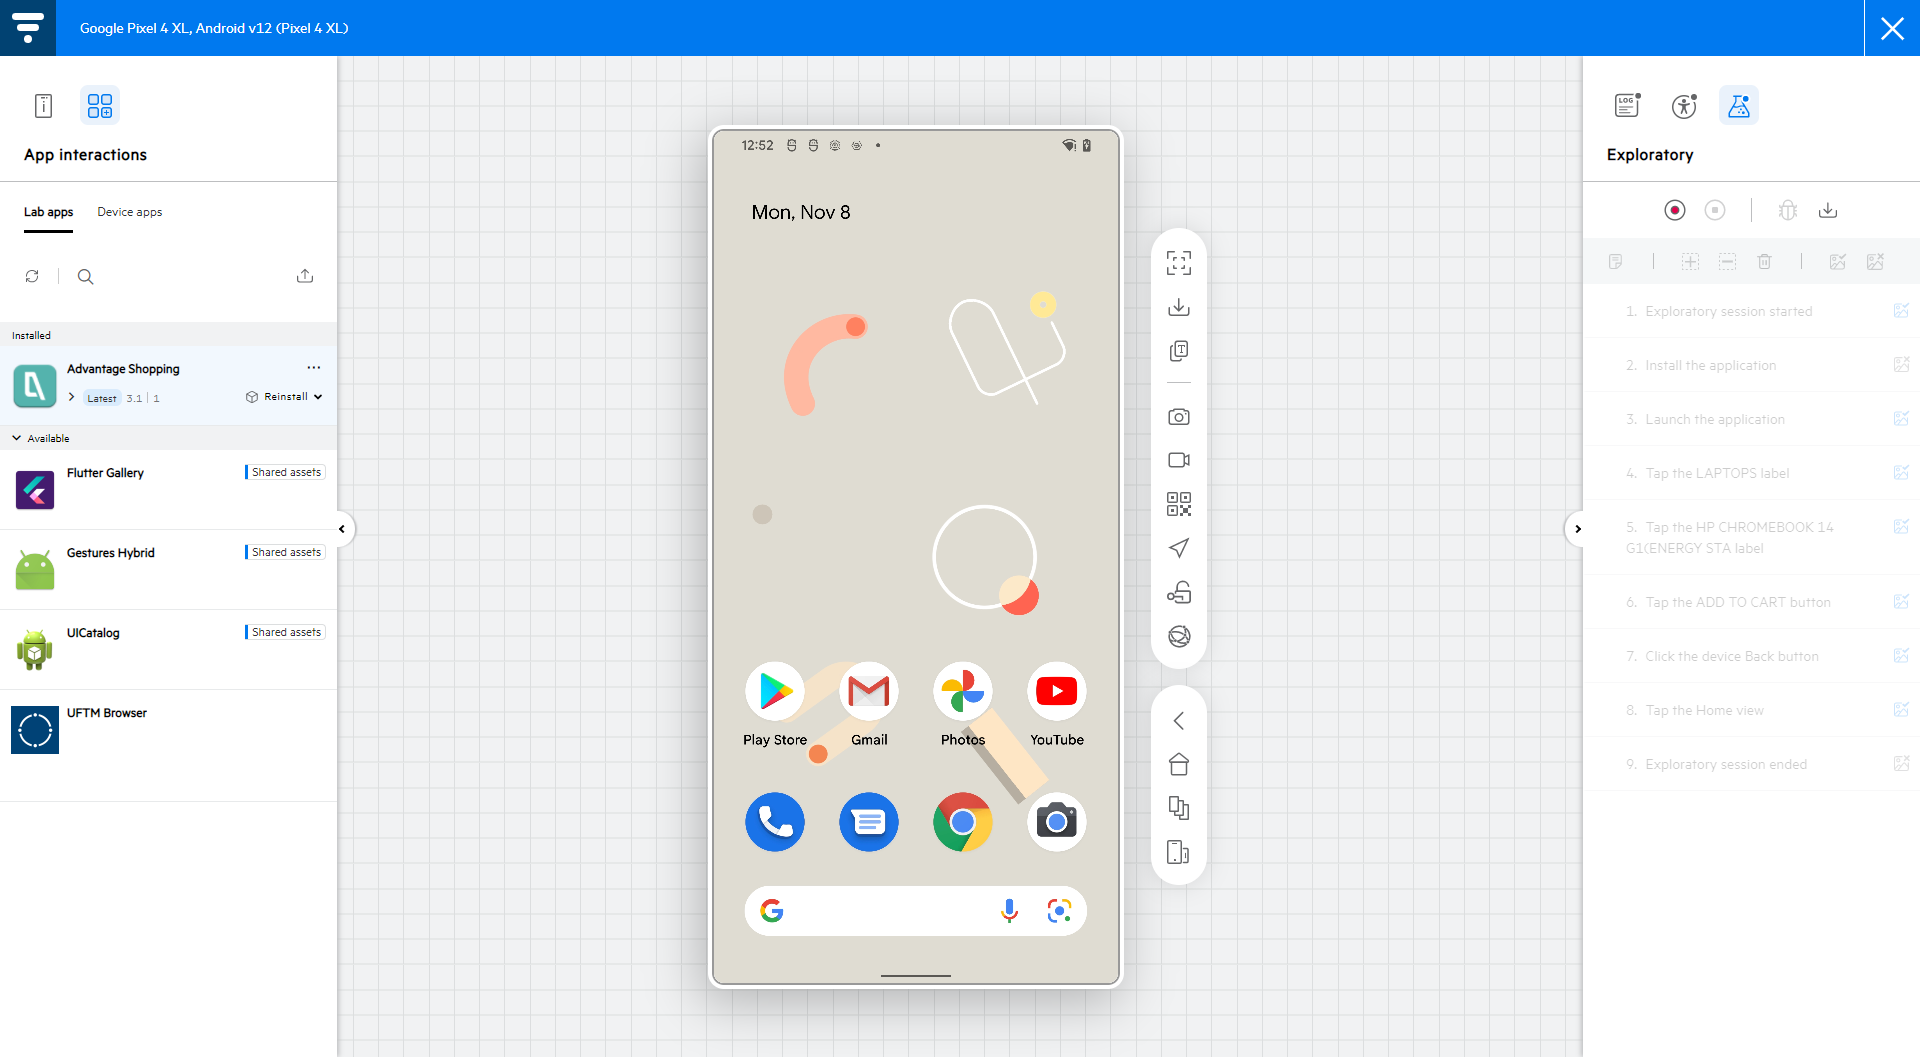
App interactions
You can interact with apps uploaded to UFT Mobile (lab apps) , that may already be installed on the device, or other apps installed on the device. To interact with apps, click the  App interactions button in the panel on the side of the device access window. You can tab between lab apps, and apps installed on the device.
Lab apps
Lab apps are displayed with their version and build numbers. To view the upload versions available, click the dropdown next to the version number.

You can reinstall an app that is installed on the device, or install an app that was uploaded to the lab but is not installed on the device. When reinstalling or installing an app, you can choose whether to use the packaged version of the app, and if the app should be uninstalled when the device session ends. If the app you want to install is not shown, you can upload it by clicking the Upload button in the app interactions toolbar.
Interaction options
Select an app and click the More button  for the following app interactions:
| Launch | Start an app that is already installed on your device. |
| Force stop | End all processes related to an app. |
| Uninstall | Uninstall the selected upload version of the app. |
| Manage | Opens the More info window of the app, where you can view app details or delete an application upload. |
Note:
- Some options are available only for lab apps
- App interactions are currently available from the UFT Mobile Lab console, and from UFT Developer only.
- For private ADF iOS devices, provided that you add the device ID to your provisioning profile, you can install apps on a private ADF device using the app interactions. For public iOS devices, the ADF signing service can only be used while setting up the device, therefore apps need to be installed when setting up the device.
In this topic:
Accessing the device control panel
The Control Panel is available from:
- The UFT Mobile lab, as exploratory interaction with the device. To access it, open the device remotely by clicking
 or
or  while hovering over a device in Card view, or by clicking Open or Open & Record in List view. Click the List
  and Card view
  buttons in the upper right corner to toggle between the views.
 - Testing tools that integrate with UFT Mobile such as UFT, Sprinter, and TruClient. To access it, begin your record or replay session.
Secure connection only (HTTPS): When using the default self-signed certificate, the browser displays a warning or error when you first try to access a device through a connector with a secure connection. For web browsers to trust the certificate, the SSL certificate must be issued by a recognized Certificate Authority (CA). The connector's self-signed certificate still works to encrypt data, the warning is letting you know that the SSL certificate was self-signed and is not signed by a CA. To view the device, you need navigate to the URL of the connector and trust the self-signed SSL certificate.
Note: Depending on the tool that you are using and the testing state (idle, capturing, or running), certain options may not be available.
Device interactions
This section lets you interact with the device during the capture or replay session, or when idle.
|
|
Change orientation. Toggles the orientation of the device (also available when idle, when you are not capturing or replaying a test). |

|
Take screenshot. Saves a screenshot of the current screen as a <step_number>.png file to your default download folder. (Not supported when accessing the UFT Mobile Lab console through a Safari browser.)
|

|
Download device logs.
Downloads the device logs as a text file to your default download folder (not supported when accessing the UFT Mobile Lab console through a Safari browser). For iOS devices, the time zone on the device must match the time zone on the connector machine. |

|
Applications interactions.
Lab Apps are displayed with their version and build numbers. To select a different upload version, hover on the app and click More info
App interactions are currently available from the UFT Mobile Lab console, and from UFT Developer only. Note: For private ADF iOS devices, provided that you add the device id to your provisioning profile, you can install apps on a private ADF device using the app interactions For public iOS devices, the ADF signing service can only be used while setting up the device, and so apps need to be installed when setting up the device. |

|
Send text to device. Opens the Send text to device window. Enter the text you want to copy to an active input field on the device, and click Send. |

|
Live log: Opens the live log panel so that you can examine the device log in real time and investigate issues encountered during testing. To use live log:
|

|
Device audio. Opens the device audio dialog, to hear audio from a remote device on your local machine. Click the play button
|
 . If the app you want to install is not shown, you can upload it by clicking Upload in the
  to start the live log.
  to stop the live log.
 Simulations
The Simulations section lets you perform common event simulations. Some simulations are not available when conducting exploratory testing from the Lab console, and are only available when accessing the Control Panel using testing tools.

|
Simulate incoming call. The dialog box that opens lets you indicate the number calling, and how to handle the call. |

|
Simulate incoming SMS. The dialog box that opens lets you indicate the number sending the message and the message text. Note: SMS simulations are not supported for Android 6 and above. |

|
Simulate sending app to background. The dialog box that opens lets you indicate the duration for which the app should be sent to the background. |

|
Simulate GPS relocation. The dialog box that opens lets you specify the latitude and longitude for the simulation. Note that for iOS, GPS simulation is only supported for packaged apps. For Android 6.0 and higher, you need to set the mock location app as follows: Developer options > Select mock location app and select UFTM Agent. |

|
Simulate photo. Supported only for packaged apps. Enables you to replace the photo taken by the device's camera. The dialog box that opens lets you specify a image files. For details, see Photo and video simulation. |

|
Simulate video. Supported only for packaged apps. Enables you to replace the video taken by the device's camera. The dialog box that opens lets you specify a video file. For details, see Photo and video simulation. |

|
QR code or barcode scan Enables you to replace a scan of a QR code or barcode with an image. For details, see QR code and barcode simulation. |

|
Simulate authentication. Supported for packaged apps only. Enables you to simulate Fingerprint or Face ID authentication on mobile devices. Authentication Simulation is active by default on packaged apps that require fingerprint or face ID authentication. Navigate to the screen in the app that uses authentication. When prompted, select an authentication result. For details, see Fingerprint and Face ID simulation. |
|
|
Network Virtualization. Simulate network conditions to test how various mobile networks affect your application's performance on different mobile devices. For details, see the Network Virtualization Help Center. (Disabled for Genymotion or AWS devices) |
Device metrics
Device metrics are only available when accessing the Control Panel using a testing tool, not when interacting with a device from the lab console.
This section lets you view the device metrics collected during the test. You can only select which metrics to collect via your testing tool's options.
- CPU. CPU usage during the test run.
- Memory. The amount of memory used during the test run.
Note: Not supported for Android 10 and later. - Free Memory. The amount of free memory on the device, during the test run.
Image quality
In this section, you adjust the resolution of the images in the displayed device. You can scale down the image to the desired size.
Scaling down an image lowers its quality, but improves the performance of your tests and other interactions with the device.
Your scaling preference is preserved per browser and machine.
General information
The General information section is located at the bottom of the Control Panel.
Zoom
The current zoom level. Use the plus and minus signs to zoom in and out.
Latency
The latency between the client and the connector to which the device is connected. The latency level is indicated as follows:
| Color | Rating | Value |
|---|---|---|
| Green | Good | Less than 100 ms |
| Yellow | Mediocre | From 100 - 200 ms |
| Red | Poor | From 200 - 300 ms |
| Gray | Bad |
Exceeding 300 ms |
Device info
The device properties such as the device type, name, and ID.
To learn more about the device and its reservations, or to perform an action on the device (such as Restart or Reconnect) click the More information button  to open the Device window.
Manual testing
You can open a device remotely from the mobile lab record an exploratory testing session. To open a device for an exploratory session, click or while hovering over a device in Card view, or click Open or Open & Record in List view. For more details on manual testing, see Start a testing session.