Share this page


Perform exploratory testing with Network Virtualization
This section describes how to do exploratory testing to check your app's behavior on mobile devices with Network Virtualization.
Network Virtualization test modes
After you see Set up Network Virtualization integration in Digital Lab, you can proceed to test your app.
First, decide which mode you would like to use. You can work in Interactive or Transactions mode.
![]()
Interactive mode lets you simulate a true mobile environment:
- Test your app’s performance over different network conditions, such as 3G or 4G.
- Change the network conditions in the middle of an operation.
- Emulate temporary network disconnection.
-
Verify that the app recovers from a network disconnection that occurs during different operations.
Transactions mode lets you mark one or more actions as transactions. You perform the same transactions over different mobile networks. At the conclusion of your test, you can view the NV Insights report that shows a comparison of your app's response times over the different networks and provides performance optimization recommendations. For details, see NV Insights report.

Start the exploratory test
Once you decide on a testing mode, you can begin your testing. See Best practices for Network Virtualization testing for useful guidelines.
-
In Network Virtualization's Devices tab, click the Play
 button on the device to open the remote view. Wait for the Control Panel in the left pane to load. For details, see the Digital Lab Help Center.
 -
In the Control Panel, expand the Network section.
-
Click the NV button
 in the simulations panel. The Network Virtualization window opens.
Tip: Click the Collapse
 and Expand
  buttons to open and close this window.
 -
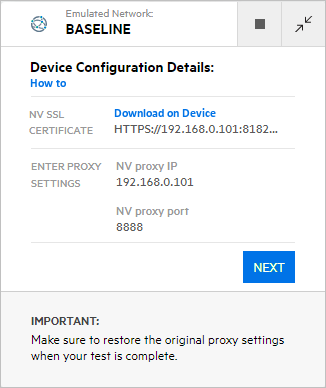
Click Start Emulation. The Network Virtualization window opens, displaying your device's proxy information.
-
Click Download on Device to open the certificate in your device's default browser. You can also manually copy the URL of the certificate into your device's browser. Accept the installation of the certificate on your device.
Note: For Android devices, you will be prompted to provide a name for the certificate. You can provide any name for this certificate.
-
Configure your device to use the NV proxy. For details, see Configure the device to use the NV proxy and certificate.
-
After you have configured the device's proxy click Next.
Perform actions in your app
-
In the Network Virtualization window, select an emulation mode, Interactive or Transactions, as described in Network Virtualization test modes.
-
For Interactive mode, perform actions on your app whose performance your want to test. First, select No emulation to create a baseline for comparison, as described in Best practices for Network Virtualization testing. After you create a baseline, resume the interactive testing.
-
For Transactions mode, create a baseline as described in Best practices for Network Virtualization testing. Mark and perform the transactions. For example, for a Launch app transaction:
- In the Transaction name field, enter the name of the transaction (or select it from the list if you already performed it in this test).
- Click Start Transaction and click the app on the device to launch it.
- When the app finishes loading, click Stop Transaction.
- Repeat steps a-c for additional transactions.
- Change the network profile and repeat this procedure.
- To stop the emulation, click the Stop button
 at the top of the Network Virtualization window.
 -
In the Emulation Ended window, click Download report or Download HAR to download the analysis results. You can use the HAR (HTTP Archive) file to create a test in LoadRunner Cloud.
- Restore the proxy settings on your devices. For details, see Restore the device's proxy settings.
Best practices for Network Virtualization testing
Before performing your network emulations, create a baseline against which to measure your mobile emulations.
You do this by setting the emulation to No emulation in the Network Virtualization window. This mode allows the transfer of traffic through the NV Test Manager server, without applying any emulation. The subsequent emulations that you perform will be compared to the baseline. In the report, you will be able to see the effect of the different mobile networks on your app.
For Interactive mode, perform actions with No emulation to create a baseline. Then, interact in the following ways:
-
Select a single mobile network and perform the same operations as before.
-
Emulate many mobile networks, repeating the same actions on each of the networks.
-
Emulate a broken connection for apps that require Internet. Enter a number in seconds and click Disconnect. This blocks all the traffic from the NV Test Manager server. The title bar of the Network Virtualization window indicates that the device is disconnected. When it reconnects, check that your app was able to recover.
For Transactions mode:
-
Set the mobile network to No emulation to create a baseline.
-
Click Start Transaction.
-
Perform an action, for example a login, or the loading of a web page, that you want to measure.
-
Click End Transaction.
-
Change the mobile network to a value other than No emulation, and select an existing transaction name.
-
Use the Start and End Transaction buttons to create another transaction using this new network, repeating the same actions as in the baseline transaction. By doing this, NV will be able to generate a comparison report of the transaction response times for each of your actions, per mobile network.
 See also: