Create sidebar plugins
You can develop plugins and display them in custom sidebars alongside grids and in the details view. These plugins can interact with a single or multiple items in the grid view, or with a single item in the details view.
Sidebar plugin overview
You can create custom sidebar plugins and add them to all grid and details views that already include pane sidebars, such as Filter and Preview.
For example, you can develop a plugin that contains a link to the Teams channel related to the selected feature, or a sketch board whose contents are added as attachments to the feature.
All main entity types are supported, including requirements, features, and tests.
Sidebar plugins are a type of external action. For the general external action guidelines, see Create external actions.
Implementation examples
Following are examples of sidebar plugins:
-
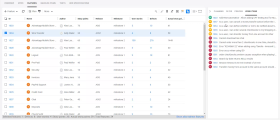
List the work items belonging to the selected feature:
You can download the code for this example in the Templates and sample files section.
-
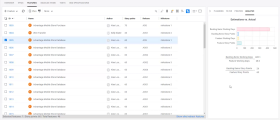
Analyze estimated vs. actual work effort of the selected feature and its items:
-
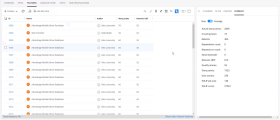
Summary of integer fields of selected features. Supports multi-selection:
Manage sidebars
In the grid and details view, you can choose which sidebar icons are displayed in the toolbar and in the sidebar pane.
In addition, you can also customize the size of the sidebar tabs and the order in which they are displayed in the details view. The sidebar selections are saved with the settings, and are loaded the next time you access the view.
To select the tabs to display:
-
Open the Manage Sidebar tabs dialog box.
-
In the grid view, click the Manage sidebars button
 .
. -
In the details view, click the Manage sidebar button
 .
.
-
-
The Manage Sidebar tabs dialog box opens, displaying the list of sidebars in the workspace and the order in which they appear. This list includes the system sidebars and any custom sidebars that were developed for your workspace. By default, system sidebars are displayed at the top of the list.
To filter the list to display only active sidebar tabs, select the List only active tabs checkbox.
-
Select which sidebar tabs you want to display by turning the relevant switches on or off.
Note:
-
A maximum of eight tabs can be displayed in the details view. If more than eight tabs are selected, any additional tabs are listed under a new tab named More.
-
You cannot hide the Comments sidebar tab in the details view.
-
To customize tab size and order (details view only):
-
In the details view, click the Manage sidebar button
 .
. -
To set the sidebar tab size, under Tab size, select Standard or Compact.
-
To customize the tab order, click the handle
 of a tab that you want to move, and drag and drop the tab to change the tab display order. By default, system sidebars are displayed at the top of the list.
Use REST API in sidebar implementations
You can use the REST API in the sidebar plugin code to access data and post new data in OpenText Core Software Delivery Platform.
The interactive API client allows you to experiment with the API on your shared space data to make API calls from within the UI. For details, see Interactive API client.
For full details on the REST API, see REST API.
Sidebar code samples
This section contains code samples for sidebar plugin actions.
Get a field value
async function getFeature(entityId) {
    const response = await
    fetch(`/api/shared_spaces/${params.shared_space}/workspaces/${params.workspace}
           /work_items/${entityId}?fields=name,wsjf_cod,rroe,job_size`);
    const entity = await response.json();
    return entity;
}
const entity = {
    fieldName: fieldValue,
};

const xsrf = new URL(document.location.href).searchParams.get('xsrf_token')

fetch(
    '/api/shared_spaces/' +
    sharedSpaceId +
    '/workspaces/' +
    workspaceId +
    '/work_items/' +
    entityId,
    {
        headers: {
            'content-type': 'application/json',
            'XSRF-HEADER': xsrf,
        },
        body: JSON.stringify(entityData) ,
        method: 'PUT',
        credentials: 'include',
    }
);
Note the use of XSRF-HEADER. It is required if the plugins are hosted in OpenText Core SDP itself, or if they are hosted in a separate service and communicate using the CORS mechanism. For details, see Use CORS for external actions.
Post events and trigger actions
Events can be triggered by external applications, as shown in the examples below. For more details, see Create external actions.
The following example results in the current entity being refreshed:
{
    event_name: 'octane_refresh_entity',
    shared_space: '1004',
    workspace: '1006',
    data: {
        entity_type: 'work_item',
        entity_ids: ['1003', '4005'],
    },
}
The following example results in a selection being refreshed:
var message = {
    event_name: 'octane_refresh_list',
    shared_space: '1004',
    workspace: '1006',
    data: {
        entity_type: 'work_item',
        entity_ids: ['1003', '4005'],
    },
};
window.opener.postMessage(message, '*');
The following example results in entities in the grid being selected:
{
    event_name: 'octane_select_entity',
    shared_space: '1004',
    workspace: '1006',
    data: {
        entity_type: 'work_item',
        entity_id: '1050',
    },
}
The following example results in Document view being opened for the selected entity:
{
    event_name: 'octane_display_entity',
    shared_space: '1004',
    workspace: '1006',
    data: {
        entity_type: 'work_item',
        entity_id: '1050',
    },
}Templates and sample files
This section includes templates for creating new plugins and examples that show possible uses for plugins.
You can download the following examples. Examples are composed of the zip files and a json configuration to copy to the external action editor when uploading the zip.
| Example | Description |
|---|---|
| feature_work_items.zip |
An implementation of the feature work items example. Use feature_work_items.json for the configuration in the external action editor. |
| external_details.zip |
This plugin showcases all APIs used in the plugin mechanism and is recommended as a template for starting a new plugin project. Use external-details.json for the configuration in the external action editor. |
| external_panel_template.zip |
Empty plugin with no content. Use this to start a new empty plugin project. Use external-details.json for the configuration in the external action editor. |
| external_panel_wsjf.zip |
Plugin with example of changing back a field via REST API. Use external_panel_wsjf.json for the configuration in the external action editor. |
The index.html files in the zips contain references to a style sheet. The css file contains basic styles aligned with OpenText Core SDP's own styles, which you can use to align the plugin's look and feel for a smoother UX.
<link rel="stylesheet" type="text/css" href="/ui/external-actions/style/alm-octane-style.css" />Advanced guidelines
Following are guidelines for advanced work with sidebar plugins.
React to changes in external action parameters
There are two ways to pass parameters to the external action plugin: as query parameters or as hash parameters.
Following is an example of a URL configuration for passing parameters as query parameters:
{octane_url}/api/shared_spaces/{shared_space}/external-entity-actions/bundle/index.html?entity_ids={entity_ids}
In this case, each time entity_ids changes, it causes the plugin to reload. This can negatively affect the UX if it takes time to load and render the plugin UI.
Alternatively, the same parameters can be passed as hash parameters:
...index.html#entity_ids={entity_ids}
In this case, the plugin will not reload when entity_ids parameters are updated. Instead, you would need to subscribe to the onhashchange event, which would allow you to react to changes in parameters. For example:
window.onhashchange = function () {
    const hashParams = document.location.hash.substring(1).split('&');
    for (let pair of hashParams) {
        const [name, value] = pair.split('=').map(value=>decodeURIComponent(value));
        console.log(`parameter name: ${name} parameter value: ${value}`);
    }
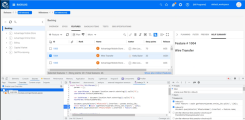
}An efficient way to develop the plugin is by using the Chrome local overrides feature. Local overrides are files that Chrome serves in place of a live request. This allows you to edit your files from the Chrome developer console to see instant changes in the plugin. It can also track the real file for changes and apply them, so you can change and save the file using an IDE, and Chrome applies the changes instantly to your plugin.
 See also:


