Workflow
This topic describes how to set up your development workflow by defining phases, and how to transition from phase to phase.
Overview
A workflow is a representation of the phases through which an entity advances as it is being developed. Workflows are available for any entity which proceeds through development, such as requirements, defects, and tests.
The extent to which workflows can be shared between workspaces, depends on the type of space—isolated or shared.
In isolated spaces, each workspace defines its own independent workflows. No elements of the workflow are inherited from the space.
In shared spaces, the elements of the workflow are determined at the space level. These are propagated to the workspaces. Each workspace can define its own lower-level workflow elements within the inherited framework.
Note the following when sharing workflows:
-
Workflows created in a shared space act as a framework that can be expanded upon on the workspace level. When customized in a shared space, workflows and their phases are available for the entity in all associated workspaces. Phases from a shared workflow are displayed with the Shared space
 icon.
icon. -
When a workflow is shared, changes made at the workspace level are only available to the workspace in which the changes were made. Only the admin for the workspace can access the changes made to the shared workflow.
Workflow phases
A workflow phase represents a status of an entity. The table below lists the common phases.
| Phase | Details |
|---|---|
| Metaphase |
Inside each workflow there are Metaphases marked with a label over the relevant phases in the diagram:
Metaphase names are provided by default and cannot be modified. A metaphase lets you categorize the phases logically. Within the metaphases, you can change the order and flow of the phases or add additional phases. For example, the metaphases and the phases for defects are:
Note:
|
| Phase |
Different entities have different phases. For example, backlog item phases include New, Deferred, Opened, Fixed, Proposed closed, Duplicate, Closed, and Rejected. If working in a workspace, a Shared space icon You can customize the phases for each entity. For details, see Lists. |
| Start phase |
When you create a workflow, the first phase in the workflow is the Start phase. A workflow has only one Start phase. |
| Master phase |
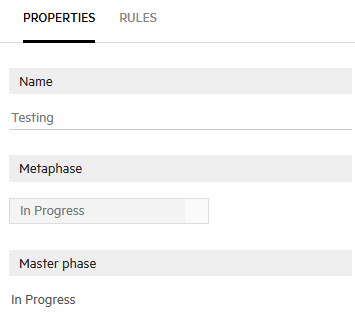
If you select a phase in a shared workflow from within a workspace, the master phase field displays the original phase in the shared workflow on which changes were based. You can see the master phase field in the Properties pane.
For examples, see Shared workflows. |
Workflow transitions
Workflow phases are connected by transition arrows.
The arrows indicate the type of transition: primary, secondary, or alternate.
| Type | Details |
|---|---|
| Primary transition |
A primary transition is the main workflow for the entity. Most entities will pass through the phases of the primary path as the entities are being developed. Indicated by a solid arrow: Each workflow has one primary transition. |
| Secondary or alternate transition |
Transitions that are alternate workflow paths. These transitions are not essential to the primary logic of the workflow. Under certain circumstances, an entity will follow the alternate path. Indicated by a dotted arrow: Example: Most New defects follow the primary path to the Opened phase. However, a New defect may be Deferred if there are not enough resources to handle it. |
Edit workflows
This section describes how to make changes to workflows.
Note: The workflow of the Release Process entity and its related entities cannot be modified.
To edit workflows:
-
Open the Settings menu
 , click Spaces, and select a shared space or workspace.
 -
Click Entities and select the entity for which you want to set up a workflow. For entities that support workflows, the pane displays the Workflow tab.
-
Click Workflow. The existing workflow phases display graphically.
-
Modify the workflow as needed. Select a phase, and then:
Action Details Name the phase In the Properties pane, enter a name for the phase.

Assign a phase to a different metaphase On the shared space level or in a workspace under an isolated space:
In the Properties pane, enter a different metaphase. In the display, the phase moves to the newly-assigned metaphase.
Add a phase You can add phases on the following levels:
-
In a shared space master workspace, or in a workspace under an isolated space. Right-click the phase before which you want to add a new phase. Select Add Phase, and then Add a transition.
If you need to create a phase, but not from an existing phase, right-click in the empty area of the metaphase column. Click Add Phase, and then select the source and target phase. The source and target phases can belong to any metaphase.
-
In a workspace under a shared space. Right-click an existing phase, and select either Add Before or Add After. The transition is added automatically.
Note: The option to add phases not from the existing phases is only available in the master workspace.
Tip: If you add phases with similar meanings to defect and user story workflows, use the same name for the phase in both workflows. This is because, in the Backlog module, the Backlog Items tab displays defects and user stories together. The phase filter for this tab includes all workflow phases for defects and user stories. Phases with the same name are listed only once in the filter.
Add a transition On the shared space level or in a workspace under an isolated space:
Right-click the phase before which you want to add a new phase. Select Add Transition. Enter the name of the target phase to which the transition should point.
Move a phase In a workspace under a shared space:
You can move a phase that you created on the workspace level before or after any phases that belong to same master phase, including master phase itself.
Right-click the phase you want to move, and then select either Move Before or Move After. In the Move this phase dialog box, select the phase before or after which to move.
Indicate the transition is a primary transition On the shared space level or in a workspace under an isolated space:
In the Properties pane, select the Primary Transition check box.
Delete a phase or a transition Right-click the phase or transition, and select the delete option.
-
You cannot delete a phase if it has outgoing transitions, so delete those transitions first.
-
You cannot delete a transition if it is the only incoming transition to a phase.
-
If you delete a transition that is the primary transition, we recommend that you clear the Primary Transition check box before you delete it and select a different transition as the primary one.
Only space admins can delete phases defined on the shared space level.
Admins for the workspace cannot delete or modify transitions created from the workspace on a shared space workflow.
As you modify the workflow, it is refreshed automatically.
-
Workflow rules
You can create rules to customize a workflow from the Rules pane in workflow diagram and also from the Rules settings area.
Workflow rules defined in a workspace are only available to that workspace.
Workflow rules defined for shared workflows are available to all associated workspaces, and can be customized for individual workspaces.
The sections below describe how to define workflow rules.
Define workflow rules in the workflow diagram
You can define workflow rules for the currently selected phase or the currently selected transition.
-
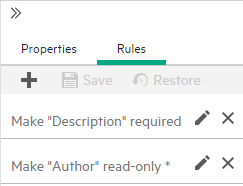
In Entities > Workflow, select the Rules side pane, and click the Add Rule button + to add a rule.
The Rules pane only shows rules for the selected phase or transition.

-
Define the rule. For details, see Design business rules.
Define workflow rules in Rules settings area
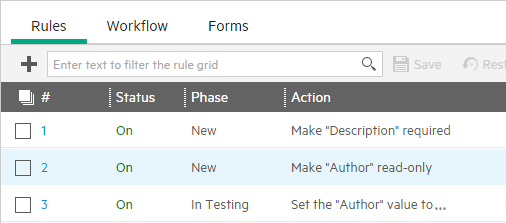
If you click Entities and select the Rules tab, you see the rules defined for the currently-selected entity, including the rules you just created from workflow.
You can add more workflow rules and modify existing workflow rules.
The Phase column in the grid shows the phases for which you created the rule. These rules do not run for any other phase.

For details, see Design business rules.
Shared workflow rule example
This section provides an example of how workflow rules can be shared across workspaces and customized for individual workspaces.
The scenario is a shared space that has the following workflow for quality stories:
New > In Progress > Done
The space admin defined a Block Transition rule that does not allow team members to advance the phase of a defect from In Progress to Done. Only QA testers are allowed to do this.

An admin for the workspace wants to customize this shared workflow by adding a new phase, In Testing, before the Done master phase. The resulting customized workflow is:
New > In Progress > In Testing > Done
The workflow rules are applied to transitions and phases.
Block Transition workflow rules
Rules with the Block Transition action prevent users from transitioning from one phase to a specific phase, even though the transition is generally permitted in the workflow for the entity.
When the Block Transition rule runs for the workspace, it runs only on the first phase in the unit. As a result, team members cannot advance the phase of the defect from In Progress to In Testing.
Other workflow rules
Added phases and their master phase are handled together.
When workflow rules, such as Make required or Make read-only, run for the workspace, the actions are applied to each added phase and the master phase. This is in contrast to Block Transition rules that are only applied to the first phase in the unit.
If the space admin makes the Done phase required in the shared workflow, both the In Testing and Done phases become required at the workspace level.
Customize phases and transitions
You can customize workflows for a specific workspace. Customization includes renaming phases and adding phases.
This section describes how to customize phases and transitions at the workspace level. There are two models of workflow customization:
-
By default you can extend phases, but not add phases or modify transitions of extended phases. This ensures that shared space workflows are enforced at the workspace level.
-
In some organizations, space admins may want to allow workspace admins to add phases and modify their transitions. This is defined per workspace, as described in the following section.
Caution: This is not reversible. After you define a workspace as permissive, allowing phase and transition customization, you cannot revert the workspace to the restrictive model.
To enable phase and transition customization
-
Open the Settings menu
 , click Spaces, and create a new workspace or edit an existing workspace.
 -
By default, the Workflow customization field is set to Phase extension only. To enable phase and transition customization, set this field to Phases and transitions.
-
Refresh the view to activate this new setting.
You can now modify phases and transitions at the workspace level, as described in Edit workflows.
To localize the phases, you need to switch your UI to that language. For details, see Localize labels, lists, and phases.
Tip: The space admin can set a default workflow customization setting for all new workspaces, using the space parameter WORKFLOW_CUSTOMIZATION_IN_NEW_WORKSPACE.
Workspace-level phases and transitions
-
In the Phases and transitions mode, phases at the workspace level still have a master phase that influences business rule behavior, shared workflows, and cross-workspace reporting.
-
Local transitions can be deleted.
-
You cannot set a new transition to be the primary transition. The transition inherited from the shared space remains the primary transition.
-
When you add a phase at the workspace level, you cannot modify its metaphase. This is inherited automatically from its parent (master) phase.
Sample workflows
The following sample workflows demonstrate the use of phases and transitions for some common entities.
User stories

Gherkin tests

Defects

This following sample demonstrates the handling of shared workflow based on the following scenario:
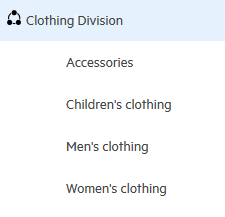
A company website has a shared space for a clothing division. This shared space has four associated workspaces:

Add a phase
This example shows a workflow where a workspace admins renames and adds a phase to a shared workflow, for defects.
The workflow for defects in the Clothing Division shared space is:

In the Men's Clothing workspace, the admin sees the following workflow for the defect entity. The admin recognizes that this workflow is shared because of the Shared space icons ![]() . The admin can rename and add phases, but cannot delete shared workflow phases.
. The admin can rename and add phases, but cannot delete shared workflow phases.

The admin modifies the workflow for the Men's Clothing workspace as follows:
-
Renames the Opened phase to In Progress
-
Adds an In Testing phase before Closed
The new In Testing phase only exists in this workspace, so it has no Shared space ![]() icon.
icon.
Because these changes were based on the Opened phase, the Opened phase is considered the master phase.

Only workspace users for that workspace can see these changes. In the shared space, the workflow looks as it did before the changes were made in the workspace.
The master phase, and any new phases directly or indirectly added to it, are handled as one unit in the shared space and in cross-workspace graphs. In this example, In Testing and Closed are considered one unit. If a shared space graph counts the number of defects that are closed, the total includes the number of In Testing defects and Closed defects.
Add multiple phases
This example shows a case where a workspace admin adds multiple phases to a shared workflow, for tasks.
The task entity is in the Clothing Division shared space:

The workspace admin modifies the workflow for the Men's Clothing workspace. The admin adds two phases before the In Progress phase (Researching and In Design) and two phases after this phase (In Review and Testing). Since the changes are based on the In Progress phase, In Progress is the master phase.
Only workspace users for that workspace can see these changes. To these workspace users, there are now five phases between New and Completed.
Each of these five phases has the same master phase, In Progress, which is displayed in the Properties pane:

The master phase, and any new phases directly or indirectly added to it, are handled as one unit in the shared space and in cross-workspace graphs. In this example, Researching, In Design, In Progress, In Review, and Testing are considered one unit based on the master phase, In Progress. If a shared space graph counts the number of tasks that are In Progress, the total includes the number of tasks in these five phases.
 Next steps:


