
Share this page


Linking Workflow Stages
In AccuRev, you use a transition to link one workflow stage to another. The stage from which you are linking is referred to as the source stage; the stage to which you are linking is referred to as the destination stage. In the following illustration, Scheduled is the source stage; it is linked to WIP, the destination stage, by the assign transition:
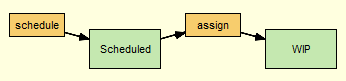
Here, only the WIP stage is currently being used as a destination stage. The Scheduled stage currently has no source stages linked to it via the schedule transition.
Destination Stage Transitions
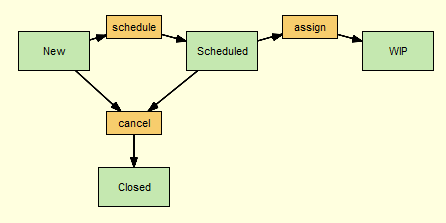
The destination stage in a pair of linked workflow stages must have a transition associated with it—without it, there is no way for an issue to enter that stage using workflow transitions. In the following example, the Closed stage cannot currently be used as a destination stage because it does not have a transition associated with it:
![]()
Once the Closed stage is associated with a transition, called cancel, for example, issues can move to it through the workflow from either the New or Scheduled stages, as shown here:
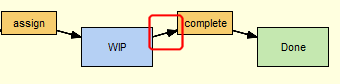
Note that a destination stage can be referenced by more than one source stage. In addition, a destination stage may have more than one transition associated with it. You might want to set up your workflow such that an issue can move from WIP to Closed via a complete transition, for example.
Creating Transitions for Destination Stages
In most cases, stages are associated with transitions. When you use the Stage Generator to create workflow stages, for example, AccuRev automatically creates a transition that uses that stage as its destination. AccuRev also lets you create new transitions for destination stages as part of the stage linking process.

Linking Workflow Stages Using Existing Transitions
There are two ways to link workflow stages using existing transitions, as summarized in the following table:
| Method | When to Use | For More Information, See |
|---|---|---|
|
Link Stages dialog box |
Use the Link Stages dialog box when your workflow contains many destination stages and transitions. The Link Stages dialog box lets you easily change source and destination stages and it filters available transitions based on the destination you select. Tip: You can also use the Link Stages dialog box to create a new transition for the destination stage. See Linking Workflow Stages Using a New Transition for more information. |
Using the Link Stages Dialog Box (see below) |
|
Stage context menu (right-click the stage) |
Use the stage context menu when your workflow has only a few destination stages and transitions and you can easily see which transition is associated with the destination stage you want to link to the source stage you have selected. |
Using the Context Menu (see below) |
You can also create a transition at the same time you create the link. See Linking Workflow Stages Using a New Transition.
Using the Link Stages Dialog Box
-
In the AccuRev Web UI, click the Admin menu and choose Open Workflow.
The Open Workflow dialog box appears.
-
Choose the depot and the workflow you want to open and click Ok.
The Workflow Editor appears.
Tip: If you select a stage in the workflow diagram, AccuRev uses that stage as the default source stage in the following step.
-
Click the Link Stages button (
 ) on the Workflow Editor toolbar.
The Link Stages dialog box appears.
-
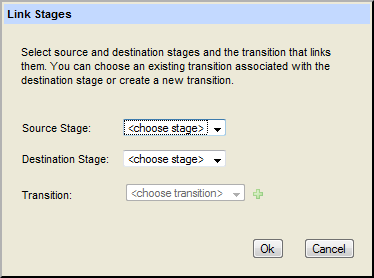
Select the source stage and destination stage you want to link from the Source Stage and Destination Stage fields.
When you select a destination stage, the Transition field displays transitions associated with that stage.
-
Select the appropriate transition from the Transition field and click Ok.
AccuRev links the source and destination stages using the transition you selected.
- Click the Save button (
 ) to save your changes to the workflow.
Using the Context Menu
To link two workflow stages using the stage context menu:
-
In the AccuRev Web UI, click the Admin menu and choose Open Workflow.
The Open Workflow dialog box appears.
-
Choose the depot and the workflow you want to open and click Ok.
The Workflow Editor appears.
-
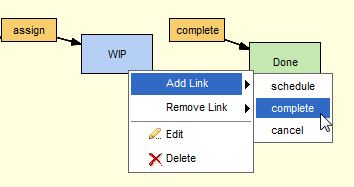
In the workflow diagram, right-click the workflow stage you want to specify as the source stage and choose Add Link from the context menu.
AccuRev displays a menu listing transitions associated with available destination stages as shown in the following example:
-
Select the transition associated with the desired destination stage.
AccuRev links the source stage you specified in Step 3 with the destination stage associated with the transition you specified in this step. For example:
- Click the Save button () to save your changes to the workflow.
Linking Workflow Stages Using a New Transition
Use this procedure when you want to link two workflow stages using a new transition that you create for the destination stage.
-
In the AccuRev Web UI, click the Admin menu and choose Open Workflow.
The Open Workflow dialog box appears.
-
Choose the depot and the workflow you want to open and click Ok.
The Workflow Editor appears.
-
Click the Link Stages button (
) on the Workflow Editor toolbar.The Link Stages dialog box appears.
Tip: If you select a stage in the workflow diagram, AccuRev uses that stage as the default source stage in the following step.
-
Select the source stage and destination stage you want to link from the Source Stage and Destination Stage fields.
When you select a destination stage, the Transition field displays the transitions associated with that stage.
-
Click the Create New Transition button (
 ).
).The Create New Transition dialog box appears:
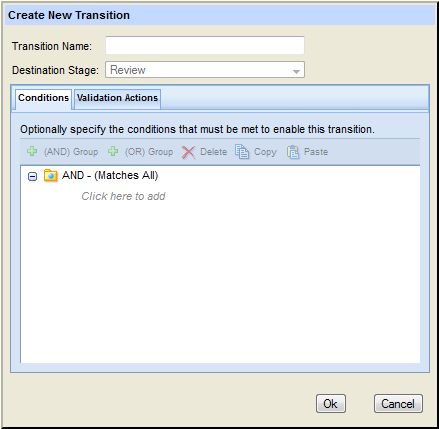
Tip: The Destination Stage field displays the name of the destination stage you selected in Step 4.
- In the Transition Name field, enter a name for the transition.
- On the Conditions tab, optionally specify the conditions that the issue record must meet in order for this transition to be enabled. See Use the Conditions Editor if you need help with this step.
- On the Validation Actions tab, optionally specify the actions you want to associate with this transition. See Specifying Actions for Stages and Transitions if you need help with this step.
-
When you are done specifying the transition, click Ok.
You are returned to the Link Stages dialog box.
- Click Ok to link the source and destination stages using the new transition.
- Click the Save button () to save your changes to the workflow.
Unlinking Workflow Stages
When you unlink two workflow stages, you are simply decoupling the source and destination stages; it has no effect on the transition associated with the destination stage. If you want to delete a transition, see Deleting a Workflow Transition.
There are two ways to unlink workflow stages, as summarized in the following table:
| Method | When to Use | For More Information, See |
|---|---|---|
|
Remove Links dialog box |
Use the Remove Links dialog box when you want to be able to view all the linked source and destination stages defined for your workflow and, optionally, unlink multiple stages at the same time. |
Using the Unlink Stages Dialog Box (see below) |
|
Stage context menu (right-click the stage) |
Use the stage context menu when you want to unlink a single pair of source and destination stages. |
Using the Source Stage Context Menu (see below) |
Using the Unlink Stages Dialog Box
-
In the AccuRev Web UI, click the Admin menu and choose Open Workflow.
The Open Workflow dialog box appears.
-
Choose the depot and the workflow you want to open and click Ok.
The Workflow Editor appears.
-
Click the Remove Links button (
 ) on the Workflow Editor toolbar.
The Remove Links dialog box appears.
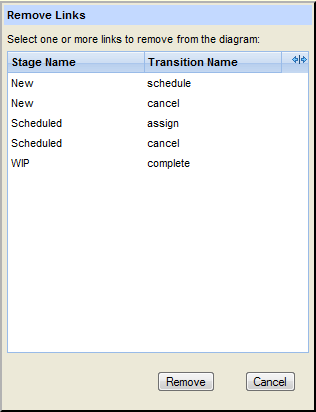
- Select the pair of source and destination stages you want to unlink. To select more than one pair of source and destination stages, use the Ctrl or Shift key on your keyboard when selecting stages.
-
Click the Remove button.
AccuRev unlinks the source and destination stages you selected.
- Click the Save button () to save your changes to the workflow.
Using the Source Stage Context Menu
To unlink two workflow stages using the source stage context menu:
-
In the AccuRev Web UI, click the Admin menu and choose Open Workflow.
The Open Workflow dialog box appears.
-
Choose the depot and the workflow you want to open and click Ok.
The Workflow Editor appears.
-
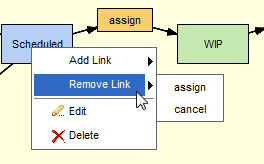
In the workflow diagram, right-click the source stage you want to unlink and select Remove Link from the context menu.
AccuRev displays a menu listing the transitions associated with destination stages as shown in the following example:
-
Select the transition associated with the destination stage from which you want to unlink the source stage.
AccuRev unlinks the source stage you specified in Step 3.
- Click the Save button () to save your changes to the workflow.


