
Share this page


Create and configure repositories
This topic describes how to create and configure repositories.
View the repositories
The Repositories page lists the repositories that are currently registered with GitCentric and provides the ability to create a new one.

Create a repository
This section describes how to create a repository for GitCentric.
A common task you will perform as a GitCentric administrator is creating a new Git repository for use with GitCentric, and optionally, mapping its branches to AccuRev streams. (If you have an existing repo that you wish to register with GitCentric, proceed to Import an existing Git repository.)
The following procedures assume that:
- You have installed GitCentric as described in the GitCentric installation.
- You have read through Before installing GitCentric .
- The AccuRev Server that was added to GitCentric during the initial login process is the server that contains a stream that you want to map to a Git branch. If you need to make another AccuRev Server known to GitCentric before mapping a Git branch, proceed to Add an AccuRev server, and then return here when done.
To create a new repo:
- Log in to GitCentric.
- Click Administration >
Repositories to display the
Repositories page.
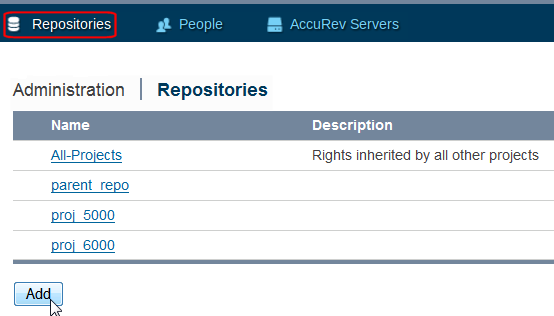
- Click
Add and populate the fields in the resulting panel.
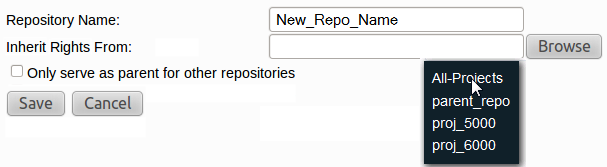
Repository Name Enter any valid string for the new repository. Keep it URL-friendly: just letters, digits, and dashes; no whitespace. Character length is only limited by your OS. There is no database limit on the text field. Note: Do not specify a .GIT extension for the repository name. GitCentric adds them on creation.
Inherit Rights From By default, new repos inherit their rights from the system-defined All-Projects. However, you can specify a different repo for more control. Only serve as parent for other projects Use this option if you wish to create a repo with specific access rights which other repos can inherit. Creating a parent-only project means that you can set ACLs on it and they get inherited by all its children. This also makes it easier to change the configuration of a number of repos at one time using the --children-of option to the gitcentric config-repo and config-branch CLI commands. For details, see the Command-Line reference. - Click
Save when done.
Once a repository is created, you can set general attributes on it, create branches, configure access rights, and map its branches to AccuRev streams, as described in the following sections.
Configure an existing repository
Follow these steps to configure an existing repository.
To open the Repositories page:
- Click Administration > Repositories to display the Repositories page.
- Click on a repository name.
- Configure the General, Branches, Access, and AccuRev Connector pages, as described in the next sections.

General page
The General page lets you specify basic repository properties, primarily associated with Gerrit Code Review features. The various fields are described below:
General Options
| Description | Enter a string that will appear in the Repository Description column of the repository lists. |
Git Repository Options
| Ignore Case | When checked, sets core.ignorecase=true in the repository’s .git/config file. |
| Ignore Symbolic Links | When checked, sets core.symlinks=false in the repository’s .git/config file. |
|
Submit Type |
Options that allow you to control how to merge changes:
For a discussion of these merge options, see the Project Configuration topic in the Gerrit Code Review documentation. |
| State | Determines the accessibility of the repository:
|
| Automatically Resolves Conflicts | By default, Code Review attempts merges only if there is no path conflict. Enabling this option forces Code Review to attempt the merge even if a path conflict occurs. |
| Require Change-Id in commit message | For a discussion of Change-Ids, see the
Change-Ids topic in the Gerrit Code Review documentation. Note: Does not apply to commits pushed directly to a branch or tag. |
Contributor Agreement Options
| Require Signed-off-by in commit message | For a discussion of Signed-off-by lines, see the Signed-off-by Lines topic in the Gerrit Code Review documentation. |
| Require a valid contributor agreement to upload | For a discussion of valid contributor agreements, search for the Contributor Agreements topic in the Gerrit Code Review documentation. |
Clone Options
| Clone Command | Lets you quickly copy the Git clone command for the current repository specified using either the HTTP or SSH protocol. |
Branches page
The Branches page displays the existing branches associated with this repo, and provides the ability to delete a branch or create a new one.
To create a new branch, click Create Branch. The fields are pre-populated with prompts to assist you with branch creation.
The following table lists the available options:
| Branch Name | See the Git documentation for git-check-ref-format for restrictions regarding Git branch names. |
| Revision | This is typically either HEAD, or the name of another branch, or the SHA1 hash for a specific commit. |
Access page
The Access menu allows you to apply GitCentric group-based permissions (ACLs) on your repositories.
These ACLs are derived from Gerrit Code Review ACLs.
Procedural information for setting ACLs is provided at Repository Access Rights (ACLs)
Overview and detailed information about group-based ACLs is provided at:
- Repository Access Rights (ACLs).
- The Change-Ids topic in the Gerrit Code Review documentation.
Most ACLs take Allow, Deny, or Block values. However, Label Verified and Label Code-Review take numeric values which are displayed as reviewer options on the Code Review page.
Each permission provides an Exclusive check box, which grants an exclusive ref-level access control so that only members of a specific group can perform an operation on a repository-reference pair. See the Access Controls topic in the Gerrit Code Review documentation for more information.
The Push and Push Annotated Tag permissions also provide a Force Push option which allows an existing branch to be deleted. Since a force push is effectively a delete immediately followed by a create, but performed atomically on the server and logged, this option also permits forced push updates to branches. Enabling this option allows existing commits to be discarded from a project history.
AccuRev Connector page
Use the AccuRev Connector menu to:
- Define the mapping between branches in your Git repositories and mount points in your AccuRev streams. This procedure is described in Map a Git branch to an AccuRev stream.
- Implement AccuRev change packages. This procedure is described in Change packages.
AccuRev Server Connection
| Server name:port | The AccuRev Server and port where the stream to be mapped exists. |
| Username | The
<gc_user> account that is a member of the group that is set to
ASSIGN_USER_PRIVILEGE.
|
| Password | The password for
<gc_user>.
|
Associate Issues With Commit
| Issue Tracking System | If you are using AccuRev change packages, use this field to specify whether you are using kandoMaintain or a third-party product such as Rally as your issue tracking system. |
| Regular Expression | If AccuRev uses an issue tracking system (either kandoMaintain, or a third-party system such as Rally), you can specify a regular expression here to enforce comment requirements for AccuRev change packages. Populating this field enables change package integration; leaving it blank disables it. |
Branch Stream Mappings
| Branch | The branch that you want to map to an AccuRev stream. |
| AccuRev Depot | The AccuRev depot containing the stream that the Git branch is mapped to. |
| AccuRev Stream | The AccuRev stream to which the current branch is to be mapped. |
| Mount Point | The directory in the mapped stream to which the branch is to be synchronized. Navigate to the mount point in the graphical tree and click it to populate the Mount Point field. |
| Initial Synchronization | This determines in which direction the first mapping will occur. If you are importing an existing repo into AccuRev, select Commit Git content to AccuRev . If you are exporting the existing content of an AccuRev stream to a newly mapped repo, select Commit AccuRev content to Git. |


