Share this page


Set user group permissions
Every user group has a set of permissions, which controls what types of tasks the group can perform.
In this topic:
User group permissions
Understand the following before you set user group permissions.
| Cannot modify permissions of default user groups | You cannot modify the permissions of a default user group. To view permissions for these groups, in the Groups and Permissions page, select the user group in the group list and click the Permissions tab. |
| Upgraded projects | If you upgrade a project, and the upgraded version contains a permission that was not present in the original version, ALM automatically assigns that permission to all users in the project. |
| Cross project customization - working with a linked project |
User groups defined by a template project are displayed with a template icon
|
 in the linked project. If you are working with a project that is linked to a template project, you cannot modify the permissions of a user
Set permissions for a user group
To set permissions for a user group:
-
In the Project Customization window, in the left pane, click Groups and Permissions.
-
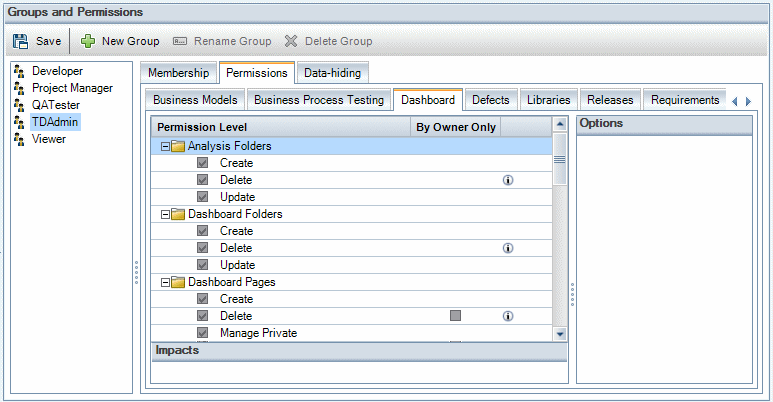
From the group list, select the user group for which you want to set permissions, and click the Permissions tab.
A set of tabs are displayed in alphabetical order, one tab for each ALM module plus tabs for specific purposes, such as for administration. Permission levels (such as Create, Update, and Delete) for the entities available in each module are listed under the Permission Level column.
-
Click a module tab. If necessary, to see the permission levels for each entity, expand the entity.
Information icon 
If a permission level of an entity is dependent on, or impacts, the permission levels of another entity, an
icon is displayed to the right of the By Owner Only column, and the Impacts pane at the bottom of the window displays information about the impact.Options pane If additional options are available for a permission level, they are displayed in the Options pane at the right of the window. -
Select the checkboxes for the permission levels that the selected user group should have for each entity.
If a permission level has sublevels, expand the permission level to display the list of associated fields. Then select the fields that the selected user group can use.
-
Limit the capabilities of modifying a field as follows:
-
To limit the entities whose permission levels can only be modified by their owners, select the checkbox for the permission level in the By Owner Only column.
Note: The By Owner Only checkbox does not work for the Recycle and Restore permission.
For example, to allow only the person who owns a requirement to delete the requirement, in the Permissions > Requirement > Delete permission level, select the checkbox in the By Owner Only column.
-
To limit the values a user group can select from a lookup list type field, set transition rules of allowed field values in the Options pane. For details, see Set transition rules.
-
-
Click the Data-hiding tab to hide data from the current user group by module. For details, see Data hiding.
-
Click Save.
Set transition rules
You can limit a group's modifying permissions by setting transition rules for modifying values in fields. These rules determine the values that the group can modify in specified fields. Transition rules can be set only for lookup and user list fields.
Example: When modifying defect information, you can limit the items a user group can select in the Status field of a defect record. You can set a transition rule that only allows a user group to edit the Status field from Fixed to Closed.
Note: When Workflow is used to change a list of values for a field that is set with transition rules, only changes that satisfy both the workflow script and the transition rules are allowed. For details, see Workflow Event Reference.
-
In the Project Customization window, in the left pane, click Groups and Permissions.
-
From the group list, select the user group for which you want to set transition rules.
-
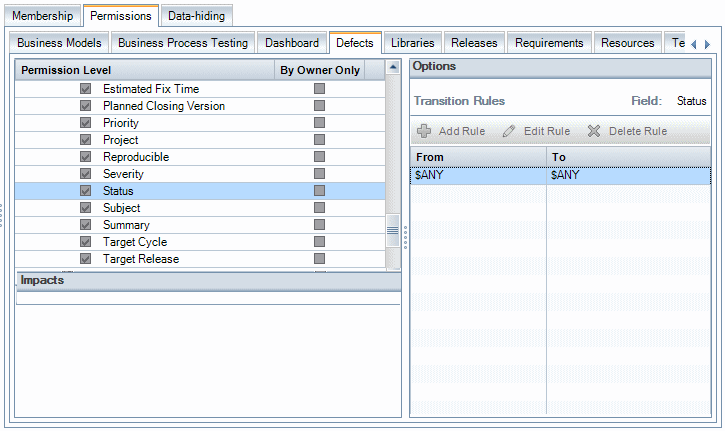
Click the Permissions tab. Click a module tab, such as Defects. The tab displays the entities available in the module and their corresponding permission levels.
-
Expand the module tab and select an entity and its permission level. For example, expand Defect and then expand Update.
-
Select a field. For example, select Status. The Transition Rules grid appears in the Options pane on the right side of the window.
-
Click Add Rule to add a transition rule.
From Do one of the following.
-
Select $ANY to allow the user group to modify the field, irrespective of the currently displayed value.
-
Select a value from the list. The user group is able to modify the selected field only when the field displays the value you select. For example, to allow the user group to edit the Status field of a defect only if Fixed is the current value, select Fixed.
To Do one of the following.
-
Select $ANY to allow the user group to change the field to any value.
-
Select a value from the list. The user group is able to change the value of the selected field only to the value you specify. For example, to allow the user group to change the value of the Status field only to Closed, select Closed.
-
-
To modify a transition rule, select a rule from the Transition Rules grid and click Edit Rule . In the Edit Transition Rules dialog box, modify the rule and click OK.
-
To delete a transition rule, select a rule from the Transition Rules grid and click Delete Rule. Click OK to confirm if prompted.
-
Click Save.
 See also: