Share this page


Integration Hub connections
This topic describes how to create a connection for ValueEdge using the Integration Hub.
Overview
The Integration Hub uses connections to synchronize data between two data sources. Before you define a connection, you must you have an integration defined for the connection.
This section describes how to define an integration through the Integration Hub. For information on how to set up a VSM connection through the Micro Focus Connect interface, see VSM connections.
Connections can be reused, provided that the same data is being synchronized. For example, if you want to synchronize several Jira projects and ValueEdge workspaces with the same types and fields, the connection can be shared and reused for multiple synchronizations.
Before you begin, request a customer-specific instance of the ValueEdge Integration Hub through a Micro Focus SaaS MyAccount Service Request. Each customer is entitled to one free instance.
Typically, provisioning is completed within a few business days. For integration with an ALM Octane or Jira on-premises installation, provisioning may take longer. Click Get Support in the footer, and collaborate with your corporate network team to establish connectivity, typically through a VPN.
Create a ValueEdge integration
Before creating a connection, you define an integration or data source.
To create an integration from the Integration Hub:
-
In the Integrations Hub dashboard, make sure that the Integrations tab is selected.
-
Click + Create new integration. The Create integration window opens.
- Specify a name for the integration and choose an Integration type. Currently, the available integrations are ALM Octane and Jira. Click Select. The Choose Server page opens.
- Specify the server information and credentials. Use the Continue and Back buttons to move between the screens.
- Click Save.
- To edit an existing integration, click the More button
 on the integration card and select Edit Settings.
 - To remove an integration, click the More button on the integration card and select Delete Integration.

Create a new connection
After you have created an integration, you can define and configure its connections.
Before you begin with actual synchronizations, create a test connection. For example, create a synchronization between a ValueEdge workspace and a single Jira project. Then, test the connection to make sure that the synchronization is correct. An incorrect configuration may lead to the creation of duplicate data entities.
To create a connection from the Integration Hub:
-
In the Integrations Hub dashboard, choose a ValueEdge workspace in the top right of the banner. Then navigate to the Connections tab.
-
Click + Create new connection. The Connection wizard opens.

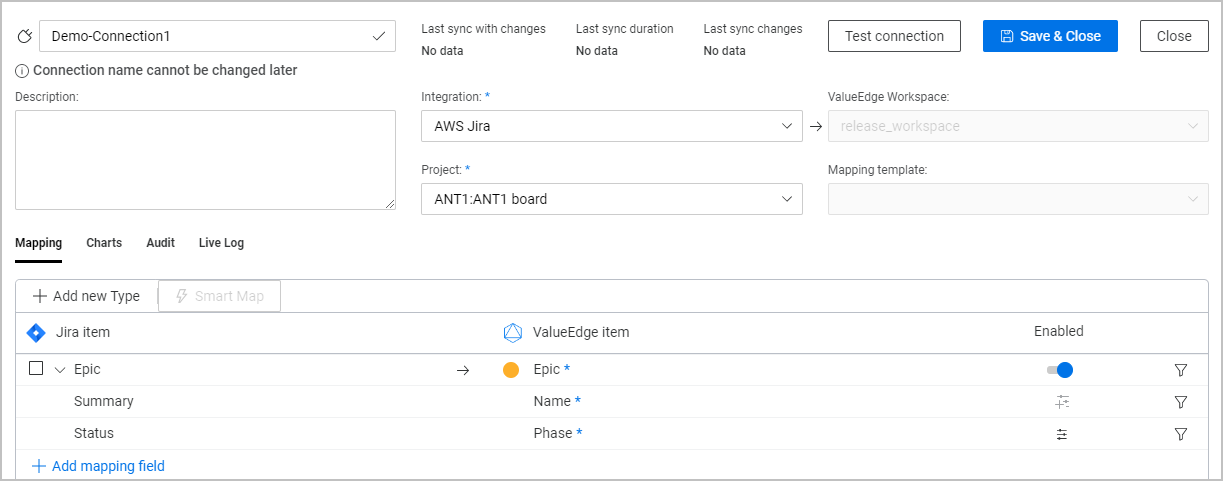
- Specify a meaningful name for your connection in place of the default name.
-
Choose an Integration.
- Choose a project from the Project dropdown. The wizard prompts you to smart-map all types.
- To smart-map all types, click Smart Map. Smart mapping automatically maps fields between the target sand source with commonly used mappings. Mappings can be edited at a later time.
- If you only want to smart-map specific types, click Cancel.
-
In the bottom pane's Mapping tab: If you chose automatic mapping, view the mappings that were created automatically.
-
For fields that were not mapped, expand the Select target field dropdown and select a field.
-
Optionally, click + Add Mapping field to add additional fields to a type. Select a target and source field. Repeat this for each field you want to add.
-
-
If you did not use smart mapping for all types, go to the bottom pane's Mapping tab. .

-
Expand the Select target type dropdown, and select a type.
-
Set up the target fields in one of the following ways:
-
Expand the Select target field dropdown and choose a field.
-
Select the checkbox next to the type, and click Smart-map Selected Types.
-
-
Optionally, click + Add Mapping field to add additional fields to a type. Select a target and source field.
-
Repeat this for all types that you want to add to the mappings.
-
-
Optionally, click + Add new Type to add more mapping types. For details, see Type mapping.
-
To add default values for a field, and other value mapping, click the Value Map button in the field's row.
-
Click Test Connection to validate your configuration.
-
Click Save & Close.
Run an iteration in the Integration Hub
After your connection is set up, you can run an iteration of the synchronization.
Note: After a connection has been run once, it can no longer be deleted or renamed.
To run an iteration in the Iteration Hub:
-
In the Integration Hub, go to the Connections tab.
-
Click the arrow in the row to the left of the connection name, to expand its view. The bottom pane shows the included mappings.

- In the right pane, expand Test connection and choose Run once or Dry run. A dry run starts an iteration without making any changes in the data. Use a dry run to test your configuration and make sure that no error messages are issued.
- Monitor the connection and logs. For details, see Audit and Connection Messages in the Troubleshooting topic.
 See also: