Share this page


VSM connections
This topic describes how to create a connection for ValueEdge by creating a VSM connection from within Micro Focus Connect.
Overview
ValueEdge uses Value Stream Management (VSM) connections to synchronize data between two data sources. The VSM connection type is a subset of the classic Micro Focus Connect(MFC) connection. Before you define a connection, you must you have a data source defined for the connection.
This section describes how to define a VSM data source and connection through the Micro Focus Connect interface. For information on how to set up a connection through the Integration Hub, see Integration Hub connections.
Connections can be reused, provided that the same data is being synchronized. For example, if you want to synchronize several Jira projects and ValueEdge workspaces with the same types and fields, the connection can be shared and reused for multiple synchronizations.
Note: The VSM connection type is currently in technical preview. The user interface for VSM connections is intended only for synchronizing data for ValueEdge VSM analysis purposes. A VSM connection is quicker to set up than an MFC connection, and requires less knowledge of the synchronization elements.
To benefit from the following capabilities, not available with VSM connections, use the classic MFC connection:
-
Rich-text descriptions, comments, attachments, and many custom fields
-
Filtering capabilities
-
Calculated values
-
A full range of ALM Octane entity types
-
Configuration validation
For details about converting an existing MFC data source to a VSM data source and vice versa, see Convert connection types.

Create a VSM data source
Before you can create a connection, you must define one or more data sources. This section describes how to create a VSM data source that can be used in conjunction with Micro Focus ValueEdge.
To create a VSM data source:
-
In the dashboard, navigate to the Data Sources tab.
-
Click + Data Source. The Add Data Source window opens.
- Specify a data source name, preferably without spaces.
- Select the role with permissions to modify the data source: Admin, User, or Any.
- Choose ALM Octane or Jira as the Data Source Project.
- As a Context Type, choose Value Stream Management.
- Click OK. The Properties page opens, with the connector's Readme file.
- Specify values for the data source's properties. Click Next to edit additional properties.
- Click Save.
Create a new connection
After you have created a data source, you can define and configure its connections.
To create a VSM connection from within Micro Focus Connect
-
In the dashboard, navigate to the Connections tab.
-
Click + VSM connection. The Connection wizard opens.
- Specify a meaningful name and description for your connection.
-
Choose a Target data source. The Master data source is the master VSM data source that you created above. For details, see Create a VSM data source.
- Set any relevant options in the right pane, such as synchronization frequency.
- Click Next to move to the wizard's Projects page. Select a project for both the master and target that you want to synchronize.
- Click Next to move to the wizard's Types and Fields page. In VSM connections, the direction is always To Master.
-
Map the types:
-
Click + Type Mapping to manually add mapping. The target and master type must be selected for manual mapping. For details, see Type mapping.
-
Click Auto Type Mapping to automatically map the type, field, and values for the connection.
-
-
Map the fields:
-
Click + Field Mapping to manually map fields.
-
Click Auto Field Mapping to automatically define all field and value mappings for the connection.
-
-
Make sure that all required types and fields are mapped. The connection will not run if the required types or fields are not mapped. The wizard displays the required VSM fields in blue bolded text. Fields displayed in red are required in order to create an instance of the specified type.
-
Map the values: In the row of the field whose values you want to map, click the Edit value map row button
 . The endpoint with the most enum values will automatically be defined. Select a default mapping value for both the target and master. The Default indicates which enum to use when no mapping is available.
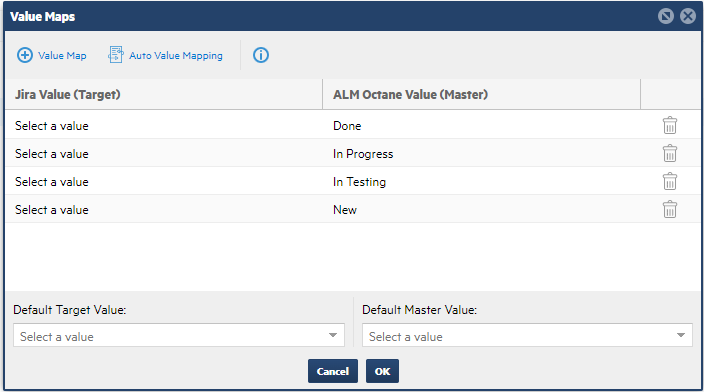
-
Click + Value Map to manually map the values.
-
Click Auto Value Mapping to automatically define all value mappings for the connection. Fields that were automatically mapped will be indicated by a blue icon. A red icon
 indicates required values that must be mapped manually.
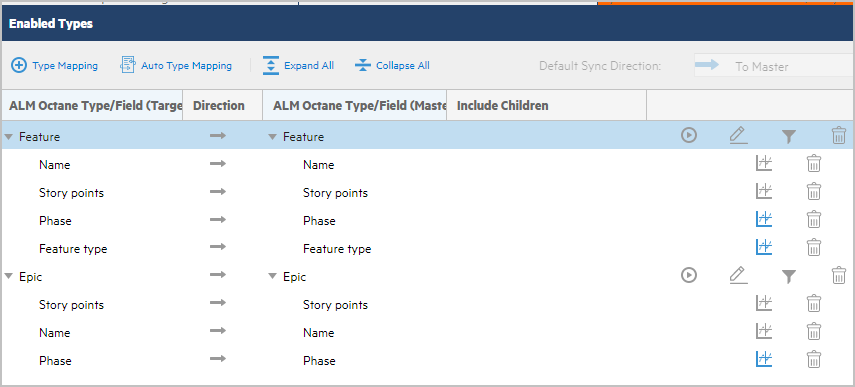
-
-
To limit the items that will be evaluated for the type mappings, click the Filter details button
 for either the master or target. Use the Test Filter button the check your filter. For details, see Filter and query data.
 -
Optionally, disable or enable type mapping for a specific type using the Enable
 and Disable
  buttons.
 -
Click Save.
Run an iteration
After your connection is set up, you can run a single iteration of the synchronization. Optionally, you can run a dry iteration without affecting any data. Use a dry run to test your configuration and make sure that no error messages are issued.
Note: After a connection has been run once, it can no longer be deleted or renamed.
To run an iteration from the Micro Focus Connect dashboard:
- Go to the list of connections in the Connection tab, and select the one that you want to run.
- Click the gear icon
 to the left of the connection name.
 -
Run a test iteration:
-
Select Run One Dry Iteration to perform an iteration of the synchronization without affecting the data.
-
Select Run One Iteration to perform one complete iteration of the synchronization.
-
- Monitor the connection and logs. For details, see Audit and Connection Messages in the Troubleshooting topic.
Convert connection types
Since the VSM connection is only a subset of the MFC connection, you may want to convert it to the MFC connection, since it allows more types and fields. Conversely, you may want to convert an existing MFC connection to a VSM connection, so that you can use it with ValueEdge.
This section describes how to convert an existing VSM connection to a Micro Focus Connect connection and vice versa.
The conversion involves the following steps:
-
Convert the VSM data source
-
Convert the VSM connection
-
Update the cross references
Convert a VSM data source to an MFC data source
This section describes how to convert an existing VSM integration data source to a Micro Focus Connect data source.
-
In the top banner, click the Actions button
 and select
Export from the menu. The
Export Connect Data dialog box opens. Choose the DataSources tab and export the VSM data source. For details, see Import, export, and back up data.
and select
Export from the menu. The
Export Connect Data dialog box opens. Choose the DataSources tab and export the VSM data source. For details, see Import, export, and back up data. -
Edit the exported xml file:
-
Clear the <connectId></connectId> tag for the data source
-
Change the
<contextType>VSM</contextType>to<contextType>MFC</contextType>. -
Provide a unique meaningful name within the name tags
<name>UniqueName</name>. -
Set
<VSMMaster>false</VSMMaster>for the data source. -
Repeat the above steps for all exported files.
-
- Click the Actions button in the top banner, and select
Import from the menu. The
Import Connect Data dialog box opens. Import the updated xml file. The new data source is created.
- Edit the data source by filling in any additional fields as required, such as the password. There will be missing fields since VSM Integrations require less settings than Micro Focus Connect.
Convert the VSM connection
After you have successfully converted the data source, you modify the connection.
-
Export these two integrations (data sources) and note the connectId for each,
<connectId>xxxyyyzzz</connectId>in the exported xml file. For details, see Import, export, and back up data. -
Export the connection. For details, see Manage connections.
-
Edit the Synchronization section in the exported XML files with the following modifications:
-
Replace the
<sourceDataSourceGuid>xyz</sourceDataSourceGuid>and<targetDataSourceGuid>xyz</targetDataSourceGuid>values for each data source with the connectId values you noted above. -
Replace the
<source></source>,<target></target>, and<name></name>values with those from the new data source. -
Clear the contents of the
<connectId></connectId>tag. -
Change the
<contextType>VSM</contextType>to<contextType>MFC</contextType>
-
-
Re-import the connection. After you import a connection, its connection status will be Disabled.
Update the cross references
To complete the conversion, you must update the cross references.
-
Export the cross references of the original connection. For details, see Manage cross references.
-
Export the cross reference template for the new connection. For details, see Manage cross references.
-
Copy the syncset guid from the template file. Replace the guid in the cross reference file with this guid. The guids represent the Project Type criteria that identify a set. Make sure that the types match.
-
Re-import the modified crossreference.xml file into the new connection.
Convert an MFC data source to a VSM data source
You can also convert an MFC data source into a VSM data source. The procedure is similar to one described above, where you set the context type to the relevant data source type.
-
Export the MFC data source. For details, see Import, export, and back up data.
-
Edit the exported xml file:
-
Clear the <connectId></connectId> tag for the data source.
-
Change the
<contextType>MFC</contextType>to<contextType>VSM</contextType>. -
Provide a unique meaningful name within the name tags
<name>UniqueName</name.
-
- Click the Actions button in the top banner, and select
Import from the menu. The
Import Connect Data dialog box opens. Import the updated xml file to create the new data source.
Tip: Monitor and adapt the data synchronization on an ongoing basis. If the data schema is modified in one of the systems, the configurations might need to be updated, for example, when modifying the available values of the Status/Phase field.
 See also: