
Share this page


Branch and merge
The Git Client enables you to branch and merge using standard Git functionality. Git supports different branching models and types of merge.
Branching
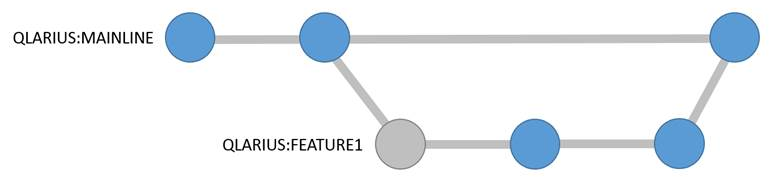
When a stream is cloned from Dimensions CM, it becomes a branch in your local git repository. New local branches pushed back into Dimensions CM become new streams. For example, assume you have the stream QLARIUS:MAINLINE with another stream branched from it, QLARIUS:FEATURE1.
To work on a branch and then commit and push changes:
-
Clone these streams into your local git repository using this command:
git clone dimensions://servername/cm_typical@dim14/qlarius/mainline/*
-
The main branch in Git contains the files from the stream QLARIUS:MAINLINE stream. There is also a branch called feature1 containing the files from QLARIUS:FEATURE1. You can work on these branches in Git just like any other Git repository. For example, switch to the feature1 branch:
git checkout feature1
-
Make code changes, such as edit files and add new files, and commit them locally:
git commit -m “made some local changes”
-
Push that commit to Dimensions CM into the
QLARIUS:FEATURE1stream:git push
For details about standard Git branching and merging functionality, see the Git documentation.

Create streams
You can create branches locally and push them as new streams to Dimensions CM. By default, streams created by the Git Client are topic streams, which use pull requests for reviewing and merging changes.
You can also create normal streams. For details, see Push changes.
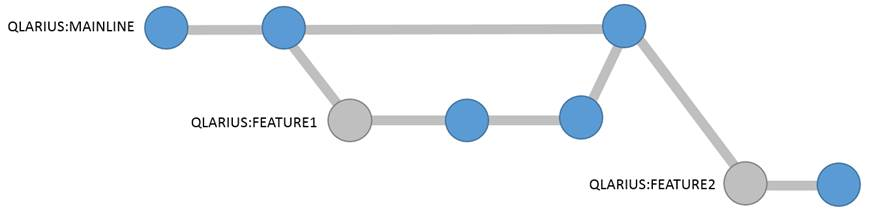
Continuing from the earlier example, Branching, assume that you want to create a new branch from the mainline called feature2:
-
Switch to the main branch:
git checkout main
-
Create the new local branch:
git checkout -b feature2
-
Make changes in the new local branch and commit them:
git commit -m “made some changes in a new branch”
-
(Optional, v2.3 and later) Specify the topic request to use when pushing the branch (for details, see Set topic stream requests):
git dm set topicrequest=QLARIUS_CR_26
-
Push the new branch to Dimensions CM, which creates a new stream. You must push and set the upstream reference to the name of the new stream:
git push --set-upstream origin feature2
This creates a new stream QLARIUS:FEATURE2 and delivers the changes to it.
The streams in Dimensions CM now look like this:
Merge branches
You can merge branches in your local Git repository and push the results of the merge back to Dimensions CM.
Continuing from the earlier example, Create streams, make changes on the main branch and feature2 branch, merge, and push:
-
Switch to the feature2 branch:
git checkout feature2
-
Make changes and commit them:
git commit -m “made feature2 changes”
-
Switch to the main branch:
git checkout main
-
Make changes and commit them:
git commit -m “made mainline changes”
-
Merge
feature2into the mainline using Git:git merge feature2
-
Resolve any merge conflicts and commit:
git commit –m “merged feature2 into mainline”
-
Push all the branches back to Dimensions CM:
git push --all origin
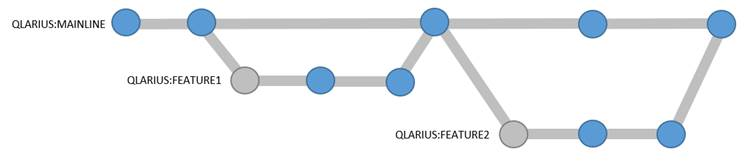
The new changes are delivered to both streams and the streams are merged.
The streams now look like this:
Note: If you perform a merge in Dimensions CM, it is recorded in Git next time you pull or clone a stream.


