
Share this page


About editing items
When you edit an item, Dimensions CM creates a new revision of the item and updates the revision ID according to your process model rules.
Edit items
Each item revision receives a revision ID based on your process model rules.
In the following example, the process model rules determine that Revision 2 is automatically increased to Revision 3.
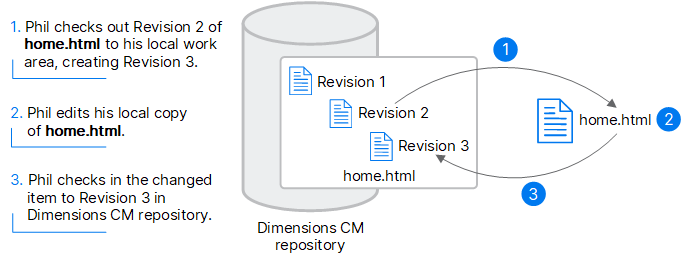
When you check out an item, the new revision is reserved in Dimensions CM. After you modify the revision in your work area, you check it in.
In the desktop client, you can use the Edit command to edit an item without checking it out first. When you use the Edit command, the item is automatically checked out and a new revision is reserved in Dimensions CM. The revision is checked back in to Dimensions CM when you exit the editor. For details, see Edit items.
You can also modify an item by revising it from a file in your work area, without first checking out the item. Dimensions CM creates a new revision of the item from the file contents, and the item revision ID is updated according to your process model rules. Use the following commands:
| Web client: | Use the Deliver command. See Deliver to project. |
| Desktop client: | Use the Revise command. See Change an item ID. |
For streams, you do not modify individual items in the repository. To change items in the stream, you modify the files in the work area and then perform a deliver of the changes.

Change the revision ID
Your process model determines how new item revisions are numbered. Generally, when you check out, edit, or revise an item, the revision ID is incremented automatically.
Your process model may allow you to choose a different revision ID. For example, if the next revision of home.html is revision 3, you may be able to change it to revision 4.
If your current project uses named branches, the branch name is included in the revision ID.
Example: If a new revision in the Windows NT branch is given the revision winnt#1, the winnt is the branch name and 1 is the revision ID.
For details about revision branches, see Version management.
Your process model may allow you to check out, edit, or revise an item without changing the revision ID. Generally, this is allowed only when an item is in its initial lifecycle state and has not yet been actioned or included in a baseline. For example, you might modify an item without changing the revision when you are working on an item during multiple editing sessions.
Note: Editing an item revision without changing the revision ID changes the content of that revision in all projects that include the revision.
Override the project file name
When you check out or get a copy of an item revision, it is placed in your work area. By default, an item revision is placed in a location relative to its path in the project, and the newly created file is given the item project file name.
Example: On a Windows system, if your root folder is c:\payroll and the item project file name is src\cabin.c, the item is copied to a file named c:\payroll\src\cabin.c.
On a UNIX system, if your root directory is /usr/home/payroll, the item src/cabin.c is copied into a file named /usr/home/payroll/src/cabin.c.
When you check out or get a copy of an item revision, you can override the target folder where the item is placed and/or the item file name. For example, if you were examining an earlier revision, you may want to place the copy in a different location than the latest revision.
Example: On a Windows system, if the default location of an item is c:\payroll\src\cabin.c, you could place the item in c:\temp\src\cabin.c (to change the folder) or in c:\payroll\src\cabincopy.c (to change the file name).
 See also:
- Web client: Manage versions
- Desktop client: Manage versions


