Share this page


Linux Installation
This section describes how to install the Digital Lab server on a Linux machine. This section is relevant only for UFT Digital Lab. For information about installing the server on a Windows machine, see Windows Installation.
Before you start
Before installing or upgrading Digital Lab:
- Refer to the support matrix for supported Linux versions. For details, see Support matrix. Note: Ubuntu is supported only on UFT Digital Lab version 24.2 and ValueEdge Digital Lab.
- Make sure that your server machine meets the system requirements.
Linux only: If you are going to connect iOS devices to this machine via USB, make sure that IPV6 is enabled.
- You have root permissions. Ubuntu: Installation requires sudo permissions.
- The host name of the server machine is accessible. Check this by running the following command:
ping -c 1 "hostname" - New installation only:
- If Nginx is already installed on the server machine, remove it before installing Digital Lab.
- CentOS 7.6 -7.9: X11 forwarding is required.

Considerations for Ubuntu
Ubuntu is supported only on UFT Digital Lab version 24.2 and ValueEdge Digital Lab.
There are a number of considerations to be taken into account when installing the Linux connector on Ubuntu.
| Consideration | Details |
|---|---|
| Version support | Only Ubuntu version 22.04.3(LTS) is supported. |
| Installation type |
Ubuntu Normal installation and Ubuntu minimal installation are supported. Ubuntu Pro is not supported. |
| Editions | Ubuntu Desktop and Ubuntu Server are supported. |
| CPU | Only X86_64 architecture is supported. |
| Permissions | Installation requires sudo permissions. |
Considerations for iOS 17
If you plan to connect iOS 17 devices directly to the server, a number of considerations should be taken into account.
| Considerations | Details |
|---|---|
| OS |
UFT Digital Lab version 24.2 and ValueEdge Digital Lab: iOS 17 is currently supported only Linux Ubuntu (22.04.3) servers. UFT Digital Lab 23.4: iOS 17 is currently supported only on Mac connectors. |
| Internet connection |
To fetch a signature key from Apple from time to time, the server machine must have access to the following:
OpenText recommends allowing access to all *.apple domains. |
| Support |
The following are not supported for iOS 17:
|
Use an external database
Digital Lab includes an embedded PostgreSQL database that is installed as part of the installation of Digital Lab. However, you can choose to connect Digital Lab to an existing external PostgreSQL database instead. This option lets your organization manage and utilize existing database resources.
Before installing or upgrading Digital Lab using an external database:
- Create a backup of the original database in the form of a hp4m.bin file. For details, see Export the embedded database.
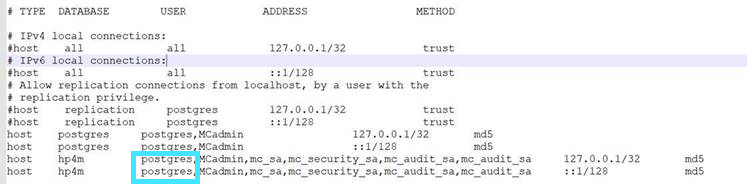
- If you uninstalled the server but did not uninstall the PostgreSQL database, and are now using the database as an external database with a clean installation of Digital Lab, add the postgres user to the pg_hba.conf file. The file is located in <Postgres_installdir>/<postgres version>/data.
You also need the original Digital Lab database encryption key. The external database needs the key to decrypt the data originally created by Digital Lab.
- In a distributed environment where the external database is on a different machine from the Digital Lab machine, make sure that the database server accepts connections from the Digital Lab server, and that Digital Lab is configured to connect to the correct database server machine:
- In the postgresql.conf file stored under <Postgres installdir>/<postgres version>/data search for
listen_addresses =. This specifies the addresses on which the server is to listen for connections. Update the value with the Digital Lab server IP or FQDN. Setting the value as a wildcard “*” means the database server accepts connections from all addresses. - Locate the conf/hp4mExt-****.properties file in <Digital Lab_ installdir>/server/conf. Check that the IP address/ FQDN is the correct address for the database server. If the FQDN is not accessible to the Digital Lab server machine due to DNS issues, replace the FQDN with the IP address of the database machine.
- In the postgresql.conf file stored under <Postgres installdir>/<postgres version>/data search for
- Restore the database. For details, see Migrate the exported data to an external database.
- If your PostgreSQL database exceeds 4 GB, we recommend that you run the VACUUM FULL command to clean the database from deleted content and reduce its size. For details, see the PosgreSQL documentation.
Important note for Postgres 13
Only the md5 method is supported for password authentication. After installing Postgres 13, perform the following:
-
In the postgres configuration file <postgresql 13 path>/data/postgresql.conf, change the password encryption setting to md5:
Password_encryption = md5 -
In the pg_hba.conf file <postgresql 13 path>/data/pg_hba.conf, change all occurrences of scram-sha-256 to md5.
- Restart the postgresql-13 service.
- Reset the postgresql13 user password and restart.
Install Digital Lab as a new installation
Follow these steps to install Digital Lab as a full installation where no previous version is installed:
-
Download the Linux server zip file.
- Log in with root permissions on your Linux machine.
- Copy the zip file to your Linux machine.
- Extract the server installation files:
unzip <name of Linux server file>.zip –d <Target directory Name> - Change directory to the Target directory:
cd <Target directory Name> -
Run the installer:
User with root permissions:
./<install_server-x64 file name>.binThe installation wizard displays the Introduction page. Read the contents and press Enter.
- The installation wizard displays the License agreement. Press Enter to move through the pages and press Y to accept the agreement.
- Choose an installation folder. The default is /opt/UFTDigitalLab/.
- Configure the Linux OS user:
- Configure the Digital Lab server according to the following guidelines:
Server configuration Details FQDN or IP address The fully qualified domain name (FQDN) consists of the host name and the domain name. For example, myhost.opentext.com. The FQDN must begin with an English alphabetical character. FQDNs beginning with numbers are not supported.
SSL connection Specify if the connection to the server should be over SSL only.
The default is Y (secure connection only.) Note: If you choose the SSL option, all connections to the server from connectors and testing tool machines need to be secure. When configuring the Digital Lab settings in connectors and tools, make sure that your selection matches that of the server.
If you intend to use single-sign on via SAML 2.0, use the default Y.Caution: When you specify an SSL connection, the setup installs a self-signed certificate. Self-signed certificates are not optimal because there is no outside authority to verify the identity of the server. We highly recommend that as soon as possible after putting the Digital Lab server into production, you install an organizational CA certificate. For details, see Using SSL certificates issued by a Certification Authority.
Server port By default, the installation is set to SSL on port 8443. The default non-SSL uses port 8080.
Free port to be used internally by Digital Lab Default: 8081 Embedded connector This component is optional. Install if you are planning on connecting devices directly to the Digital Lab machine. Default user The installation creates a default administrator user, admin@default.com, for accessing the Digital Lab console. Specify a password for this user. Local folder for Temporary files Specify a local folder to be used for temporary files, or accept the default.
At the PostgreSQL Configuration stage, the installation prompts you to indicate whether to use an external PostgreSQL database. Using an external database lets your organization utilize existing database resources and manage them with all their other systems. If you want to use the PostgreSQL version embedded with Digital Lab, skip to the next step.
Before installing Digital Lab with an external database, make sure that you have followed the steps described in Use an external database .
When prompted Do you want to use an external PostgreSQL database, type "y".
Make sure that the database machine is accessible, and provide the following parameters for the connection:
- External database server: The IP address or Fully Qualified Domain Name (FQDN) of database machine.
- Database port: The port of the external database machine.
- Database: The name of the external database. You can use a database name, such as “hp4m”. This database could already exist in the target database server. If not, it is created as part of Digital Lab server installation provided that the user has sufficient permissions.
Schema: You can use a schema name, such as “public”. This schema could already exist in the specified database. If not, it is created as part of Digital Lab server installation, provided that the user has sufficient permissions.
Note: If the database/schema were originally created by Digital Lab (for example, if you uninstalled the server but not the PostgreSQL database), you are prompted to provide the encryption key when you proceed to the next screen. If the database/schema were not created by Digital Lab, you do not need to provide an encryption key.
- Database user name and password.
- When using the embedded version of the PostgreSQL database, configure PostgreSQL according to the following guidelines.
- The password must be between 6-20 English characters long (any alphabetical character, numbers, and the special characters "@" and "_" are permitted).
- Contains at least one digit, one uppercase and one lowercase English character.
Choose a folder to which applications uploaded to Digital Lab are saved. The default is opt/UFTDigitalLab/storage. Read and write permissions to the folder are required both for the user running this installation, and for the Linux OS user that was defined at the start of the installation.
- Optionally, set the shared spaces (multi-tenancy) configuration:
If required, enable the shared spaces feature.
Important: This feature requires an Enterprise or Ultimate license. Disabling shared spaces is not supported and requires a clean installation. For details, see Shared spaces. - Review the pre-installation summary and press Enter to continue with the installation.
- The installation takes several minutes to complete. When the installation is complete, a message is displayed that the server was installed and provides options to:
- Allow collection of anonymous data for the improvement of the product. You can modify your selection for this option after installation, in the Administration Settings.
- Start the service. Unless specified otherwise during the installation process, by default, the server starts on port 8443 (HTTPS) or 8080 (HTTP).
To use an existing Linux OS user, select Y and provide the user name.
Caution: Do not use the same name as the user with root permissions that is running this installation.
| Database configuration | Details |
|---|---|
| Database server port | Default: 5432 |
| PostgreSQL superuser password | When the PostgreSQL server is first installed, a superuser account postgres is created automatically. The superuser is needed to create the Digital Lab database schema, and to add a user for administering the database. The superuser can override all access restrictions within the database, so it is best to carry out most operations using a non-superuser role. You need to provide a password for the superuser: |
| PostgreSQL database administrator username | The installation creates an additional user for administering the database. This user is not a superuser and has permissions to perform operations only on the Digital Lab database. You need to provide a username for the database administrator (Default: DLadmin). The user name may consist of any lowercase English alphabetical characters, numbers, and the special character "_". Do not use postgres as the name for this user. |
PostgreSQL database administrator password | You need to provide a password for the database administrator. The password must contain at least one digit, one uppercase and one lowercase English character, and must be between 6-20 English characters long. Any alphabetical character, numbers, and the special characters "@" and "_" are permitted. |
- After installation:
To keep your files and data and safe, we strongly recommend that you incorporate the following for the application file storage folder and external database (if relevant):
Access monitoring
Limited access rights (only Digital Lab user)
Regular backup
Encryption
Storage consumption monitoring. You can set a threshold for total file storage and monitor this with the File storage widget in the admin dashboard. For details, seeFile storage.
We also recommend that you:
- Incorporate filesystem monitoring on the Digital Lab installation and temporary folders.
- Back up the encrypted.properties file located in the <path to your Digital Lab server installation> Server >conf directory.
Upgrade the Digital Lab server
Digital Lab can be installed as an upgrade to an existing installation.
To ensure a smooth upgrade see Upgrade best practices.
Packaged apps:
To run the app packager upgrader on iOS apps, you must have already set up your Mac machine as described in Automatic signing services
If your apps were packaged manually from the command line and then uploaded to Digital Lab, the upgrader is no longer able to upgrade the apps. You need to repackage your apps using the latest version of the Packager Service (iOS) or the Android Enabler, before uploading them to Digital Lab.
To upgrade the Digital Lab server:
-
Download the Digital Lab Linux Server zip file.
- Log in as a user with root permissions on your Linux machine.
- Copy the zip file to /root, your home directory.
- Extract the server installation files:
unzip <name of Linux server file>.zip –d <Target directory Name> - Change directory to the Target directory:
cd <Target directory Name> - Run the installer:
As a user with root permissions:./<install_server-x64 file name>.bin
The installation wizard displays the Introduction page. Read the contents and press Enter. - Read the License Agreement, and select y to accept the terms and proceed with the installation.
- The installer detects that this is an upgrade and warns you accordingly. When you upgrade, all existing apps remain associated with their corresponding workspaces.
- Enter the PostgreSQL superuser password.
- Indicate whether you want to perform an automatic backup of the database during the upgrade, so that the installation can perform a rollback in case of failure. This step may increase the duration of the upgrade.
- Indicate whether you want to automatically run the app packager upgrader after the installation. Apps are upgraded asynchronously after upgrade of the Digital Lab server, reducing downtime of the server. Users are able to access the upgraded server and continue using Digital Lab while apps are being upgraded.
If you choose not to, you can run it manually after the upgrade. For details, see Upgrade packaged apps.
- You can also delete old uploads of applications. If you select y, specify the number of uploads to keep (Default: 30). When you choose to delete old uploads and specify the number of uploads to keep, these settings are copied over to the General section in Administration > Settings. For details, see General settings.
- Select a folder to which applications uploaded to Digital Lab are saved. Read and write permissions to the folder are required both for the user running this upgrade, and for the Linux OS user that was defined during the initial installation.
- If you choose to upgrade the apps, you are prompted to select the operating systems of the apps you want to upgrade.
-
Review the pre-installation summary and press Enter to continue with the installation.
- In the package upgrade summary section, click Enter to complete the server upgrade. Applications continue to be upgraded after the upgrade of the server.
Note that after the installation is complete and the server is started, you are able to check the upgrade status of apps in the Apps menu in the Digital Lab console. To see the status of an app, click the More info icon on the app card. The example below shows an app that is still in the process of being upgraded.
 - When the installation is complete, a message is displayed that the server was installed, and provides an option to allow collection of anonymous data for the improvement of the product. You can modify your selection for this option after installation, in the Administration Settings.
- Exit the installer.
- After the upgrade:
- Clear the browser cache before logging into the Lab Management console. Testing engineers should clear the browser cache on their testing tool machines before connecting to Digital Lab.
- iOS: Re-sign the Agent apps with your Developer certificate. For details, see Connect iOS mobile devices.
To keep your files and data and safe, we strongly recommend that you incorporate the following for the application file storage folder and external database (if relevant):
Access monitoring
Limited access rights (only Digital Lab user)
Regular backup
Encryption
Storage consumption monitoring. You can set a threshold for total file storage , and monitor this with the File storage widget in the admin dashboard. For details, seeFile storage.
We also recommend that you:
- Incorporate filesystem monitoring on the Digital Lab installation and temporary folders.
- Back up the encrypted.properties file located in the Digital Lab_ server_installdir> Server >conf directory.
- Clear the browser cache before logging into the Lab Management console. Testing engineers should clear the browser cache on their testing tool machines before connecting to Digital Lab.

Stop, start, or restart the server
You can stop and start the Digital Lab server with the following commands:
- To start the server:
service DL start - To stop the server:
service DL stop -
To restart the server:
service DL restart
Ubuntu: Log information will print to the log file <Digital Lab_server_installdir>/log/hpmc_deamon_service.log and not to the console.
Server logs
We do not recommend deleting server logs while the server is running. However, if you need to clear a log file while the server is running on Linux, you can run the following command:
cat /dev/null > <logFileName>
When deleting log files to increase free disk space, it is recommended to only delete log files with a numbered suffix. For example, connectorKeepAlive-1.log, connectorKeepAlive-2.log.
Upgrade best practices
To ensure a smooth upgrade and prevent the loss of data, we highly recommend first performing an upgrade on a test machine, with the same operating system as your production machine. If the upgrade succeeds on the test machine, you can then proceed to upgrade your production server.
Prepare for the upgrade
Before you start the upgrade process:
- If you are using the iOS packager service, upgrade it to the new version before you run the upgrade process. For details, see Automatic signing services.
-
Decide if you would like to upgrade your applications during the upgrade process, as you are prompted during the setup.
- Apps are upgraded asynchronously. Users can access and continue to use the upgraded server, while apps are being upgraded. You can check the upgrade status of an app in the Apps menu of the Lab console.
- If you do not want to upgrade your apps automatically, you can upgrade the apps a later stage. For details, see Upgrade packaged apps.
- Back up your existing Digital Lab database. For details, see Export the embedded database.
-
Prepare a testing machine with the same operating system as your production environment. Other hardware parameters such as CPU and RAM can be different. This machine serves as a test environment for the upgrade.
Perform the upgrade
We recommend that you perform an upgrade on the test machine that you prepared above. Upgrade Digital Lab as follows:
- Install your current Digital Lab server version on the test machine with the same operating system as your production environment.
- Import the original database to the test machine. For details, see Migrate the exported data to an external database.
-
Verify that the import was successful by logging into Digital Lab on the testing machine and verifying the apps, devices, settings, and additional items as indicated in the Upgrade checklist. Note that you are not able to communicate with those connectors, because they were configured to work with the production machine—not the test machine.
- Locate the server installation file for the Digital Lab version to which you want to upgrade.
- Extract its contents and run the file on the test machine as described in Upgrade the Digital Lab server. If you encounter any difficulties during the upgrade, contact Support.
- Verify that the import was successful by logging into Digital Lab on the test machine and verifying the apps, devices, settings, and additional items as indicated in the Upgrade checklist.
- Optional: Install a new connector on the upgraded test machine and attempt to run a test through one of the integrated testing tools.
-
If all the above information is correct on the test machine, proceed to Upgrade the Digital Lab server on your production machine.
After the upgrade process has completed on the test machine, check the following items to ensure that the upgrade succeeded:
| Item | Details |
|---|---|
| Login | Log in to Digital Lab as an admin user. |
|
Users |
Check that all the users were migrated to Digital Lab in the Administration > Users page. |
| Settings | Check that all the Administration Settings were migrated from the production environment. |
| Apps | If you chose to upgrade your applications during the upgrade process, make sure that all your apps are visible in the Apps screen. |
| Connectors | Verify that all the connectors are visible in the Devices > Connectors page. Note that you are not able to communicate with those connectors, because they were configured to work with the production machine—not the test machine. |
| Devices | Make sure that you see all the production environment's devices. |
If there are any missing items or if you encounter any other issues, contact Support.
Patch installation
To benefit from the latest enhancements and fixes, install the latest patch for your current version of Digital Lab. Server and connector patches can be downloaded from Software Licenses and Downloads. The latest patch includes the content of any previous patches. There is no need to install previous patches.
Important: If you use the remote iOS signing service, this should be upgraded before you upgrade the server.
When upgrading the server to the latest patch, the following should also be upgraded:
-
All connectors
-
Manual signing tools (if applicable)
-
iOS Enabler for manual signing of iOS apps. After installing the server patch, the iOS enabler is available in the Agent folder. Patches are available on the ADM Marketplace.
-
Android Enabler for manual signing of Android apps. After installing the server patch, the updated Android enabler is available in the server folder.
-
Follow the patch installation instructions included in the patch release.
Troubleshooting
If you encounter this error, install the createrepo tool manually:
-
Run the following command:
sudo yum install createrepo-
Install the UFT Digital Lab server.
 See also: