Share this page


Initial setup
This topic describes the flow and tasks for initially setting up and configuring ALM Octane. Most setup and administrative tasks are done in the Settings area of ALM Octane.
Some topics are relevant only for on-premises.
In this topic:
- Log in to Settings
- Set preferences
- Set accessibility
- Learn about spaces and workspaces
- The configuration flow
Log in to Settings
To configure, log into the Settings area.
In the top banner, click Settings  .
.
Then select the area to configure:
-
Site. Site settings (on-premises).
-
Spaces. Space and workspace settings.

Set preferences
You can set preferences using the Settings drop-down menu.
In the top banner, click Settings . Then toggle on/off preferences:
-
Email me when I am mentioned in a comment. Enables ALM Octane to send you a notification via email when someone tags you in a comment with the @ character.
-
Use Sprinter to run manual tests. Enables ALM Octane to run manual tests in Sprinter rather than in the Manual Runner. For details see Run and edit manual tests in Sprinter.
Set accessibility
You can set accessibility using the Settings drop-down menu.
In the top banner, click Settings . Then toggle on/off preferences:
-
Show tabular format as default. Enables ALM Octane to display graphs in the form of tables with rows and columns.
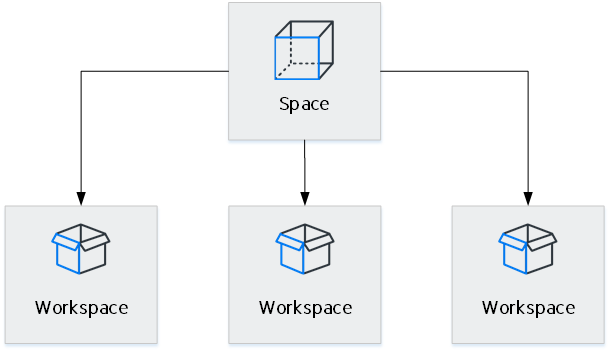
Learn about spaces and workspaces
Data in ALM Octane is divided into separate areas within a larger environment. The separate areas are called workspaces. The environment is called the space. The spaces can be isolated or shared. Workspaces associated with shared spaces can share data.
| Shared space admins | Admins for individual workspaces | Workspace members |
|---|---|---|
|
Can create multiple workspaces to represent multiple projects, programs, or products managed on the same ALM Octane site. Can also add users, and assign users different roles within workspaces. They also assign admins for each workspace. |
Can manage data inside their workspaces that are associated with isolated spaces. This includes releases, teams, users, the backlog, application modules, tests, defects, and so on. |
Can only access workspaces that they are assigned to. All users are automatically assigned basic access privileges within the default workspace. To learn more about users and their roles, see Assign roles and permissions. |
The configuration flow
The flow for configuration is provided here.
Some topics are relevant only for on-premises.
We recommend that admins create and configure the following in this order:
-
For on-premises, the site admin creates spaces that will be containers for all the workspaces in your environment. Spaces can be isolated or shared. For details, see Manage the site (on-premises).
Then, for both on-premises and SaaS, the space admin creates workspaces that will be containers for all the items that define your environment:
-
Put workspaces that will share data in the same shared space.
-
Put workspaces that will not share data in an isolated space.
For details, see Manage spaces (for space admins) and Best practices for setting up spaces and workspaces.
Tip: For strategies for setting up your spaces and workspaces, see the space definition strategy white paper.
-
-
Configure other items. Set up items such as releases, teams, and users. These items are the building blocks that help define how users work in ALM Octane.
Define items that workspaces will share, such as releases, in their associated shared space.
Define non-shared items in the relevant workspaces.
-
Define rules. After defining the items above, configure how the ALM Octane user interface works, and control the actions users can perform.
 Next steps: