Running a New Scenario Optimization
Note: When an optimization is run for any particular scenario, the results overwrite any previous manual specification (using check boxes) as to which lifecycle entities in the scenario comparison are to be included and excluded in that scenario. If you want to preserve the original scenario you plan to optimize, copy the scenario comparison and rename that scenario. See Copying a Scenario Comparison and Changing the Name of a Scenario.
To run a new scenario optimization:
-
Open the scenario comparison that includes the set of lifecycle entities you want to make available for the optimization. See Listing and Viewing Scenario Comparisons.
-
 Near the top of the Scenario Comparison page, click Optimize Scenarios.
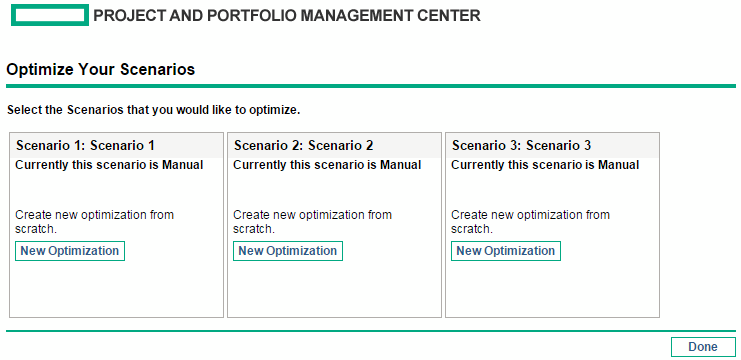
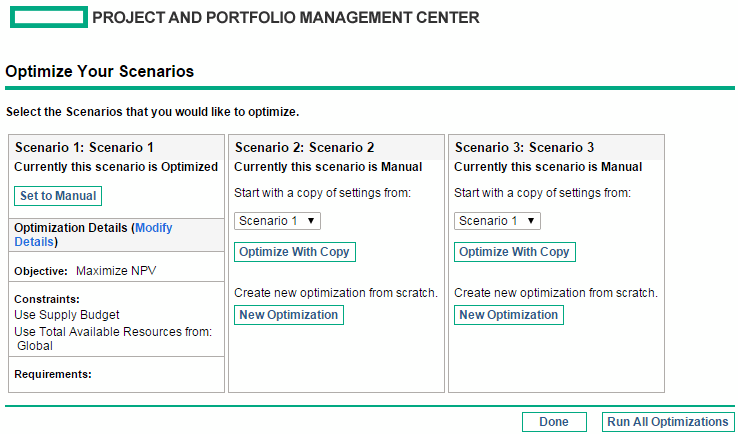
The Optimize Your Scenarios window opens.
-
 Configure the optimization parameters for one or more scenarios:
-
Click New Optimization for the scenario that you want to optimize.
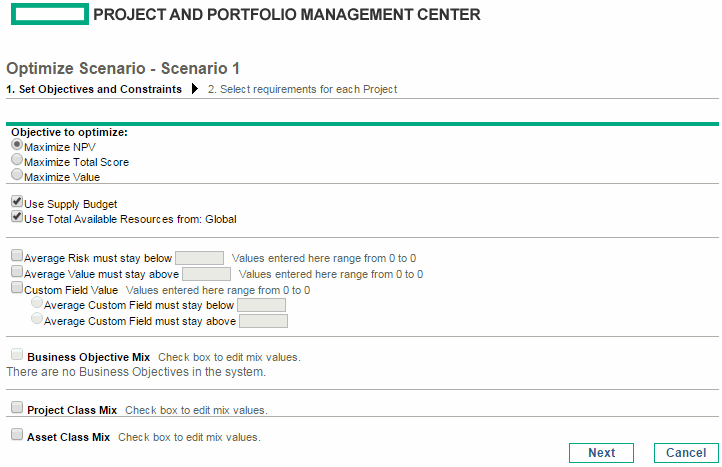
The first Optimize Scenario window (of two) appears.
-
Specify which option you want to maximize as the objective of the optimization—NPV, Total Score, or Value.
-
Specify the option to use the supply budget (if any), which might have been previously specified for this scenario comparison.
-
Specify the option to use the indicated resource pools (if any), which were previously specified for this scenario comparison as part of the optimization constraints.
-
(Optional) To specify the highest average Risk Rating to allow for the lifecycle entities the optimizer will choose, select the check box and specify a value in the stated range for the Average Risk must stay below field. (For a definition of Risk Rating, see Determining Value and Risk Ratings.)
-
(Optional) To specify the lowest average Value Rating to allow for the lifecycle entities the optimizer will choose, select the check box and specify a value in the stated range for the Average Value must stay above field. (For a definition of Value Rating, see Determining Value and Risk Ratings.)
-
(Optional) To specify the highest average Custom Field value to allow for the lifecycle entities the optimizer will choose, select the Custom Field Value check box, select the Average Custom Field must stay below option, and specify a value in the stated range.
To specify the lowest average Custom Field value to allow for the lifecycle entities the optimizer will choose, select the Custom Field Value check box, select the Average Custom Field must stay above option, and specify a value in the stated range.
-
(Optional) To specify the minimum percentage of budget to be allocated to various business objectives:
-
Select the Business Objective Mix check box.
-
Select a business objective from the Business Objective list that appears, and specify its minimum budget percentage in the % Mix field. To specify percentages for other business objectives in the list, if any, click Add a Business Objective and repeat this step.
You need not specify minimum percentages for all of the business objectives—regardless of whether you specify a percentage for a particular business objective, the optimizer can select lifecycle entities that use the business objective if the lifecycle entities meet all your other constraints.
The total of the percentages for the business objectives you specify must be 95% or less.
-
(Optional) To specify the minimum percentage of budget to be allocated to various project classes:
-
Select the Project Class Mix check box.
-
Select a project class from the Project Class list that appears, and specify its minimum budget percentage in the % Mix field. To specify percentages for other project classes in the list, if any, click Add a Project Class and repeat this step.
You need not specify minimum percentages for all of the project classes—regardless of whether you specify a percentage for a particular project class, the optimizer can select lifecycle entities that use the project class if the lifecycle entities meet all your other constraints.
The total of the percentages for the project classes you specify must be 95% or less.
-
-
(Optional) To specify the minimum percentage of budget to be allocated to various asset classes:
-
Select the Asset Class Mix check box.
-
Select an asset class from the Asset Class list that appears, and specify its minimum budget percentage in the % Mix field. To specify percentages for other asset classes in the list, if any, click Add an Asset Class and repeat this step.
You need not specify minimum percentages for all of the asset classes—regardless of whether you specify a percentage for a particular asset class, the optimizer can select lifecycle entities that use the asset class if the lifecycle entities meet all your other constraints.
The total of the percentages for the asset classes you specify must be 95% or less.
-
-
Click Next.
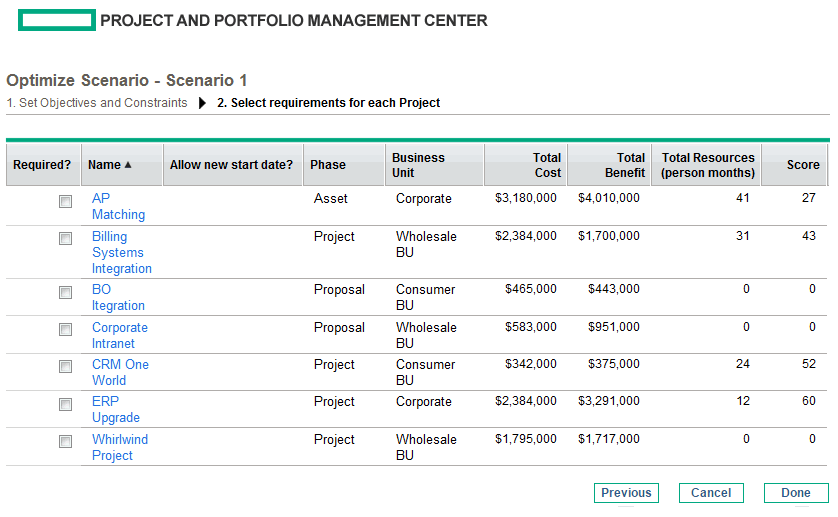
The second Optimize Scenario window (of two) appears, listing all the lifecycle entities in the scenario comparison.
-
Use the check boxes in the Required? column to specify which lifecycle entities you insist must be included in the scenario optimization, regardless of the effect of including them on maximizing the performance objective.
Note: Regardless of your selections for the Required? column, if any of the scenario comparison's listed lifecycle entities specify any dependencies on any other listed lifecycle entities, the selections of the optimizer will adhere to those dependencies. In other words, the optimizer will prevent any dependency violations. However, the optimizer does not consider dependencies of lifecycle entities in the scenario comparison list upon lifecycle entities that are not in the list at all.
-
Use the check boxes in the Allow new start date? column to specify which of the proposals and projects that have not been started you will allow the optimizer to delay starting if doing so improves performance for the objective you chose. The optimizer always considers delays in increments of one month, up to six months.
If the planned start date for a proposal or project is in the past, that proposal or project does not have the option to allow you to delay its start date. Assets do not have the option.
Note: If the optimization delays the planned start dates for any lifecycle entities, the scenario reflects those delays, which are indicated by orange outlines around those lifecycle entities in the scenario's Timeline tab on the Scenario Details page. However, if you want to make the changes permanent, you must open the lifecycle entities themselves and change their start dates.
-
Click Done to close the second Optimize Scenario window and save the optimization settings.
Note: The optimization does not run yet.
The Optimize Your Scenarios window reappears with new options.
-
In this window, do one of the following:
-
For the scenario whose optimization parameters you specified, click Set to Manual to return the scenario to manual control with no optimization parameter settings after all.
-
For the scenario whose optimization parameters you specified, click the Modify Details link to change the optimization parameters.
-
For a scenario that is Manual (a scenario that is not optimized and says Currently this scenario is Manual), a list of the optimized scenarios is available. Select one scenario from the list and click Optimize With Copy to copy that scenario's optimization parameters. Then you can revise the parameters to obtain a different optimization.
-
For a scenario that is Manual, click New Optimization to specify a new set of optimization parameters for that scenario.
-
Click Done to close the Optimize Your Scenarios window and refresh the browser for the Scenario Comparison page. You can view your optimization criteria on the Optimization Details tab that is added to the Scenario Details page for individual scenarios (described in detail later in this section).
The optimizations have still not been run. You can click the scenario name to open a window that allows you to run the scenario's optimization.
-
Click Run All Optimizations to run the optimizer against all the scenarios for which you specified optimization parameters. This is the only way to run the scenario optimization. Continue with step 4.
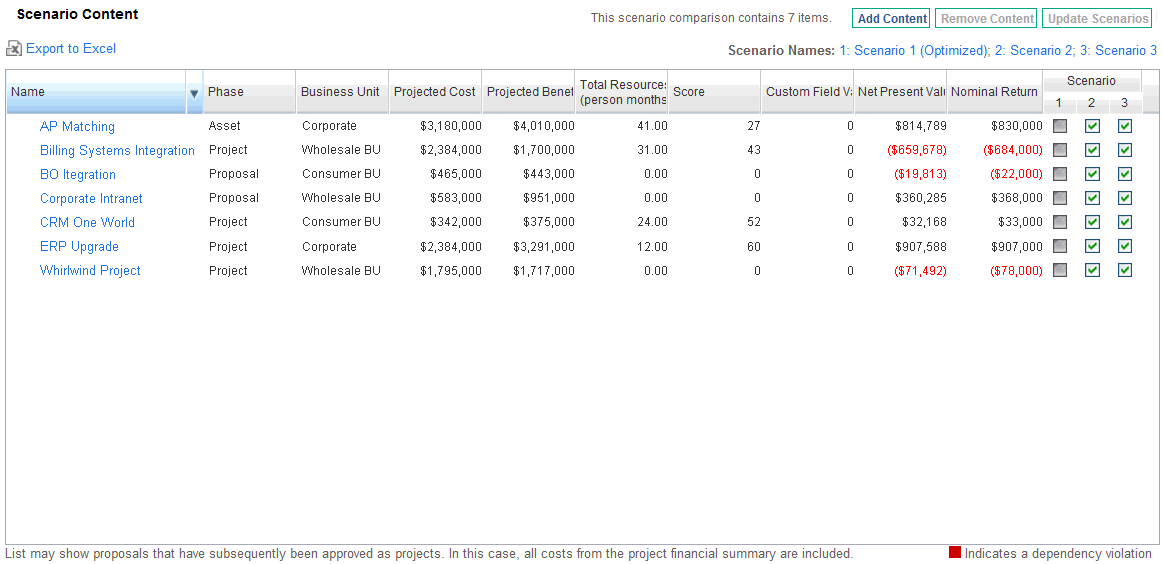
Note: If you specify optimization parameters for a particular scenario but you do not actually run the optimization, the Scenario Content section of the Scenario Comparison page appears similar to Figure 5-13. Scenario Content for an optimized scenario, but the scenario's link indicates that the scenario is "Optimized - Not Run" and the selection of read-only check marks reflects previous manual selections.
-
-
-
 Wait for the optimizer to run.
The optimizer can take a considerable amount of time to run, depending on the amount of data it must process. A progress bar is displayed for each scenario that is being optimized.
When the calculations are completed, the View Scenario Comparison button appears.
Note: If no combination of lifecycle entities can meet the set of constraints you specified, the optimizer cannot find a feasible solution. In this case, specify constraints that are less restrictive and run the optimization again.
-
Click View Scenario Comparison. The scenario comparison appears again, with optimization results available.
You can review the following optimization results:
-
In the Scenario Content section of the Scenario Comparison page, all the check boxes for all the lifecycle entities of the optimized scenarios are replaced by read-only check marks or blank areas. These indicate, respectively, the optimizer's inclusion or exclusion of each lifecycle entity in the optimized scenarios, in keeping with the optimization criteria (including required lifecycle entities) you specified in step 3 and any previously specified dependencies among the lifecycle entities in the scenario comparison. The order of the lifecycle entities (rows) is not changed. See Figure 5-13. Scenario Content for an optimized scenario.
-
The data for the optimized scenarios are changed in the graphs on all the tabs of the Scenario Comparison page to reflect the lifecycle entities chosen by the optimizer according to your criteria.
In particular, if you have previously generated the efficient frontier graph on the Efficient Frontier tab (see Efficient Frontier Tab), the graph shows data points for all three scenarios of the scenario comparison, regardless of whether you optimized all the scenarios. (The graph also shows the criteria you specified to generate the efficient frontier.)
If the criteria for generating the efficient frontier and the optimized scenario were the same, the optimized scenario's data point should be on the efficient frontier curve. For more information about the positions of the scenario data points relative to the efficient frontier curve, see Efficient Frontier Tab.
-
For each optimized scenario, wherever you allowed the optimizer to delay lifecycle entity start dates, the Timeline tab of the Scenario Details page is changed to reflect any such delays, as indicated by orange outlines around those lifecycle entities. (As with any scenario comparison, the start dates in the lifecycle entities themselves must be updated manually.)
-
Lifecycle entities that the optimization excludes from the scenario are shown in the Timeline tab in the same manner as lifecycle entities excluded in manually specified scenario comparisons.
-
Data on the Role Availability tab of the Scenario Details page for each optimized scenario changes to reflect the optimization results.
-
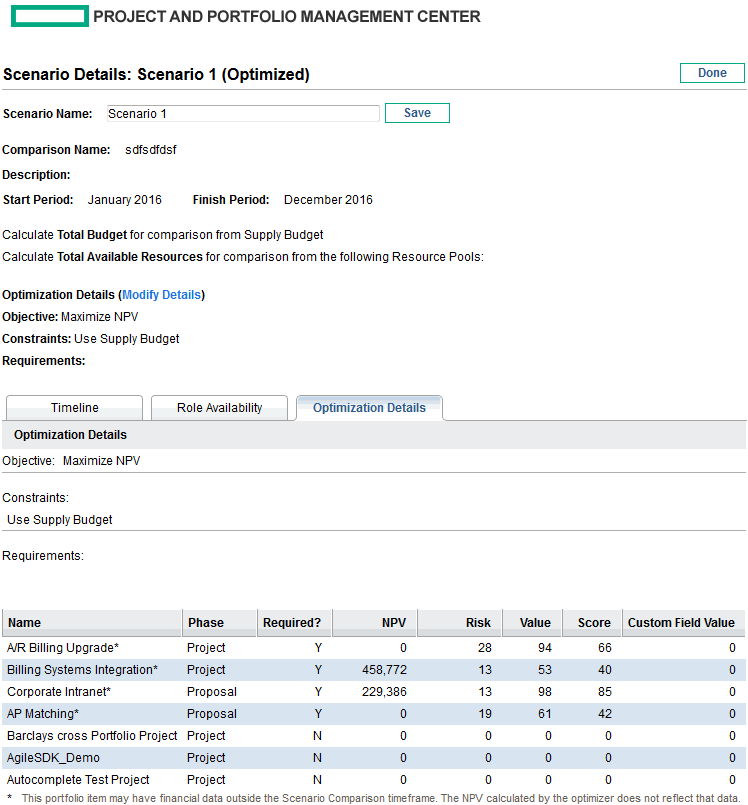
On the Optimization Details tab of the Scenario Details page, the list of lifecycle entities is changed to include only the lifecycle entities identified by the optimization. The entities are sorted from highest to lowest value of the optimization objective, such as NPV, indicating their relative leverage in the optimization toward maximizing your objective. The list also shows which lifecycle entities you specified as being required in the optimization. See Figure 5-14. Optimization Details tab after scenario optimization.
The Optimization Details tab displays the criteria you specified in step b through step j. It also displays the optimizer's "actual" (calculated) percentages for all the defined types of business objectives, project classes, and asset classes. These percentages adhere to any minimum values you specified in step h through step j.
You can change the optimization criteria for this scenario (see Changing an Existing Optimization).


