Share this page


Record an AI-based test
Supported on GUI UFT Mobile and Web tests only, in UFT One versions 15.0.2 and later
This topic describes how to record AI-based test steps.
Note: This task is part of a higher-level task. For details, see Add AI-based steps to your tests.
Overview
Use the AI Record to simplify test creation and improve test automation. Following your clicks, the AI Record learns objects and creates test steps. The recording result is a resilient test that can run on multiple platforms and environments.
Recording an AI-based step is made up of three parts: Inspect, Add, and Run.
- Inspect: AI Record inspects a web page or mobile application to identify objects you can use in an AI-based test. For supported object types, see AI-based testing: Supported control types.
-
Run: Click on an object, and AI Record runs an operation on the application, preparing to add it to the test.
-
Add: AI Record adds the step to the test.
AI Record records a default operation for the object according to its type, unless you select a different operation.
You can also open AI Record from AI Codeless Testing. For details, see Use AI Record in AI Codeless Testing.
When using AI Record in UFT One:
- AI Record adds AIUtil steps to the test for operations supported by AI. It does not add AI objects to any object repository.
- AI Record is not affected by the Record & Run settings.

Prerequisites for recording on an application
Before recording on a web or mobile application, review the following requirements:
| If you are testing a web application | If you are testing an application on a mobile device |
|---|---|
|
|
Use AI Record in AI Codeless Testing
Before you use AI Record to create AI steps in AI Codeless Testing, make sure you follow the prerequisites for designing a test in AI Codeless Testing. For mobile applications, you also need to add environments to open them in a remote access window. For how to add an environment, visit Codeless Help Center.
To open AI Record in AI Codeless Testing, click AI RECORD under the IDENTIFY tab.
For how to use AI Record in AI Codeless Testing, see Start a recording session.
Start a recording session
Use AI Record to record AI-based test steps on a web or mobile application.
To start a recording session:
-
In the toolbar, open a test and click the AI Record
 button.
UFT One is minimized, and the AI Record toolbar opens at the top of the screen and begins initializing.
You can drag the AI Record toolbar to any place you want on the screen.
-
Click on an opened web or mobile application.
AI Record inspects the application and highlights the identified objects. Visual elements and texts are highlighted in different colors.
In UFT One, an AIUtil.SetContext step is automatically added to your test.
In the Settings
 of AI Record toolbar, select the Visual Elements and/or Texts check boxes to specify the type of object you want to highlight.
If AI Record does not clearly highlight all identified AI objects, do one of the following:
- Click the Refresh button
 to inspect the application again.
 - Click the Settings button and increase Delay Time, so that the tool waits more time before inspecting again. (Default: 3s, Range: 0-60s)
Note: The toolbar settings remain the same the next time you launch the AI Record.
- Click the Refresh button
-
Click a highlighted object, or hover over one to select an operation other than the default operation on the tooltip.
The AI Record runs the default operation depending on the object type or runs the selected operation. It adds the step to the test only after the operation is successful.
For input fields, search boxes, and combo boxes, the AI Record may prompt you to enter a value for the recorded step.
You can see the recording progress, step code, recording result, as well as error messages from the toolbar.
- To stop the recording, press the exit button to close the toolbar.
- To pause the recording, click the Pause button
 on the toolbar. You can then click the Resume button
  later to resume the recording.
 -
To record on another application, click the Select application to inspect button
 to select the application as a new context on the toolbar.
 Note:
- The Select application to inspect button is available only in UFT One.
- Make sure that you pause or stop the current recording process before you move to record on another application.
- To resume recording on a new tab that your recorded flow opens, select the new one as a new context.
-
Once a step is added, AI Record automatically re-inspects the application. After the inspection is complete, repeat the above step to add more AI-based steps to your test.
To identify objects that are not supported by AI, click the Object Identification Center button
 on the toolbar to spy them, and manually add spied objects to your test.
Note: The Object Identification Center button is available only in UFT One.
-
To better identify an AI object during recording, you can hover over the object and edit information on the tooltip. For details, see Add a relation during recording.
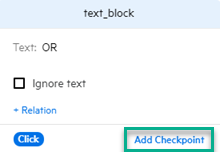
If you hover over an object with attached text and the captured text displayed on the tooltip is incorrect, you can edit the text yourself to uniquely identify the object or click Ignore text to not identify the object by text. AI Record will verify your edited text to ensure unique identification.
Note: The Ignore text function is not supported in AI Codeless Testing.
Add a checkpoint during recording
During recording, you can add a checkpoint. That means that you can check the existence or state of an object.
Note:
- The checkpoint for verifying existence applies to all visual elements and texts, and both in UFT One and AI Codeless Testing.
- The checkpoint for verifying states applies to only objects with an On/Off state, such as toggles, check boxes, and radio buttons, and only in UFT One.
To add a checkpoint
-
Hover over a highlighted object you want the test to check.
A tooltip displays, from which you can add a checkpoint for the object.
-
Click Add Checkpoint on the tooltip.
-
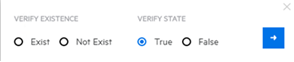
Select Exist or Not Exist for verify existence.
Select True to check if the state is On or False to check if the state is Off.
Add a relation during recording
During recording, you can add a relation. That means that you can specify another AI object in proximity to the one you want to identify, that helps identify this one.
Note: This is only available if you opened AI Record from UFT One.
To add a relation
-
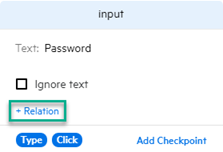
Hover over a highlighted object you want to identify.
A tooltip displays, from which you can add a relation for the object.
-
Click + Relation on the tooltip.
-
Click on another object in proximity to add the relation.
If the relation is successfully added, a blue dot appears next to the object you want to identify.
To remove the added relation, hover over the object you want to identify again and click Remove Relation on the tooltip. The AI Record will validate the object and restore the relation in case that the object becomes invalid.
Note:
- You can select only available objects in proximity on the web page or application.
- You cannot add a relation if the object you selected has a circular relation with the object you want to identify. Circular relation: A series of objects defined by their proximity to one another, where the last object is defined by its proximity to the first.
 See also: