
Share this page


Use the Object Spy
Relevant for: GUI tests and components
The Object Spy enables you to view the native properties and operations of any object in an open application, as well as the test object hierarchy, description properties, and operations that UFT One uses to represent that object.
Try the Object Identification Center
The Object Identification Center (OIC) is a next-generation Object Spy. Enjoy a new object-spying experience with this new tool, currently provided alongside the existing Object Spy.
The OIC displays a test object's hierarchy and properties, and enables you to drag objects into your test or add them to object repositories.
In addition, it provides new capabilities:
- Spying on multiple objects, as well as adding multiple objects from the OIC to your test or to object repositories.
- Modifying the test object's description properties within the OIC to customize the object's identification.
See Use the Object Identification Center.

Access the Object Spy
To access the Object Spy, do one of the following:
-
Click the down arrow near the Object Identification Center
 toolbar button and select the Object Spy
  .
. -
In the Record toolbar, click the Object Spy button during a recording session.
-
In the Object Repository window or Object Repository Manager, click the Object Spy toolbar button
.
Tip: Keep the Object Spy open continuously as you work with UFT One.
Object Spy tools
Before spying, determine whether you want to spy on your objects by clicking them, or by hovering over them for a few moments. To spy on an object by hovering, enable Hover mode before you spy.
Then, use any of the following Object Spy toolbar buttons:
|
Button |
Description |
|---|---|
|
|
Pointing Hand. Click to spy on an object. For more details, see Spy on your object. To spy an object as a UI Automation object, click the drop-down arrow and select UI Automation. For more details, see UI Automation in UFT One. |
|
|
Highlight in Application. Locates the test object currently selected in the Object hierarchy tree in your application. Tip: First make sure your application is visible on your screen. |
|
|
Add Object to Repository. Adds the test object currently selected in the Object hierarchy tree to a selected object repository. For more details, see Add objects to the object repository. |
|
|
Copy properties to Clipboard. Copies all of the properties and values for the object currently selected in the Object hierarchy tree. For details, see Copy properties to the clipboard. |

|
Select object to compare. Enables you to select another object of the same type and compare properties. For details, see Compare between two spied objects. |
|
|
Keep on Top. Keeps the Object Spy on top while spying on your application. This button is not relevant for the Remote Object Spy. Tip: If you don't keep the Object Spy on top, it may become hidden behind your application as you spy. Use the CTRL+TAB keys to switch your application windows around. |

Spy on your object
Spy on an object in your application to view or capture properties and/or operations for that object.
Do the following:
- If you want to select the object by clicking it, simply click the pointing hand button
 , and select the object in your application.
 - If you want to select the object by hovering over it instead of clicking, first toggle on the Hover mode above the toolbar. Then click the pointing hand to switch to your application and hover over your object.
In most environments, the Object Spy highlights the object as you mouse over it, and displays the relevant information, including the hierarchy of test objects related to that object.
If an object in the hierarchy already exists in a repository associated with the active action or component, a repository icon
![]() displays in the lower-right corner of the object's icon.
displays in the lower-right corner of the object's icon.
Note: In some environments, you may need to open or expand a combo box or tree-type object before spying to view the correct properties for the object.
Once you click a child object and the object tree is shown in the Object hierarchy tree:
-
Select another object in the tree to view its properties, values, and operations.
-
Click
 Highlight in Application to locate the currently selected object in your application.
AI objects
If AI-based testing is enabled in UFT One and you spy on web or mobile objects, the Spy also displays the AI object you could use to represent the object.
AI objects do not rely on object properties. Using them can result in more robust and resilient tests that can run on multiple platforms and are not affected when object properties change in the application.
To display all the objects UFT One identifies in your application screen using AI, click INSPECT.
For details on using AI objects from the spy, see To identify single objects.
For details on enabling AI-based testing, see AI-based testing in UFT One.
Select an object in the Object hierarchy to view more details in the tabs below.
Toggle between the Properties and Operations tabs to display details for the selected object.
| Properties tab |
Select the Native or Identification options to toggle between showing the object's native or identification (description) properties and values. Tips:
|
| Operations tab |
Select the Native or Test Object options to toggle between showing the available native operations and test object operations for the selected object or its associated run-time object. |
Select a row in either of these tabs to display details in the Selection and Description fields below.
Insight & Text test objects
The Object Spy does not support Insight or Text test objects.
Check your zoom level
When using Internet Explorer, or when working with JavaFX controls:
If UFT One doesn't recognize objects in the correct location, check to see that you are viewing the page at 100%, and are not zooming in or out.
For example, if you view the page at 90% or 120%, you may be required to click or select an area to the left or the right of the actual object in order to recognize it.
Add objects to the object repository
To use your spied object in GUI tests and components, first add it to an associated object repository.
Do the following:
-
Spy on an object in your application, and select it in the Object Spy Object hierarchy.
-
In the Object Spy toolbar, click the Add to Repository button
 .
.
UFT One adds the object to the repository listed in the dropdown list under the Object Spy toolbar. A repository icon
![]() is added to the bottom of the test object icon.
is added to the bottom of the test object icon.
Available object repositories
The object repositories listed in this dropdown list varies, depending on how you opened the Object Spy:
-
If you opened the Object Spy from the UFT One toolbar, repositories listed include those associated with the currently active action.
-
If you opened the Object Spy from the Object Repository window or the Object Repository Manager, the list includes the active repository or active shared repository.
Copy properties to the clipboard
Copy description properties to the clipboard, and then into any document. For example, use this option when creating programmatic descriptions.
Do the following:
-
Spy on an object, and then select it in the Object Spy Object hierarchy.
-
Under the Object hierarchy, select the Properties tab and the Identification option.
-
In the Object Spy toolbar, click the Copy properties to Clipboard
 button.
The copied properties and values are formatted in standard programmatic description syntax with line breaks between each property-value pair.
For example:
"Class Name:=Image",
"abs_x:=585",
"abs_y:=573",
"alt:=Specials",
For more details, see Programmatic descriptions.
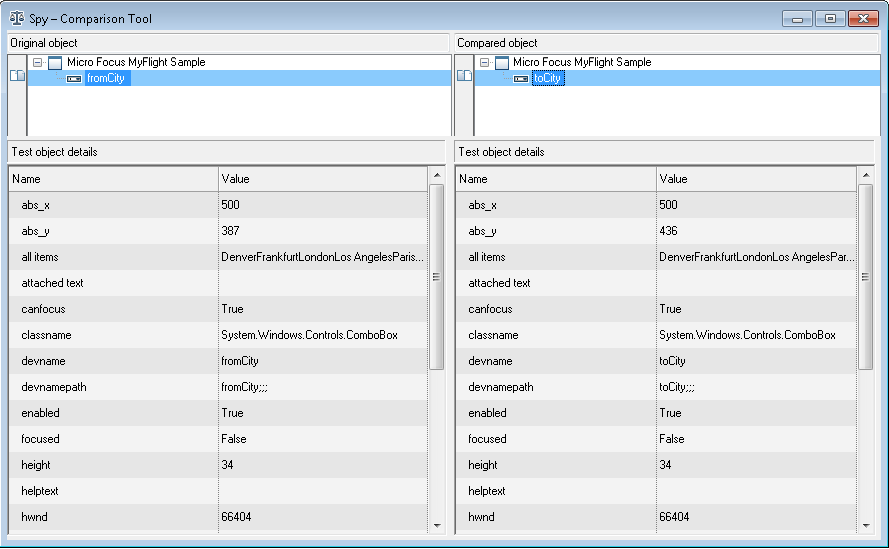
Compare between two spied objects
To compare two objects, first spy on a baseline object to use as your original. Then, in the Object Spy, click the Compare button and select a second object to compare.
UFT One displays details about both of your spied objects side by side, using both an object tree hierarchy and a list of properties.
For example:
Tip: If you selected to compare two child objects, UFT One displays the parent object nodes in the object hierarchy.
Click a parent node in the hierarchy to view properties for the parent objects instead of the children.
Add a step with a newly spied object
Add a step to your test with your newly spied object to update your test and object repository at the same time.
Do the following:
-
Open your test in the Editor.
-
Spy on an object.
-
Drag your spied object directly to the relevant step in your test in the Editor.
For more details, see Spy on your object and The Editor.
UFT One creates a new step in your test, with the appropriate object hierarchy and the default object method.
If the object does not yet exist in your local object repository, UFT One also adds the object and its parents to your local object repository and test or component.
Spying on a remote Mac computer
To view and add Web objects running in Safari on a Remote Mac computer, use the Remote Object Spy (Tools > Remote Object Spy).
The Remote Object Spy has many of the same functions as the Object Spy, with some differences when configuring the capture information. For details, see Use the Remote Object Spy.
 See also:
- Known issues: Spying


