Define Mobile Record and Run Settings
This topic describes how to define your UFT One Record and Run Settings for various mobile testing scenarios.
Access the Mobile Record and Run Settings
In your test or component, access the Record and Run Settings as follows:
- In a test, select Record > Record and Run Settings.
-
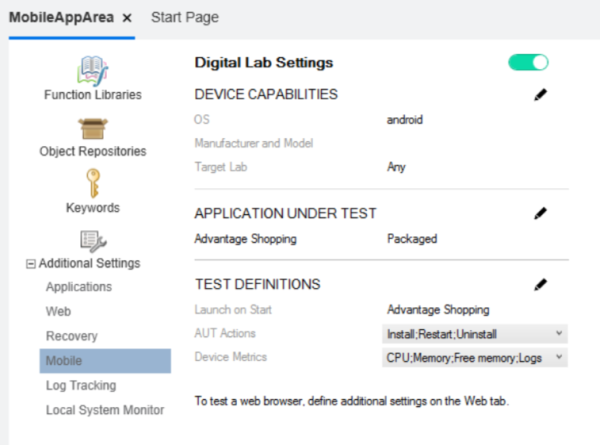
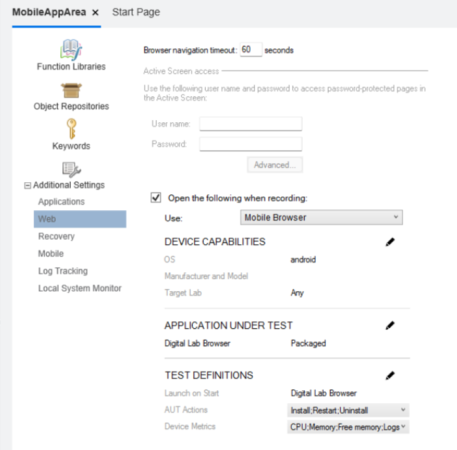
In a component, open the component's application area, and then expand the Additional Settings tab.
Note: Application area settings are limited to a single device and application. For details, see Prepare for BPT testing on multiple devices.
Additionally, if you have modified the Digital Lab server values in the UFT One options dialog, close and re-open your Application Area to refresh the server value.
Define your settings in the Web or Mobile tab, depending on what you're testing:
|
Mobile testing |
Select Mobile to test mobile apps. |
|
Web testing |
Select Web to test web apps, on a desktop machine or a device. Web app testing includes:
|
For example:
Mobile Test using Digital Lab
Mobile Component
Web Test
Web Component
Continue with one of the following:
- Define settings to test mobile apps
- Define settings to test Web apps using a mobile browser
- Define settings to test Web apps using the Chrome emulator
- Parameterize browser and device values for Web tests
Note: If you use the Digital Lab Wizard to define your settings (such as if you click  Open in Digital Lab) close the wizard when you're done. Recording is disabled if the wizard is open.
For more details, see the Digital Lab Help.
Define settings to test mobile apps
To test mobile apps on mobile devices:
-
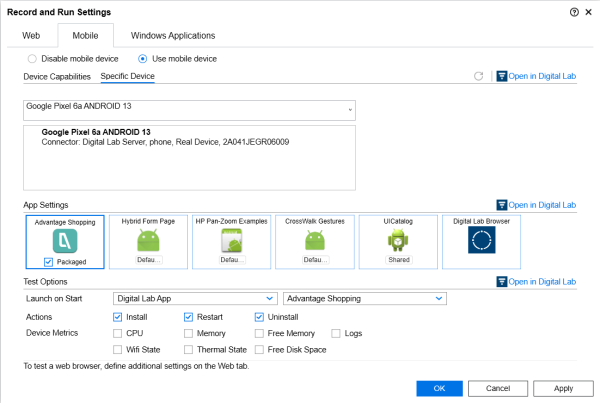
On the Mobile tab, select Use mobile device or Use local device.
One of these options is displayed, depending on whether you connected UFT One to Digital Lab or to a local device. To change the connection go to Tools > Options > GUI Testing > Digital Lab. For details, see Connect to Digital Lab or local mobile devices.
-
To view updated device and app details, clear all current selections, and click Refresh
 .
. -
Define the following Mobile setting values:
Device Local device testing: Have UFT One select a connected device according to the device capabilities you specify, or specify a specific device to test.
Digital Lab: Have Digital Lab select a device for you from available devices in the lab, or specify a specific device to test.
- Green lock icon = The device is in use by you.
- Red lock icon = The device is in use by someone else.
- Device icon with a line = Device is disconnected.
App Settings Select the app or apps you want to test.
To add apps to the list, do one of the following:
Using Digital Lab: Click
 Open in Digital Lab to use the Digital Lab Wizard.
Testing on local devices: Click + to browse to and open an application stored on the UFT One machine.
Hover over an app to view its details, such as the upload number, the app version, or the relevant Digital Lab workspace.
Notes for local device testing:
-
You can select only one app.
-
By default, you can select only non-packaged apps. To test a packaged app, you need to package it yourself, as described in Prepare your apps.
Test Options Define the following options for your test:
Actions. Define whether you want your selected apps installed and restarted at the start of your test, and uninstalled at the end of your test.
Launch on Start. Define which app you want to launch automatically at the start of your test. Other apps are not started automatically.
Device Metrics. Define the device metrics you want to log during your test.
If UFT One is connected to Digital Lab, you can define the settings directly in the Record and Run Settings dialog, or you can click the
 Open in Digital Lab button to use the Digital Lab Wizard.
Use the Digital Lab Wizard in the following cases:
- If you are using a device stored on Amazon Web services.
- If UFT One warns you that you have settings defined for a previous version of Digital Lab.
- App settings: If you want to use a different upload number than the app displayed.
For more details, see the Digital Lab Help.
Define settings to test Web apps using a mobile browser
To test web apps using a web browser on a mobile device:
-
If you are testing a native browser, install it on your device before running your test.
If you are using Chrome as a native browser, ensure that it is set as the default browser. If your device does not enable you to set a default browser, disable the default browser.
-
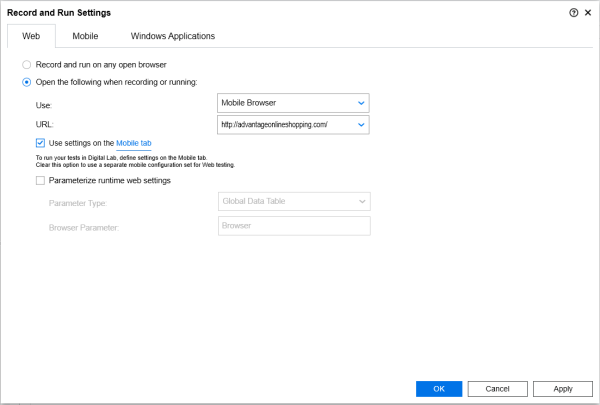
On the Web tab, select Open the following when recording or running, and define:
-
Use Mobile Browser.
-
The URL of your web app.
-
Whether to use the settings on the Mobile tab or define mobile settings separately.
-
-
In some scenarios, the browser app is not launched automatically.
In such cases, add steps to your test to launch your browser app before performing other test steps, or modify browser and device values for each test iteration.
These scenarios include:
- If you did not define a browser app. In such cases, the test uses the device's native browser.
- If you defined the browser as the Digital Lab Browser app, as an additional app.
For more details, see Parameterize browser and device values for Web tests.
Define settings to test Web apps using the Chrome emulator
The Chrome emulator enables you to record tests that can be run on both desktop and mobile browsers, as well as test devices not yet supported by Digital Lab.
-
On the Web tab, select Open the following when recording or running, and define:
-
Use Local Browser
-
The URL of your web app
-
Browser: Chrome Emulator. If you do not see this option, make sure you have Chrome installed.
Alternatively, modify browser and device values for each test iteration. For details, see Parameterize browser and device values for Web tests.
-
-
Specify and configure your emulated devices using the EmulatedDevices.xml file. For details, see Configure your emulated devices.
Parameterize browser and device values for Web tests
Data drive your tests during runtime by modifying browser and device values for each test iteration.
When you run your test, each iteration takes data from the parameter values. When working with an emulator or the Digital Lab Browser app, UFT One looks for test objects whose description properties match the parameter values.
-
On the Web tab, select Parameterize runtime web settings using:, and then define your parameter value location:
- GlobalData Table. For global parameters, defined in the Data table.
- Test Parameter. For test parameters, defined in the Properties pane.
-
Define the name of the parameter used to define the browser. (Default = Browser)
-
Prepare the mobile parameter values in your selected location.
Supported parameters and values include:
| Browser |
One of the following:
|
| browser_identifier |
To use the Digital Lab Browser app, define this as com.hp.mobileweb. To use a native mobile browser, leave this parameter blank and set the device_ostype parameter. This enables Digital Lab to automatically define the browser identifier. |
| device_manufacturer |
Defines the device's manufacturer. Leave this value blank for an iteration running with the Chrome emulator. |
| device_model |
Defines the device name. Device names must be identical to those listed in the Device dropdown list in the Record and Run Settings dialog box. When working with the Chrome emulator, you can modify these values in the EmulatedDevices.xml file. For details, see Configure your emulated devices. |
| device_ostype |
One of the following:
Mandatory if the Browser value is set to MOBILE_CHROME, MOBILE_SAFARI, or MOBILE_HPEWEB. |
| device_osversion | Defines the device's operating system version. |
| device_source |
Defines the source lab for the device. One of the following:
|
| host |
Defines the device ID, as defined in Digital Lab. Required for running the test on mobile devices (as opposed to on the Chrome emulator). |
Configure your emulated devices
Edit the EmulatedDevices.xml file to specify specific devices to be used for the Chrome emulator. This file is located in the <UFT One installation folder/bin> directory.
Specify the following attributes for each emulated device:
| <Name> | The device name that is displayed in the list of devices in the Record and Run Settings. |
| <width> and <height> |
The width and height of the device when emulated by Chrome. The value must be a positive integer. |
| <deviceScaleFactor> |
The number by which to scale the emulated device. The value must be a positive integer. |
| <userAgent> | The type of browser used for the emulated device. |
|
<show_by_default> |
Whether or not to display the emulated device in the Device dropdown list in Record > Record and Run Settings dialog box > Web tab. Type: Boolean (True or False) Selecting True adds the emulated device to the list of the Device dropdown on the Web tab. |
| <touch> |
Whether or not the emulated device is touch-enabled. Type: Boolean (True or False) |
| <mobile> |
Whether or not the emulated device is a mobile device. Type: Boolean (True or False) |
| <fit> |
Whether or not to use the current Chrome browser as the emulator for this device. Type: Boolean (True or False) Recommended: False. Selecting True places the emulated device in the center of the remote access window. The resulting offset can cause a test to fail. |
Define test run iteration settings
If your test has multiple iterations, you must instruct UFT One how to handle device restart and installation between each iteration of the test.
-
In UFT One, select File > Settings to open the Test Settings dialog.
-
In the Mobile Advanced tab of the Test Settings dialog, select the following options according to your needs:
-
Release devices after each iteration or test. Recommended, to make your device available for others when possible.
-
Restart mobile apps between iterations
-
Reinstall mobile apps between iterations
-
 See also:


