Share this page


New UFT One Custom Support Class Wizard
You use the New UFT One Custom Support Class wizard to create each support class within a Java Add-in Extensibility project. After you specify the details of the custom class and the required UFT One support, the wizard creates the support class and all of the necessary methods, accordingly. The wizard also provides method stubs for any additional methods you need to implement.
Open the New UFT One Custom Support Class wizard
In the Eclipse Package Explorer tab, select a UFT One Java Add-in Extensibility project. Then select File > New > Other. The New dialog box opens.
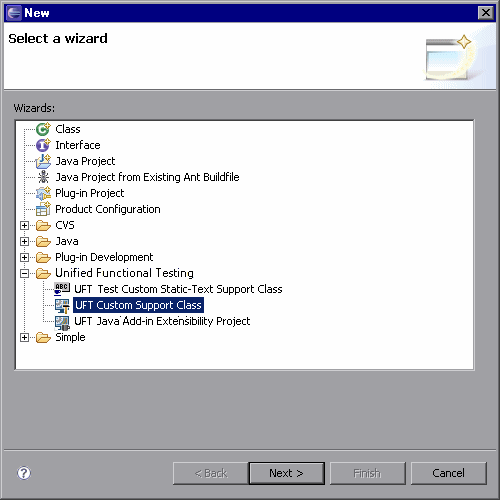
Expand the UFT One folder and select UFT One Custom Support Class.
Click Next. The Custom Class Selection Screen opens.
Tip: You can shorten this process by customizing Eclipse to provide UFT One Custom Support Class as an option in the New menu. To do this, perform the following: Select Window > Customize Perspective. In the Shortcuts tab in the dialog box that opens, select the UFT One and UFT One Custom Support Class check boxes. Click OK.

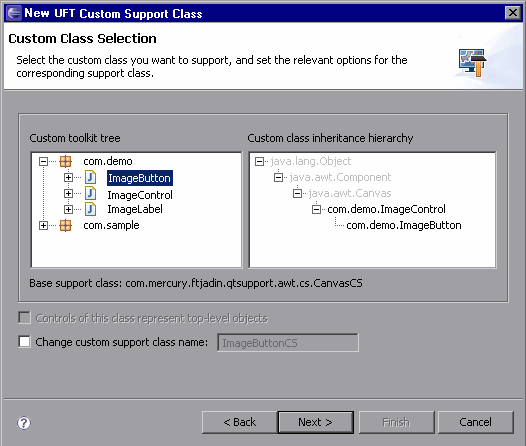
Custom Class Selection Screen
The Custom Class Selection screen is the first screen in the New UFT One Custom Support Class wizard. In this screen, you select the custom class you want to support and set the relevant options. The wizard automatically determines which existing support class the new support class must extend, based on the custom class inheritance hierarchy.
When you click Next, the Test Object Class Selection Screen opens.
Note: Selecting the class to support is fundamental to creating a custom support class. If you make changes in later screens and then return to this screen and select a different class, those changes will be discarded.
The main area of this screen contains the following options:
Custom toolkit tree. Displays all of the classes in the custom toolkit that are candidates for support (taken from the custom toolkit class locations you listed in the New UFT One Java Add-in Extensibility Project wizard). Use the expand (+) and collapse (-) signs to expand and collapse the tree, and to view its packages and classes.
Only classes that fulfill the following conditions are displayed:
Classes that extend java.awt.Component or org.eclipse.swt.widgets.Widget.
Classes for which UFT One support has not yet been extended. If support for a custom class was previously deployed to UFT One, or if support for a custom class is being developed in the current Eclipse project, the custom class does not appear in this tree.
Note: If you think a certain class meets all of the requirements above, but it still does not appear in the tree, try to update your environment by using the Reload Support Configuration command.
For example, if you delete custom support in an Eclipse Java Add-in Extensibility project to create new support for the same custom control, you must reload the support configuration. This enables the custom class to appear in the Custom toolkit tree.
Custom class inheritance hierarchy. Displays the inheritance hierarchy of the class selected in the Custom toolkit tree. Gray nodes indicate classes that are not included in this toolkit. Black nodes indicate classes that are part of the custom toolkit.
You can select the custom class you want to extend in the Custom toolkit tree or the Custom class inheritance hierarchy. (In the Custom class inheritance hierarchy you can select only black nodes, and only classes that do not have UFT One support.)
Base support class. The support class that the new support class must extend. You cannot modify this information. The wizard selects the support class of the closest ancestor in the hierarchy that has UFT One support. (If support for a custom class was previously deployed to UFT One, or if support for a custom class is being developed in the current Eclipse project, the wizard recognizes the custom class as having UFT One support.)
When UFT One recognizes a Java object that is not mapped to a specific support class, it uses the support class mapped to the object's closest ancestor. Therefore, the base support class is the class that would provide support for the custom control if it were not mapped to a specific support class. In the new custom support class, you need to implement (or override) only the support that the base support class does not adequately provide.
You can use the information displayed in the Custom class inheritance hierarchy and Base support class to help you decide whether you should first extend support for another custom class, higher in the hierarchy. Before you decide, consider the following:
Is there a custom class higher in hierarchy that does not have UFT One support?
If so, does the custom class have elements that need to be supported in a similar manner for more than one of its descendants?
If you answered "yes" to the above, consider creating support for the higher class first. This will enable its support class to be used as the Base support class. If the class is displayed as a black node in the hierarchy, you can select it in this screen and create support for it in this session of the wizard. If the class appears as a gray node, it is not part of this toolkit, and you cannot create support for it within the current UFT One Java Add-in Extensibility project.
If the higher class extends the base toolkit of the current support project, you can add it to the scope of this project by adding it to the custom toolkit. For information on base toolkits, see Custom Toolkit Details Screen. For information on adding a custom class to an existing support project, see Modifying UFT One Java Add-in Extensibility Project Properties.
Otherwise, if you want to create support for the higher class first and then use its support class as a base support class, you must perform the procedure described below.
The bottom of the Custom Class Selection screen contains the following options:
Controls of this class represent top-level objects. Enables you to specify that UFT One may be expected to recognize the control as the highest Java object in the test object hierarchy. For more information see, Supporting Top-Level Objects.
If you select this check box, the wizard implements the isWindow method in the new custom support class. This method returns true.
This option is available only if the class you selected to support is a container class, meaning that it extends java.awt.container or org.eclipse.swt.widgets.Composite. The check box is selected by default if the new support class extends one of the following support classes: ShellCS (SWT), WindowCS (AWT), AppletCS (AWT).
Change custom support class name. Enables you to modify the default name the wizard provided for the support class, if needed.
By default, the name for a support class is <custom class name>CS. In most cases, there is no need to change the default name. However, if your custom toolkit contains classes from different packages, you might have more than one custom class with the same name. In this case, you must provide different names for the custom support classes because they are stored in one package.
To modify the custom support class name, select the Change custom support class name check box and then enter the new name.
Note: The options in the Custom Class Selection screen are identical to the options available in the Custom Static-Text Class Selection screen in the New UFT One Custom Static-Text Support Class Wizard (described on page 1).
To create support for a higher class that is not part of this custom toolkit and use this support as a base support class:
Create support for the higher class in another UFT One Java Add-in Extensibility project.
Deploy the support to UFT One.
Reopen the original UFT One Java Add-in Extensibility project. Select UFT One > Reload Support Configuration or click the Reload Support Configuration
 button.
Open the New UFT One Custom Support Class Wizard (described on page 1). The wizard now selects the new support class you created as the Base support class.
Test Object Class Selection Screen
In the Test Object Class Selection screen, you map the custom class to a test object class. In UFT One GUI tests, the custom class controls are represented by test objects of the selected test object class. In the custom support class, the wizard adds a to_class_attr property method that is implemented to return the test object class you select in this screen. This enables the support class to inform UFT One what test object class is mapped to the custom class.
When you click Next, the Custom Support Test Object Identification Properties Screen opens.
Note: Selecting the test object class to map to the custom class is fundamental to creating a custom support class. If you make changes in later screens and then return to this screen and select a different test object class, those changes will be discarded.
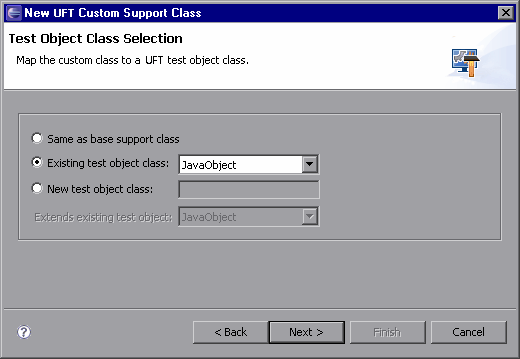
In this wizard screen you select one of the following options:
Same as base support class. Maps the custom class to the test object class returned by the to_class_attr property method of the base support class. (If you select this option, the wizard does not add a to_class_attr method to the new support class that it creates. The new support class inherits the base support class' method.)
In the Custom Class Selection Screen, you determined the base support class, which is the support class that the new support class extends. The custom class supported by the base support class is mapped to a specific test object class. If this test object class is also a logical test object for your custom class, select the Same as base support class option.
The following examples illustrate when to select the Same as base support class option:
You want to support a custom control that is similar to the one supported by the base support class. Controls are considered similar if they have the same set of identification properties and test object methods, but the properties and methods are implemented differently. In this case, the test object class returned by the to_class_attr property method of the base support class is appropriate for your custom control.
You are creating a support class for other support classes to extend—not to support actual controls. In this case, you can select this option because it is not important which test object class you map to the custom class. To view an example of this type, see Creating Support for the ImageControl Custom Class.
Existing test object class. Enables you to map the custom class to an existing test object class that is already supported by UFT One. This list contains all of the Java object types that UFT One supports. If you define new test object classes for custom support, they are also included in the list.
If you defined new test object classes in the current Eclipse workspace, they are displayed in this list immediately. Otherwise, new test object classes are displayed in the list only after they are deployed to UFT One and you reload the configuration (for more information, see Reload Support Configuration).
If you select a test object class that is not defined within your project, its test object class definition must also be deployed to UFT One for your support to function properly.
When you select this Existing test object class option, you must also select the appropriate existing test object class from the list.
Tip: Select this option only if this test object class includes all of the identification properties and test object methods of the custom control. If you need to add additional properties or methods, select New test object class.
New test object class. Enables you to map the custom control to a new test object class that you create. Select this option if none of the existing test object classes include all of the identification properties and test object methods of the custom control. Then enter a name for the new test object class. The test object class name must begin with a letter and contain only alphanumeric characters and underscores.
If you select this option, the Extends existing test object option is enabled.
Extends existing test object. Each new test object class is based on an existing one, extending its set of identification properties and test object methods. All test object classes extend the JavaObject class. You can choose a more specific existing test object class to extend by selecting it from the list. This list is identical to the list of existing test object classes provided for the Existing test object class option.
If you select the New test object class option, you define additional details about the new test object class in the New Test Object Class Details Screen. The wizard then adds the definition of the new test object class to the test object configuration file. For information on the structure and content of this file, see the UFT One Test Object Schema Help.
Custom Support Test Object Identification Properties Screen
The Custom Support Test Object Identification Properties screen displays the identification properties supported by the base support class you are extending, as well as additional properties that are defined in the test object class you selected, but are not yet supported. It enables you to select properties whose support you want to implement or override with new functionality. It also enables you to add new properties.
When you click Next, the Custom Support Test Object Methods Screen opens:
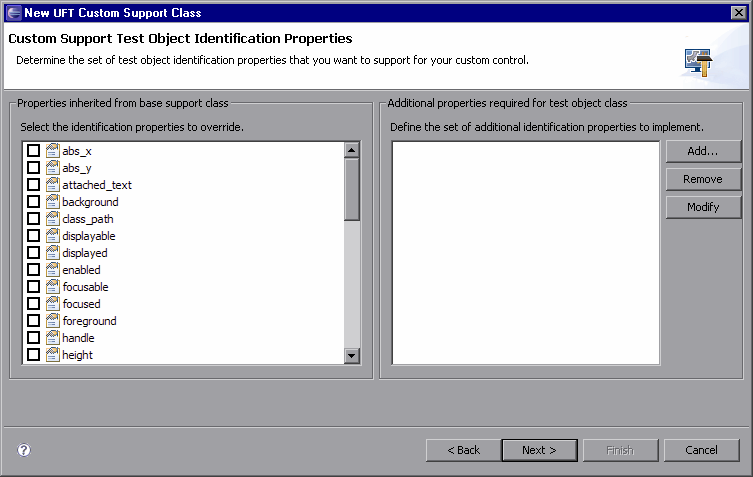
The left pane displays all of the identification properties implemented by the base support class. These are the identification properties that will be inherited by the support class you are creating. You can select any identification properties whose support you want to override with a different implementation.
Note: Some of these identification properties are not included in the test object class definition. Therefore, they are not displayed in UFT One in the Object Spy or in the Checkpoint Properties dialog box. You can access those identification properties by using the GetROProperty method. For more information on the GetROProperty method, see the UFT One Object Model Reference for GUI Testing.
When the wizard creates the support class file, it adds a support method stub, named <identification property name>_attr, for each of the identification properties you select. The support method stubs return the same values as the support methods in the base support class. You can implement the new support methods to match the needs of your custom control.
The right pane displays the identification properties that are defined in the test object class you selected, but are not supported by the base support class. You can modify this list using the Add, Remove, and Modify buttons.
For each of the identification properties in this pane, the wizard adds a support method stub to the support class it creates. The support method stubs return null until you implement them to match the needs of your custom control.
If you add identification properties to this list, the wizard adds them to the test object class definition in the test object configuration file. For information on the structure and content of this file, see the UFT One Test Object Schema Help.
Note: If you selected the Same as base support class option in the Test Object Class Selection Screen, the wizard does not know which test object class is mapped to the custom control. As a result, no identification properties are displayed in the right pane. If you add an identification property, the wizard adds the appropriate support method stub to the support class it creates. However, the identification property is not added to any test object class definition.
Considerations for Adding and Removing Properties from the List
If you add identification properties to this list, they are added to the test object class definition. This means that the new properties appear in the list of identification properties in UFT One for all test objects of this class.
Therefore, if you plan to add properties, it is recommended to create a new test object class based on the existing one, instead of using the existing test object class.
If you remove an identification property from the list, it is no longer supported for this custom class. However, it is still part of the test object class definition. Therefore, although it still appears in the list of identification properties shown in the UFT One Object Spy, it will have no value.
Modifying an identification property is equivalent to removing it and adding a new one.
Managing the List of Identification Properties
The procedures below describe how to add, remove, and modify identification properties in the list of additional properties required for the test object class.
To add an identification property:
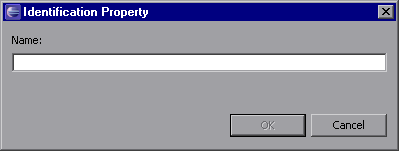
In the Additional properties required for test object class pane, click Add. The Identification Property dialog box opens.
Enter a name for the new identification property and click OK. (The identification property name must begin with a letter and contain only alphanumeric characters and underscores.)
To remove an identification property:
In the Additional properties required for test object class pane, select the property you want to remove.
Click Remove. Then click Yes to confirm.
To modify an identification property:
In the Additional properties required for test object class pane, select the property you want to rename.
Click Modify. The Identification Property dialog box opens.
Modify the identification property name and click OK.
Tip: To add identification properties after the support class is created, use the Add Identification Property button or select UFT One > Add Identification Property in Eclipse.
Custom Support Test Object Methods Screen
The Custom Support Test Object Methods screen displays the test object methods defined for the test object class you mapped to the custom control. You use this screen to select test object methods whose support you want to implement or override with new functionality and to add new test object methods.
When you click Next, one of the following screens open:
If you are creating support for an AWT-based custom control, the Custom Control Recording Support Screen opens.
If you are creating support for an SWT-based custom control, and you mapped a new test object class to the custom control, the New Test Object Class Details Screen opens.
If neither of the previous conditions is met, the Custom Control Support Class Summary Screen opens.
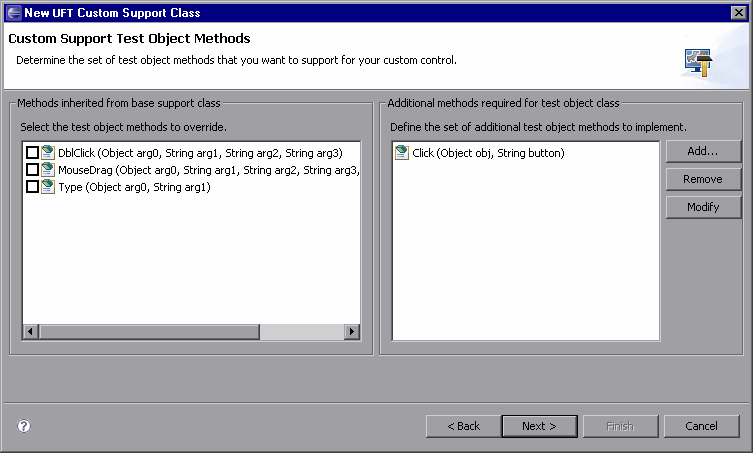
The left pane displays all of the test object methods that are defined for the test object class you selected and are implemented by the base support class. These are the test object methods that will be inherited by the support class you are creating. You select any test object methods whose support you want to override with a different implementation.
When the wizard creates the support class file, it adds a support method stub, named <test object method name>_replayMethod, for each test object method you selected. The support method stubs return the same values as the support methods in the base support class. You can implement the new support methods to match the needs of your custom control.
Note: If you selected the Same as base support class option in the Test Object Class Selection Screen, the wizard does not know which test object class is mapped to the custom control. As a result, no test object methods are displayed in the left pane. After the wizard creates the new support class, you can override any of the replay methods that it inherits from the base support class by adding them to the class manually.
The right pane displays the test object methods that are defined in the test object class you selected, but are not supported by the base support class.
You can modify the list in this pane using the Add, Remove, and Modify buttons.
Note that modifying the name of a method is equivalent to removing the method and adding a new one. For more information, see Understanding the Test Object Method Dialog Box.
Tip: To add test object methods after the support class is created, use the Add Test Object Method button or select UFT One > Add Test Object Method in Eclipse.
For each of the test object methods in this pane, the wizard adds support method stubs to the support class it creates. The support method stubs return the error value Retval.NOT_IMPLEMENTED until you implement them to match the needs of your custom control.
If you add test object methods to this list, the wizard adds them to the test object class definition in the test object configuration file. For information on the structure and content of this file, see the UFT One Test Object Schema Help.
Note: If you selected the Same as base support class option in the Test Object Class Selection Screen, the wizard does not know which test object class is mapped to the custom control. As a result, no test object methods are displayed in the right pane. If you add a test object method, the wizard adds the appropriate replay method stub to the support class it creates. However, the test object method is not added to any test object class definition.
Considerations for Adding and Removing Test Object Methods to the List
If you add test object methods to this list, they are added to the existing test object class. This means that the new methods appear in UFT One for all test objects of this class, regardless of whether or not they are supported for these objects. In a UFT One GUI test, if you call a test object method for an object, and that method is not supported, a run-time error occurs.
Therefore, if you plan to add test object methods to support a custom control, it is recommended to create a new test object class based on the existing one, instead of using the existing test object class.
If you remove a test object method from this list, it is no longer supported for this custom class. However, it is still part of the test object class definition. Therefore, it still appears in the list of test object methods in UFT One.
If you use this test object method on a custom control in UFT OneGUI tests, a run-time error occurs. For example, although a drop-down-list control is supported as a List test object, if you select the select_range test object method for a drop-down-list control, and it is not supported, a run-time error occurs.
Understanding the Test Object Method Dialog Box
When you click Add or Modify in the Custom Support Test Object Methods Screen, the Test Object Method dialog box opens.
The Test Object Method dialog box enables you to specify details for the test object methods listed in the Additional methods required for test object class pane in the Custom Support Test Object Methods screen.
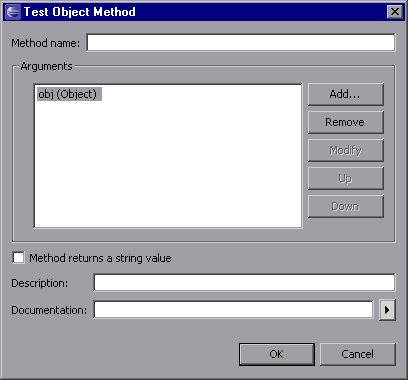
The Test Object Method dialog box contains the following items:
Description | |
|---|---|
Method name | The name of the test object method as it appears in UFT One GUI tests. The name should clearly indicate what the test object method does so that a user can select it from the Step Generator or in the Keyword View. Method names cannot contain non-English letters or characters. In addition, method names must begin with a letter and cannot contain spaces or any of the following characters: ! @ # $ % ^ & * ( ) + = [ ] \ { } | ; ': " , / < > ?
|
Arguments | A list of the test object method arguments and their types.
|
Method returns a string value | Indicates that this test object method returns a string value in addition to the return code. (The return value can be retrieved and used in later steps of a UFT One GUI test.) If you select this check box:
|
Description | The tooltip that is displayed when the cursor is positioned over the test object method in the Step Generator, in the Keyword View, and when using the statement completion functionality in the Editor. |
Documentation | A sentence that describes what the step that includes the test object method actually does. This sentence is displayed in the Step documentation box in the Step Generator and in the Documentation column of the Keyword View. You can insert arguments in the Documentation text by clicking |
 and selecting the relevant argument. The arguments are then replaced dynamically by the relevant values.
When you click Add or Modify in the Test Object Method dialog box, the Test Object Method Argument dialog box opens. The Test Object Method Argument dialog box enables you to specify the details for each of the arguments you list in the Test Object Method dialog box:
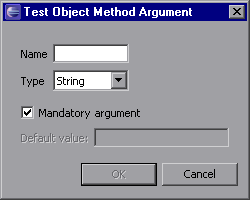
The Test Object Method Argument dialog box contains the following items:
Option | Description |
|---|---|
Name | The name of the argument as it appears in UFT One GUI tests. The argument name should clearly indicate the value that needs to be entered for the argument. Argument names must contain only alphanumeric characters. In addition, argument names must begin with a letter and cannot contain spaces or any of the following characters: ! @ # $ % ^ & * ( ) + = [ ] \ { } | ; ' : " , / < > ? |
Type | Instructs UFT One to do one of the following:
Even if you define the Type as Variant, all arguments are passed to the replay methods as strings. In addition, when you record test steps, the arguments are always registered as strings. Note: If you want to define a list of possible values for an argument, you must do so manually. In the test object configuration file, define the list of values and change the argument's type to ListOfValues. For more information, see the UFT One Test Object Schema Help. |
Mandatory argument | Instructs UFT One whether to require the person writing the test to supply a value for the argument. In the list of arguments, mandatory arguments cannot follow optional arguments. |
Default value | If an argument is optional, you can provide a default value that UFT One uses if no other value is defined. This option is not available for mandatory arguments. |
Custom Control Recording Support Screen
Note: The Custom Control Recording Support screen does not open if you are creating a support class for an SWT-based custom class.
To support recording on a custom control, the support class must implement listeners for the events that trigger recording.
The Custom Control Recording Support screen displays the event handler methods implemented by the support class you selected to extend.
The Custom Control Recording Support screen enables you to:
Select methods whose implementation you want to override with new functionality
Add new event listeners to implement
Set recording-related options
For information on how the wizard implements the details you specify in this screen, see Understanding What the Wizard Adds to the Support Class.
After you complete the recording-related support information:
If you mapped a new test object class to the custom control, click Next to continue to the New Test Object Class Details Screen.
Otherwise, click Finish to continue to the Custom Control Support Class Summary Screen.

The left pane displays the event handler methods implemented by the base support class. You can select the methods you want to override.
In the right pane, you specify the listeners you want to add for the new support class. Each listener you select implies a set of event handler methods you can implement.
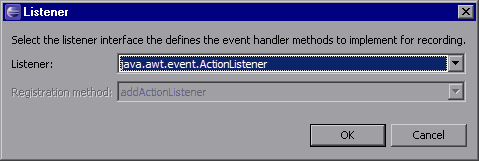
To add a listener to the list:
Click Add and select the appropriate listener from the Listener dialog box that opens.
If the selected listener has more than one registration method, select a method from the Registration method list.
Click OK. The listener you selected and all of the event handler methods it includes are added to the list.
The list contains the listeners that can be registered on the custom control. The wizard compiles this list by identifying listener registration methods in the custom class and its superclasses. The wizard identifies as registration methods, only methods named add<XXX>Listener whose first argument extends java.util.EventListener.
If your custom class uses a registration method that does not comply with this definition, you cannot add the corresponding listener using the wizard. You can implement the required support manually after the wizard creates the new custom support class.
To remove a listener from the list:
Select a listener or one of its event handler methods and click Remove.
Tip: To add event handlers after the support class is created, use the Add Event Handler button or select UFT One > Add Event Handler in Eclipse.
The Custom Control Recording Support screen contains the following options:
Option | Description |
|---|---|
Treat controls of this class as wrapper controls | Instructs the wizard to implement the com.mercury.ftjadin.infra.abstr.RecordWrapper interface in the new support class. If the custom control extends java.awt.container, this check box is selected by default. Otherwise, it is not available. For more information, see Wrapper Implementation in the Support Class. |
Override low-level mouse event recording | Instructs the wizard to implement the mouseRecordTarget method in the new support class so that it returns null. This instructs UFT One not to record low-level mouse events (coordinate-based operations), so you can record more complex operations, such as, selecting an option in a menu. |
Override low-level keyboard event recording | Instructs the wizard to implement the keyboardRecordTarget method in the new support class, so that it returns null. This instructs UFT One not to record low-level keyboard events, enabling you to record more complex events, such as, setting a value in an edit box. |
The options listed in the table above are available only in the wizard (and not in the Eclipse UFT One commands that you can use to edit a support class after it is created). If you do not select these options when you create the support class, and you want to implement them later, you will have to do so manually.
Understanding What the Wizard Adds to the Support Class
The following sections describe the methods that the wizard adds to the support class it creates, based on the definitions in Custom Control Recording Support screen:
Listener Implementation in the Support Class
In the support class file it creates, the wizard implements the listeners and options you specified, as follows:
The implemented listener interfaces are added to the support class signature.
A constructor is added to the support class, listing all of the listeners that need to be registered on the custom control. It also lists the methods used to add and remove the listeners. This is done by calling addSimpleListener for each listener.
A method stub is added to the support class for each of the event handler methods you selected in the left pane. The method stubs call the corresponding event handler methods in the base support class. You can implement the new event handler methods to match the needs of your custom control.
Some of the event handler methods are implemented in existing support classes as final methods, which cannot be overridden. If you select one of these methods in the left pane, the wizard adds an underscore at the beginning of the method name in the method stub that it creates. For example, if you select focusGained, focusLost, keyTyped, keyPressed, or keyReleased, the wizard creates _focusGained, _focusLost, _keyTyped, _keyPressed, or _keyReleased, respectively. Each one of the final methods is implemented to call _<method name> after performing its basic functionality. Therefore, you can override the _<method name> methods to add functionality to these final methods.
A method stub is added to the support class for each of the event handlers listed in the right pane. You must implement the event handler methods to call MicAPI.record. (Each method stub includes a comment to remind you to do this, and a basic skeleton which provides a recommendation for the method's structure.) For more information, see Supporting the Record Option.
Wrapper Implementation in the Support Class
You select the Treat controls of this class as wrapper controls check box if you are creating support for a container control that groups the controls within it and represents them as a single control. If you select this check box, the wizard adds the following method stubs to the support class:
blockWrappedObjectRecord. (Returns False.)
registerWrapperInspector. (A comment is added to remind you to implement this method to register this class as a wrapper of specific control types.)
checkWrappedObject. (Returns null.)
wrapperRecordMessage. (Returns the record message sent by the wrapped control without performing any intervention.)
You can implement these methods to achieve the required wrapping functionality. For more information, see Supporting Wrapper Controls.
New Test Object Class Details Screen
If you mapped a new test object class to the custom control, you define additional details about the new test object class in the New Test Object Class Details screen.
When you click Finish, the Custom Control Support Class Summary Screen opens.
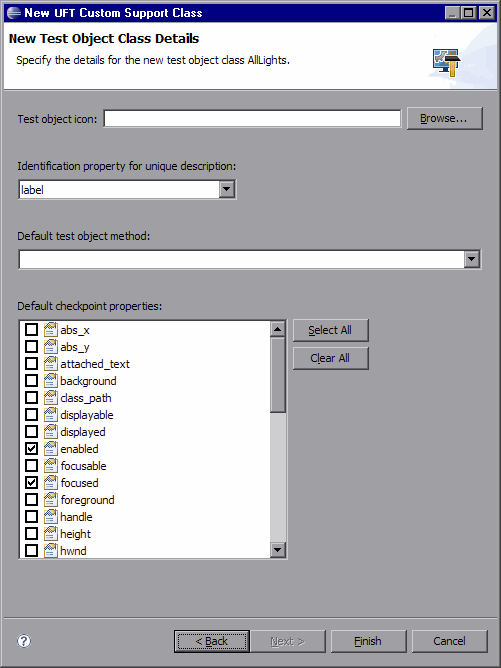
The New Test Object Class Details screen contains the following options:
Option | Description |
|---|---|
Test object icon | The path of the icon file to use in the Keyword view for this test object class. The icon file must be in an uncompressed .ico format. This is optional. If you do not define an icon file, the JavaObject icon is used. |
Identification property for unique description | Specifies the identification property that UFT One uses to uniquely identify the control (in addition to the toolkit_class and index properties). You can select an identification property from the list or leave the property the wizard selected by default. |
Default test object method | Specifies the default test object method displayed in the Keyword View and Step Generator when a step is generated for an object of this class. Select a test object method from the list. |
Default checkpoint properties | Specifies the identification properties that are selected by default when you create a checkpoint for an object of this class. Select the check boxes for the appropriate properties. Click Select All or Clear All to select or clear all of the check boxes. |
When the wizard creates the new support class, it adds the new test object type to the test object configuration file. The options you specify in the New Test Object Class Details screen are recorded in this file. For information on the structure of this file, see the UFT One Test Object Schema Help.
If you want UFT One to include additional identification properties in the test object description, you must manually specify this in the test object configuration file. The wizard adds the test object class definition to the test object configuration file. For each property that you want to add to the test object description, find the line that describes it in the file. Between the words Property and Name, add the words ForDescription="true".
The list of identification properties in the test object description can be modified in UFT One using the Object Identification dialog box. Therefore, by default, UFT One reads this information from the test object configuration file only once, to prevent overwriting any changes a user makes in UFT One. For information on how to ensure UFT One reads modifications you make to the ForDescription attribute, see Modifying Identification Property Attributes in a Test Object Configuration File.
Custom Control Support Class Summary Screen
Before the wizard creates the custom support class file, the Custom Support Class Summary screen summarizes the specifications you provided for the new support class:
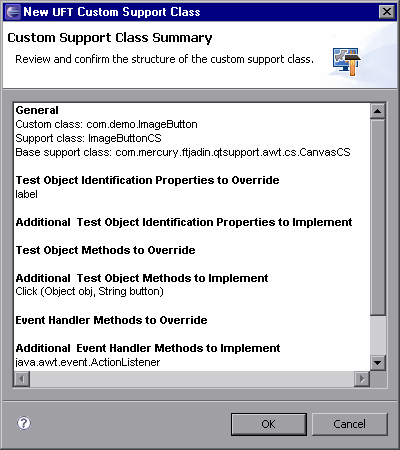
If you want to change any of the data, click Cancel to return to the previous wizard screen. Use the Back and Next buttons to open the relevant screens and make the required changes.
If you are satisfied with the definitions, click OK. The wizard creates the new support class with all of the required methods, according to your specifications.
In addition, the wizard adds the test object class definition to the test object configuration file if one of the following conditions is met:
You mapped a new test object class to the custom control.
You added identification properties or test object methods to an existing test object class.
Note: If the test object configuration file does not exist, the wizard creates it at this time. For information on the structure of the test object configuration file, see the UFT One Test Object Schema Help.
Completing the Custom Class Support
After you finish creating a custom support class (using the New UFT One Custom Support Class Wizard), you need to perform the following additional steps:
Save the class.
In Eclipse, the new class file is opened and displayed in a tab in the right pane. Until you save the class, an asterisk (*) is displayed in the tab next to the support class file name. The changes made by the wizard are codependent and need to be saved to prevent discrepancies.
Implement any method stubs that the wizard created in the new custom support class. For more information, see Understanding the Toolkit Support Class.
If you added new test object methods or identification properties to the test object class, the wizard adds them to the test object class definition in the test object configuration file.
If you remove (or do not implement) the support methods that the wizard created in the support class, the test object methods or identification properties remain part of the test object class definition. They are available in UFT One when editing tests but are not supported for this custom class.
Deploy the toolkit support to UFT One to enable the support to be available. For more information, see Deploying and Running the Custom Toolkit Support.
 See also: