Share this page


Stage 3: Create rules to map the test object class to the control
To support a custom control, UFT One must be able to identify which test object class to use for a specific control. Therefore, a crucial stage in developing support for a custom control, is creating rules that enable UFT One to correctly map the control to the test object class that represents it.
Creating mapping rules
Extensibility Accelerator provides a point-and-click mechanism that helps you automate this process. You click on controls that you want to be represented by the test object class, and Extensibility Accelerator generates mapping rules for the test object class based on the properties of the selected controls.
These rules are stored in the toolkit configuration file (WebExtSample.xml), in Identification elements defined within each Control element. Each Control element defines a test object class. The Identification element specifies which controls should be represented by that test object class.
In this topic, you use the mechanism provided in the Map to Controls tab (Test Object Class designer), to create mapping rules for the sample Book control.

Open the Map to Controls Tab of the test object class designer
In the main document area of Extensibility Accelerator, select the tab for the WebExtBook test object class designer.
If you closed the designer, open it from the Class View by double-clicking the WebExtBook in the list of test object classes for your project.
Select the Map to Controls tab from the tabs on the left side of the test object class designer.
Run the sample Book application
Run the sample application by opening the C:\Users\Public\Documents\ExtAccTool\Samples\WebExtSample\Application\Book.htm file in a supported browser.
Make sure that running scripts in the browser is enabled.
Study the Map to Controls tab to understand its structure
In some cases, different rules for mapping the test object class to a control must be used, depending on the version of the browser running the control. In those cases, click the Add Browser-Specific Rules button  on the tab next to the Default Rules tab, to create additional sets of rules.
Additionally, in some cases you want to create rules that instruct UFT One to ignore specific controls, or to call a JavaScript function to perform more complex mapping. In those cases, select the Ignore Control or Call Identification Function panel instead of the Identify Control panel, before you begin the process of automatically creating rules.
For the book control, you only need one set of rules for all supported browser versions, and the rule is used to identify the control.
Start a control selecting session
Click Select Controls in the Identify Control panel in the Default Rules tab.
Extensibility Accelerator is hidden, and two buttons are displayed at the top of the screen: Create Rules and Cancel.
Hover over different areas in the application
The mouse pointer is converted to a pointing hand.
Each control that you move over is highlighted in the application, and the name of the HTML element that represents the control is displayed. In the image below, the TD HTML element is displayed for the area that contains the book title:
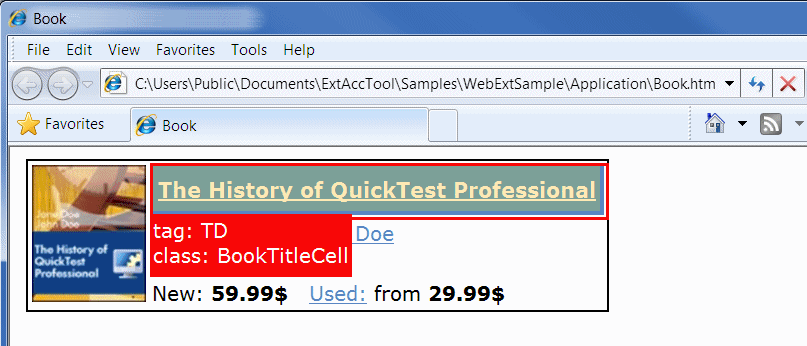
Select the HTML element that represents the Book control
Click on the area that contains the book title, selecting the TD element displayed above.
The Selection dialog box opens on top of the browser, displaying the HTML properties of the element:
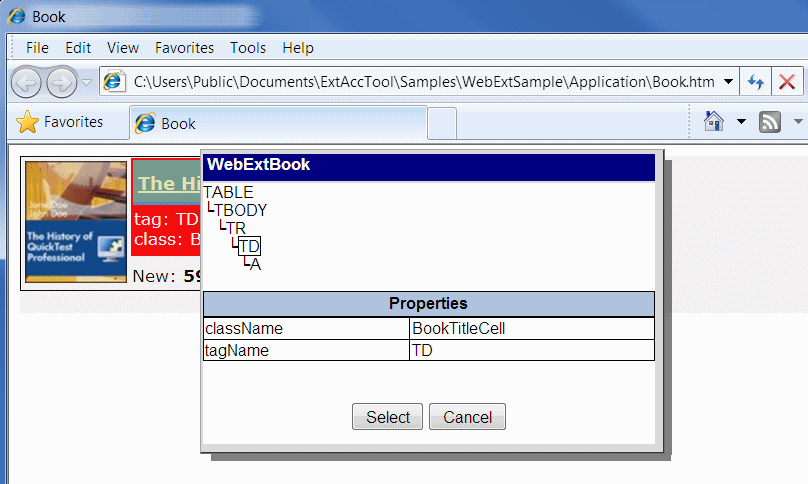
This is not the element that represents the Book control itself. The top part of the dialog box displays the HTML hierarchy of the TD element, including the TABLE element that represents the Book control.
Click on TABLE in the HTML element hierarchy.
The properties of the TABLE element are displayed.
Click Select.
End the control selecting session
Click Create Rules to end the control selecting session.
Based on the properties of the TABLE element, Extensibility Accelerator creates mapping rules for the test object class in the Rule Creation panel.
The rules match the conditions you planned in Plan support for the Web Add-in Extensibility Book sample toolkit: tagName = table, className = Book.

Tip: When you develop support for your own controls, you should select more than one control during a session. This enables Extensibility Accelerator to create more accurate rules, which identify all controls of the relevant type and not only the specific control that you selected.
Test the mapping rules that Extensibility Accelerator created
In this step, you verify that the automatically created rules identify the Book control in both Internet Explorer and Google Chrome.
Run the sample Book application (
C:\Users\Public\Documents\ExtAccTool\Samples\WebExtSample\Application\Book.htm) in a supported version of Chrome, in addition to the application already open in Internet Explorer.Click the Test Rules button, located beneath the rules.
The Book control is highlighted in both the browsers, and a Done button is displayed at the top of the screen. (You may need to bring the browsers into focus manually.)
Click Done and then save your changes in Extensibility Accelerator.
View the changes that Extensibility Accelerator made
View the changes that Extensibility Accelerator made in the toolkit configuration file.
In the Project Viewer, double-click the WebExtSample.xml file. In the file, you can see the Identification element defined in the WebExtBook's Control element. It contains a browser independent Conditions elements that contains two conditions, both of which must be met for the control to qualify as a WebExtBook:
<Control TestObjectClass="WebExtBook">
    <Identification>
        <Browser name="*">
            <Conditions type="IdentifyIfPropMatch">
                <Condition prop_name="className" expected_value="Book" />
                <Condition prop_name="tagName" expected_value="TABLE" />
            </Conditions>
        </Browser>
    </Identification>
</Control>
For details on defining the Identification element for a test object class, see the section on teaching UFT One to identify the test object class to use for a custom Web control in the UFT One Web Add-in Extensibility Developer Guide, and the
Continue to Stage 4: Define the WebExtBook's list of operations and identification properties.