Share this page


Digital Lab - Windows Installation
This section describes how to install the server on a Windows machine. This section is relevant only for UFT Digital Lab. For specific information about installing the server on a Linux machine, see Digital Lab- Linux Installation .
Before you start
Before installing Digital Lab, make sure that:
- Your server machine meets the requirements specified in the Support matrix.
- You have administrator privileges.
- The host name of the server machine is accessible. Check this by running the following from a Windows command line:
ping -n 1 "hostname" - You have installed the USB drivers for your Android devices, or iTunes for iOS devices.
-
The Windows connector is not already installed on the machine (C:\Program Files\UFTDigital Lab Connector). If there is a connector, use the Uninstall command from the Start menu.
Note: Server installation on a USB stick or flash drive is not supported.

Use an external database
Digital Lab includes an embedded PostgreSQL database that is installed as part of the installation of Digital Lab. However, you can choose to connect Digital Lab to an existing external PostgreSQL database instead. This option lets your organization manage and utilize existing database resources.
Before installing or upgrading Digital Lab using an external database:
- Create a backup of the original database in the form of a hp4m.bin file. For details, see Export the embedded database.
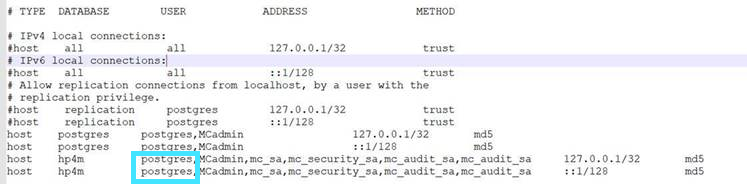
- If you uninstalled the Digital Lab server without uninstalling the PostgreSQL database and are now using the database as an external database with a new installation of Digital Lab, add the postgres user to the pg_hba.conf file. The file is located in <Postgres installation folder>/<postgres version>/data.
You also need the original Digital Lab database encryption key. The external database needs the key to decrypt the data originally created by Digital Lab.
- In a distributed environment where the external database is on a different machine from the Digital Lab server, make sure that the database server accepts connections from the Digital Lab server, and that Digital Lab is configured to connect to the correct database server address:
- In the postgresql.conf file stored under <Postgres installation folder>/<postgres version>/data search for
listen_addresses =. This specifies the addresses on which the database server listens for connections. Update the value with the Digital Lab server IP or FQDN. Setting the value as a wildcard “*” means the database server accepts connections from all addresses. - Locate the conf/hp4mExt-****.properties file in <Digital Lab installation folder>\server\conf. Check that the IP address/ FQDN is the correct address for the database server machine. If the FQDN is not accessible to the Digital Lab server machine due to DNS issues, replace the FQDN with the IP address of the database machine.
- In the postgresql.conf file stored under <Postgres installation folder>/<postgres version>/data search for
- Restore the database. For details, see Migrate the exported data to an external database.
- If your PostgreSQL database exceeds 4 GB, we recommend that you run the VACUUM FULL command to clean the database from deleted content and reduce its size. For details, see the PostgreSQL documentation.
Important note for Postgres 13
Only the md5 method is supported for password authentication. After installing Postgres 13, perform the following:
-
In the postgres configuration file <postgresql 13 path>/data/postgresql.conf, change the password encryption setting to md5:
Password_encryption = md5 -
In the pg_hba.conf file <postgresql 13 path>/data/pg_hba.conf, change all occurrences of scram-sha-256 to md5.
- Restart the postgresql 13 service.
- Reset the postgresql 13 user password and restart.
Full Installation
Follow these steps to install Digital Lab as a full installation where no previous version is installed:
- Make sure that a connector is not installed on your machine. If it is, you need to remove it before installing the Windows server. For details, see Troubleshooting.
- Obtain the installation zip file. Use an extraction tool to extract the contents of the archive file install-server-windows-x64-x.xx-x.zip to your computer.
- Log in to your machine as administrator.
- Locate the extracted .exe file. Make sure it is on a local drive and not a network shared drive.
- Click the setup file and choose Run as administrator from the right-click menu. The installation wizard opens to the Introduction page.
- Select a folder for the installation and a local folder for temporary files.
- If you are planning on using standalone connectors only, and are not connecting devices directly to the Digital Lab machine, clear the Embedded connector checkbox.
-
Configure the Digital Lab server according to the following guidelines:
FQDN or IP address Use the automatically detected values or modify them as needed. When using the Fully Qualified Domain Name (FQDN), the FQDN must begin with a character from the English alphabet. FQDNs beginning with numbers are not supported. SSL connection Clear the SSL only check box to work with a non-secure HTTP connection (non-SSL).
Consider the following guidelines:
-
The SSL setting affects all connectors and testing tools that integrate with the server. When configuring the Digital Lab settings in connectors and tools, make sure that your selection matches that of the server.
-
If you intend to use single-sign on via SAML 2.0, do not clear the check box.
Caution: When you specify an SSL connection, the setup installs a self-signed certificate. Self-signed certificates are not optimal because there is no outside authority to verify the identity of the server. We highly recommend that as soon as possible after putting the Digital Lab server into production, you install an organizational CA certificate. For details, see Using SSL certificates issued by a Certification Authority.
Free port Accept or edit the default internal port, 8081, that is not included in the machine's firewall. Make sure that this port is available and that it is not externally accessible.
-
- Configure an external PostgreSQL database:
You can choose to connect Digital Lab to an existing external PostgreSQL database by selecting the Use external PostgreSQL database checkbox. This option lets your organization manage and utilize existing database resources. Before installing Digital Lab with an external database, make sure that you have followed the steps described in Use an external database.
When you select this option, the Next button opens the External PostgreSQL database configuration screen. Make sure that the database machine is accessible, and provide the following parameters for the connection:External database server The IP address or Fully Qualified Domain Name (FQDN) of database machine.
Database port The port of the external database machine. Database The name of the external database. You can use a database name such as “hp4m”. You can use a name that already exists in the target database server. If the database does not exist, it is created as part of Digital Lab server installation provided that the user has sufficient permissions.
Schema You can use a schema name such as “public”. You can use a name that already exists in the specified database. If the schema does not exist, it is created as part of Digital Lab server installation provided that the user has sufficient permissions.
Note: If the database/schema were originally created by Digital Lab (for example, if you uninstalled the server but not the PostgreSQL database), you are prompted to provide the encryption key when you proceed to the next screen. If the database/schema were not created by Digital Lab, you do not need to provide an encryption key.
User credentials The PostgreSQL database user name and password. - Choose a folder to which applications uploaded to Digital Lab are saved. Starting with Digital Lab (UFT Mobile) version 3.2, applications are no longer stored in the database but are saved to the file system.
Read and write permissions to the folder are required both for the user running this installation and the Local System account. When using a shared folder, the local system account on the Digital Lab machine must have read and write permissions to the folder. Machines that are not in a domain have separate user management. Each machine keeps track of its own user accounts. To use a folder on another machine, make sure that a Windows account with the same name and password is defined on both machines. After installation, modify the Digital Lab server to run under this Windows account. For details, see Run the services as a different user. - Shared spaces configuration (optional):
If required, enable the shared spaces (multitenancy) feature.
Important: This feature requires an Enterprise or Ultimate license. Disabling shared spaces is not supported and requires a clean installation. For details, see Shared spaces. - Specify the following credentials:
Digital Lab default administrator The installation creates a default shared space administrator user, admin@default.com, for accessing the Digital Lab console. Specify a password for this user.
Postgres users- embedded database only
When the PostgreSQL server is first installed, a superuser account postgres is automatically created. The superuser is needed to create the Digital Lab database schema, and to add a user for administering the database. The superuser can override all access restrictions within the database, so it is best to carry out most operations using a non-superuser role.
The installation creates an additional user for administering the database. This user is not a superuser and only has permissions to perform operations on the Digital Lab database. The default name is UFTMadmin. Do not use postgres as a user name.
Follow the password rules displayed on the screen—at least six characters, both lower and upper case, at least one digit, and only letters or numbers except for a space or the "@" symbol.
- When the installation is complete, the wizard displays a message that the server was successfully installed, and provides options to:
- Start the service automatically when you press Next.
- Allow data collection for the improvement of the product. You can modify your selection for this option in the Administration Settings.
After the service has started, the Digital Lab console opens in the default browser window. Log in with the credentials you provided earlier. Follow the instructions on the screen to connect devices and begin working.
The installation creates a new shortcut on the desktop, Digital Lab Server, to the server's installation folder.
- After installing Digital Lab, we strongly recommend that you keep your files and data safe by incorporating the following for the application file storage folder and external database (if relevant):
Access monitoring
Limited access rights (only Digital Lab user)
Regular backup
Encryption
Storage consumption monitoring
- Change the account running the Digital Lab service, instead of the default LocalService account. Make sure that this account has full access to the Digital Lab installation folder. For details, see the Windows documentation.
- Incorporate filesystem monitoring on the Digital Lab installation and temporary folders.
- Back up the encrypted.properties file. The file is located in <path to your Digital Lab Server installation> server >conf.
We also recommend that you:
Upgrade
Digital Lab can be installed as an upgrade from version 3.2 or later.
To ensure a smooth upgrade, see Best practices for upgrades.
Packaged apps:
To run the app packager upgrader on iOS apps, you must have already set up your Mac machine as described in Automatic signing services.
If your apps were packaged manually from the command line and then uploaded to Digital Lab, the upgrader is not able to upgrade the apps. You need to repackage your apps using the latest version of the Packager service (iOS) or the Android Enabler, before uploading them to Digital Lab.
To upgrade Digital Lab:
- Obtain the installation zip file. Use an extraction tool to extract the contents of the archive file install-server-windows-x64-x.xx-x.zip to your computer.
- Run the setup file. When you begin the installation, the wizard detects that you are performing an upgrade and warns you about losing existing apps. It also prompts you for the database password. When you upgrade, all existing apps remain associated with their corresponding workspaces. For details, see Lab and workspace management.
- Indicate whether you want to perform an automatic backup of the database during the upgrade, so that the installation can perform a rollback in case of failure. This step may increase the duration of the upgrade.
- In the next screen, indicate whether you want to automatically run the app packager upgrader after the installation. Apps are upgraded asynchronously after upgrade of the Digital Lab server, reducing downtime of the server. Users are able to access the upgraded server and continue using Digital Lab while apps are being upgraded.
If you choose not to run the automatic upgrader, you can run the upgrader manually at a later time. For details, see Upgrade packaged apps . - You can also choose to delete old uploads of applications. If you select Yes, specify the number of uploads to keep (Default: 30). When you choose to delete old uploads and specify the number of uploads to keep, these settings are copied over to the General section in Administration > Settings . For details, see file storage settings in Administration settings.
- Select a folder to which applications uploaded to Digital Lab are saved. Read and write permissions to the folder are required both for the user running this installation and the Local System account.
Note: Starting with Digital Lab version 3.2, applications are no longer stored in the database but are saved to the file system.
When the file storage and the Digital Lab server machines are not in the same domain, but are part of the same Windows workgroup, the same Windows admin username and password are required on both machines. After installation, run the Digital Lab server under the Windows admin user. For details, see Run the services as a different user.
- If you choose to upgrade the apps, the next screen prompts you to select the operating systems of the apps you want to upgrade.
- Review the summary of the installation settings and click Next to proceed with the installation.
To complete the server upgrade, click Next. Applications continue to be upgraded after the upgrade of the server. After the installation is complete and the server is started, you are able to check the upgrade status of apps in the Apps menu in the Digital Lab console.
When the installation is complete, the wizard displays a message that the server was successfully installed, and provides options to:
- start the service automatically when you press Done.
- allow data collection for the improvement of the product. You can modify your selection for this option in Administration Settings.
Click Done.
After upgrading the Digital Lab server, we strongly recommend that you keep your files and data safe by incorporating the following for the application file storage folder and external database (if relevant):
Access monitoring
Limited access rights (only Digital Lab user)
Regular backup
Encryption
Storage consumption monitoring
We also recommend that you:
- Change the account running the Digital Lab service, instead of the default LocalService account. Make sure that this account has full access to the Digital Lab installation folder. For details, see the Windows documentation.
- Incorporate filesystem monitoring on the Digital Lab installation and temporary folders.
- Back up the encrypted.properties file located in the Digital Lab server installation folder.
Stop, start, or restart the server
From the Windows Start menu, navigate to Digital Lab Server and choose the required action. You can also search for the required command: "Start Digital Lab Server service", "Stop Digital Lab Server service", or "Restart Digital Lab Server service".
Run the services as a different user
For certain integrations, you may need to run the Digital Lab service as another user. You can do this through the Services manager.
- Click Win +R to open the Run dialog box, and enter services.msc
- Locate the Digital Lab Server and Digital Lab Nginx services.
- Right-click the Digital Lab Server service and select Properties.
-
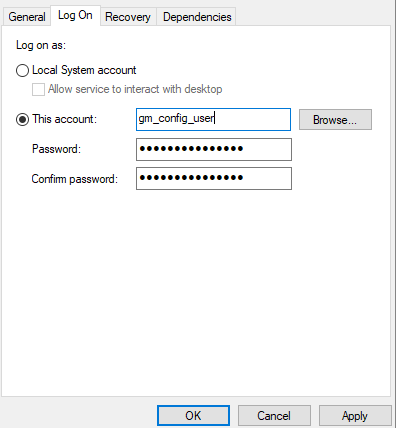
In the Log On tab, select This account, enter the credentials, and click Apply.

- Repeat the above steps for the Digital Lab Ngnix service.
Best practices for upgrades
To ensure a smooth upgrade and prevent the loss of data, we highly recommend first performing an upgrade on a test machine, with the same operating system as your production machine. If the upgrade succeeds on the test machine, you can then proceed to upgrade your production server.
Prepare for the upgrade
Before you start the upgrade process:
- If you are using the iOS packager service, upgrade it to the new version before you run the upgrade process. For details, see set up automatic app packaging and signing services.
-
Decide if you would like to upgrade your applications during the upgrade process, as you are prompted during the setup.
- Starting with Digital Lab 3.2, apps are upgraded asynchronously. While apps are being upgraded, users can access and continue to use the upgraded server. You can check the upgrade status of an app in the Apps menu of the Lab console.
- If you do not want to upgrade your apps, you can update the apps after the upgrade. For details, see Upgrade packaged apps .
- Back up your existing Digital Lab database. For details, see Export the embedded database.
-
Prepare a testing machine with the same operating system as your production environment. Other hardware parameters such as CPU and RAM can be different. This machine serves as a test environment for the upgrade.
Perform the upgrade
We recommend that you perform an upgrade on the test machine that you prepared above. Upgrade Digital Lab as follows:
- Install your current Digital Lab server version on the test machine with the same operating system as your production environment.
- Import the original database to the test machine. For details, see Migrate the exported data to an external database.
-
Verify that the import was successful by logging into Digital Lab on the testing machine and verifying the apps, devices, settings, and additional items as indicated in the Upgrade checklist below. Note that you are not able to communicate with those connectors, because they were configured to work with the production machine—not the test machine.
- Locate the server installation file for the newer version of Digital Lab and extract its contents on the test machine.
- Run the setup file on the test machine as described in Upgrade . If you encounter any difficulties during the upgrade, contact Support.
- Verify that the import was successful by logging into Digital Lab on the test machine and verifying the apps, devices, settings, and additional items as indicated in the Upgrade checklist below.
- Optional: Attempt to run a test through one of the integrated testing tools.
-
If all the above information is correct on the test machine, proceed to Upgrade on your production machine.
After the upgrade process has completed on the test machine, check the following items to ensure that the upgrade succeeded:
| Login | Log in to Digital Lab as a shared space admin user. |
| Users | Check that all the users were migrated to Digital Lab in Administration  > Users . > Users . |
| Settings | Check that all the Administration Settings were migrated from the production environment. |
| Apps | If you chose to upgrade your applications during the upgrade process, make sure that all your apps are visible in the Apps screen. |
| Connectors | Verify that all the connectors are visible in the Devices > Connectors page. Note that you are not able to communicate with those connectors, because they were configured to work with the production machine—not the test machine. |
| Devices | Make sure that you see all the production environment's devices. If you are using iOS devices, re-sign the Agents otherwise the devices will be displayed as disconnected. |
If there are any missing items or if you encounter any other issues, contact Support.
Troubleshooting
The following information may assist you in resolving your issues with the UFT Digital Lab server:
The installation log files located in the installation/Logs folder under the Digital Lab installation. Even if an installation hangs, you can view the intermediate log, installation/Digital Lab_Server_install.log.
This error occurs due to constraints of the operating system. To resolve the error, perform these steps on all Windows based UFT Digital Lab servers and connectors being used by your tests:
-
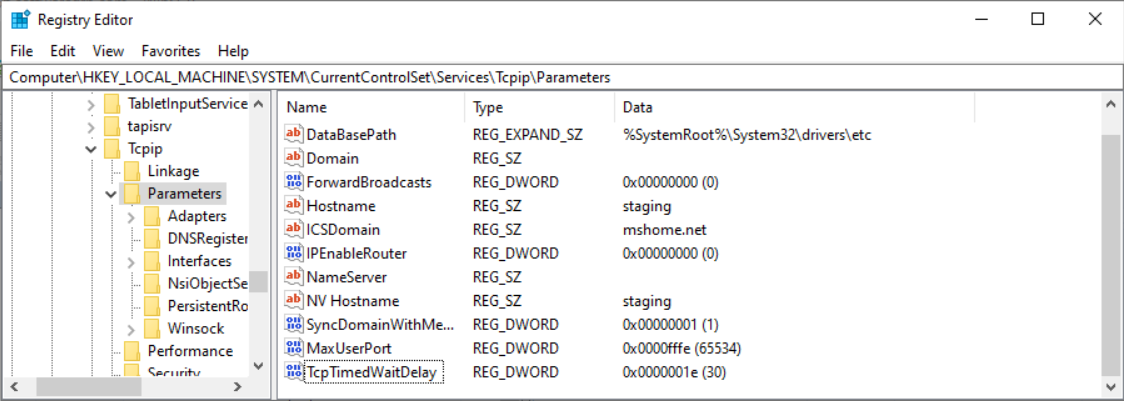
Open the Registry Editor and add the following DWORD values under HKEY_LOCAL_MACHINE\SYSTEM\CurrentControlSet\Services\Tcpip\Parameters:
- MaxUserPort with decimal value of 65534
- TcpTimedWaitDelay with decimal value of 30
-
Restart the operating system.
Alternatively, restart both ADB (Android Debug Bridge) and AMDS (Apple Mobile Device Service).
To restart ADB:Run the following command under the Android SDK directory used by the server or connector (Path to UFT Digital Lab\server|connector\android-sdk-windows\platform-tools\):
adb.exe kill-serverNote: Wait for 10 seconds before running any other adb commands. This is to avoid to automatically starting ADB with a different user. UFTDigital Lab will start it after a few seconds.
To restart AMDS:
-
Open the Run dialog (Windows + R).
-
Enter services.msc to open the Services window.
-
Locate Apple Mobile Device Service. Right-click on the service and select Restart from the context menu.
-
When the file storage and the Digital Lab server machines are not in the same domain, but are part of the same Windows workgroup, the same Windows admin username and password are required on both machines. After installation, you should run the Digital Lab server under the Windows admin user. For details, see Run the services as a different user.
To modify the server details, see Reconfigure the Digital Lab server .
- Navigate to C:\Program Files and delete the Digital Lab Connector folder (after you have tried to run an uninstall) if it exists.
- Delete the (hidden) Zero G Registry folder. If it is not visible, in the Windows Explorer, choose Organize > Folder and search options > View tab, and select Show hidden files, folders and drives.
- If you began the server installation and it failed, delete the Windows server installation folder, C:\Program Files\UFTDigital Lab Server, and restart the setup.
- If the installation was successful, but you cannot access the Digital Lab server, check that the port is not being blocked by a firewall or your antivirus program.
- Refer to the installation log file in the installation > Logs folder, and look for error messages.
 See also: