Share this page


This topic describes the components and behavior of the steps in your TruClient script.
Managing step data in your script
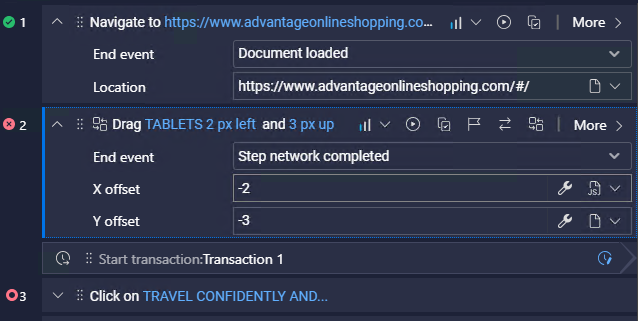
Steps contain a user action to perform, object identification, and the point where the next step can start. They can be recorded steps, or other steps you manually add to the script.
You can manage some aspects of the steps within the editing area of the Actions view in the Development window. Other step components are edited in the Step editor.
The sections and data you can edit depend on the specific type of step.

Step options
The steps area can include the following options and functionality. The specify contents vary, depending on the step type:
| UI Elements | Description |
|---|---|
| <Status icons> |
The icons to the left of the step number indicate replay status or other information about the step:
|
  |
Unfold/Fold step. Click on the arrows to expand or minimize the step display. When expanded, the step displays the step toolbar, and up to two editable property fields for the step. For recorded steps, these are most often End event, and one of the key arguments for the step. For details on the properties, see Edit step properties. |

|
Grab handle. Use to change the step order of your script, by grabbing and dragging the step to a different location. |
|
|
Step level. Each step is assigned a level number between 1-3 at recording time (indicated by bars). Lower numbers represent higher level. For example, a level 1 Click the down arrow to the right of the Step level icon Note: For replay, you can filter the displayed steps by their level, using the Script level selector in the toolbar. For more information, see Step levels. |

|
Play this step. Click to play just that step (or group of steps). |

|
Disable/enable during replay. Click to deactivate the step. Deactivated steps are ignored during script replay. Click the button again to activate the step. |

|
Highlight the object. Click to check if the object is visible in the browser window at that time. The object is highlighted in the browser with a red outline. For details, see Highlight an object. |

|
Replace the test object. Use to replace the current object with a different object, without replacing the step. For details, see Replace an object. |

|
Alternative steps. Opens the Alternative steps dialog box, where you can redefine the step in alternative ways. Alternative steps allow you to view instances in which there are multiple ways to perform the same user action in a step. Select the relevant step definition, and click OK. For more information, seeUse alternative steps. |

|
Edit transaction. Opens the Transactions dialog box, where you can define new transactions and modify existing ones. For details, see Insert transactions in scripts. |

|
More. Opens the Step editor, where you can modify the properties and arguments for the step. For details, see Edit step properties. |

|
Set the default value. Click to reset the value to the default value. |

|
Argument method. Defines how the value of the argument is evaluated during replay. Click the right arrow to open a dropdown list where you can select a different argument method. Available methods:
|

|
Encrypt/decrypt this text. For parameter fields, determines if the parameter value is shown encrypted or in plain text during replay. Select an option from the dropdown list:
|
 Breakpoint. Click to the left of a step number to add a breakpoint. Click on the icon to remove it.
  Playing. Step is currently being replayed.
 Success. The step was replayed successfully.
 Paused. The replay was paused at this step.
  Stopped. Replay was stopped at this step.
 Failure. Step replay failed. Place the cursor on the icon to view the error message.
 step is necessary to the business process; a level 3
  step has no apparent effect on the application.
  to modify the level for the step.
 JavaScript. The arguments for a step are all JavaScript-based and can accept JavaScript expressions, which are evaluated during replay.
 Parameter name. The key for the parameter. The current value of the parameter is used during replay.
  Text is not encrypted. The decrypted parameter is displayed as plain text.
 Next steps: