
Share this page


Create and design application processes
You can create an application process and design its sequence of steps in the process designer. On the process details page, you can view the process's changes and modify the details.
Create an application process
When creating an application process, you specify its basic details.
For details on how to create applications, see Create applications.
Note: To create applications and application processes, you need the Create Applications permission. Administrators have this permission by default. As an administrator, you can grant this permission in Administration > Security > Role Configuration > DA Server. For details, see Server roles and system security.
To create an application process:
-
In Deployment Automation, navigate to Management > Applications > [select application].
- Select the Processes tab.
- Click Create. The Create Application Process dialog box opens.
-
Specify the following information:
Field Description Name Enter a name for the process. Typically, it corresponds to the application you plan on deploying. Description (Optional) Specify additional information about the process. Required Application Role Select the role that enables a user to run the application. By default, no role is selected.
For details about creating application roles, see Role configuration.
Inventory Management To have inventory handled automatically, accept the default option, Automatic.
To handle inventory manually, select Advanced. For details, see Inventory management.
Offline Agent Handling Specify the system's behavior if expected agents are offline:
- Check Before Execution. Before running the process, the system checks if expected agents are online. If the agents are offline, the process doesn't run.
- Use All Available; Report Failure. The system runs the process as long as at least one expected agent is online. This option reports any failed deployments due to offline agents. It is useful for rollbacks or configuration deployments.
- Always Report Success. The system runs the process as long as at least one expected agent is online. This option reports successful deployments.
Only Changed Versions Leave this option selected to preselect the Only Changed Versions option in the Run Application Process wizard. If you clear the checkbox, the Only Changed Versions option in the wizard is not selected by default.
You can select or clear the Only Changed Versions option in the wizard regardless of the default setting.
To change the default setting, see Configure the Default for Only Changed Versions option.
Execution Timeout Specify how long the process runs until it times out, in hours and minutes.
To run the process indefinitely, accept the default value, 00:00.
-
Click Save.
To create another application process, click Save and New.
After creating an application process, design its flow, as described next.

Design an application process
After creating an application process, design its flow to tell Deployment Automation how to deploy the whole application.
In the process designer, drag process steps from the Tools pane onto the design space, set the steps' properties, and join the steps into a sequence.
Here's an example of a designed application process:
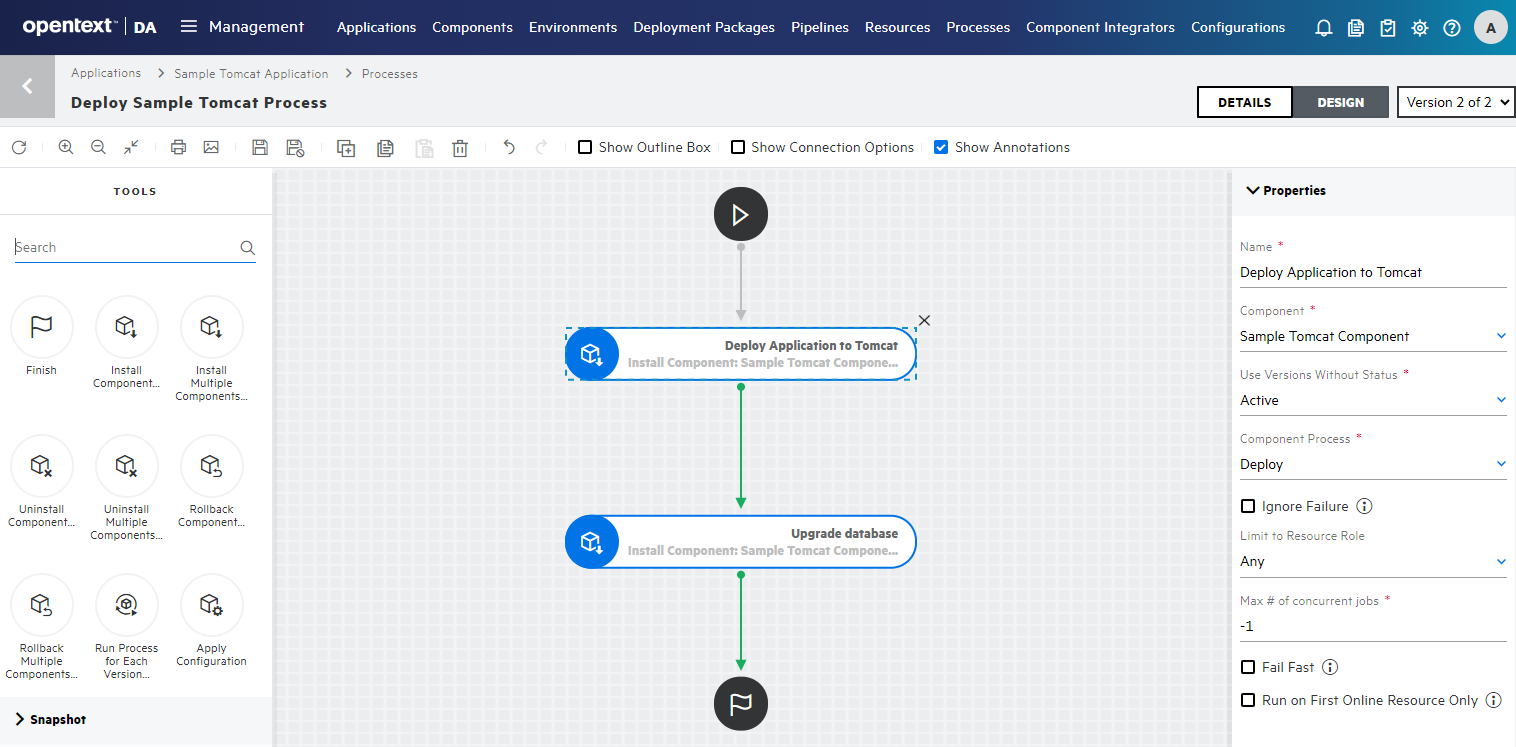
To design an application process:
- From the list of application processes, select the process you created earlier. The process designer opens.
-
(Optional) Use the process designer's toolbar to help you design the process:
Action Description Scale the view. Use the Zoom In, Zoom Out, or Actual Size icons. Copy, duplicate, or delete selected steps and connections.
Use the Copy, Paste, Duplicate, or Delete icons.
Tip: You can also use keyboard shortcuts and keys: CTRL+C to copy, CTRL+V to paste, CTRL+D to duplicate, and the Delete key to delete.
Revert the changes you made to the process.
Use the Undo or Redo icons.
Tip: You can also use keyboard shortcuts: CTRL+Z to undo and CTRL+Y to redo.
Move the process around in the design space. Select Show Outline Box. In the Outline Map box, drag the outline corner inward or outward. Display all available options for connections between steps. Select Show Connection Options. Hide annotations. The annotations added to the process are displayed by default. To hide annotations, clear the Show Annotations option. -
In the Tools pane, select a process step. Use search to find steps by name.
For details about available steps, see Basic application process steps.
- To add a step to the process, drag the step onto the design space. You can place it anywhere on the design space and reposition it later.
- In the Properties pane, configure the step.
-
(Optional) Add more steps as needed.
Tip: You can reuse steps by copying them. For details, see Copy or duplicate process steps.
-
Connect the process steps in a sequence. Hover over an originating step to view a connection tool. Then drag the connection tool and release it over a target step.
Connect other steps in the same way. For details on how to create connections with conditions, see Use conditions and switch steps.
Tip: If the connection options are not displayed, select each connection to view its options. Connections are color-coded for the process path: Success (green), Failure (red), and Always (gray).
-
After configuring and connecting the steps, click Save
 .
.
For details on how to run the process, see Run application processes.
Copy or duplicate process steps
To reuse one or more steps in a process, copy or duplicate them. These actions create the step's exact replica named <source-step-name> (copy).
Guidelines and limitations:
-
You can copy steps from any process version to the latest version. The option of copying between processes is not available.
-
You can copy or duplicate any steps except the Start step.
-
You can copy and duplicate step connections. A connection can be copied only if you copy both steps joined by the connection.
-
You cannot copy steps from one browser tab or window to another.
-
If a step uses an old plugin version which is not available on your Deployment Automation server, you cannot copy the step.
To copy steps in the process designer:
| Action | Description |
|---|---|
| Select multiple steps and connections. | Hold CTRL and select steps and connections in the design space one by one. |
| Select all steps and connections in a specific area. |
Hold CTRL and use your mouse to select an area containing steps and connections. If a connection points to or from a step that is not in the selected area, the connection is not selected. |
| Copy and paste steps. |
Right-click the step in the design space and select Copy from the menu. Then right-click anywhere in the design area and select Paste here from the menu. Tip: You can also use the Copy and Paste icons in the toolbar, or standard keyboard shortcuts such as CTRL+C to copy and CTRL+V to paste. |
| Duplicate steps. |
Right-click the step and select Duplicate from the menu. Tip: You can also use the Duplicate icon in the toolbar, or the keyboard shortcut CTRL+D. |
Note: Exiting the process designer clears all items copied to clipboard.
To finish designing your process, see Design an application process.
Manage application process details
On the process details page, you can modify the process, add or edit properties, and view process changes and inventory.
To manage application process details:
-
In Deployment Automation, navigate to Management > Applications, select an application, and select the Processes tab.
-
In the list of processes, click Details
 next to the relevant process.
 -
On the process details page, modify process details as needed:
Task Action Add, remove, or change the sequence of process steps. Click the Design button. Change basic process details. Click Edit  in the process information pane.
View the process's history of changes. Select the Changes tab. View changes in inventory. Select Changes > Inventory. Add process properties. In the Properties tab, click Add Property. For details, see Add application process properties. Edit or delete a property. In the Properties tab, click the relevant icon next to the property.
 See also:


