
Share this page


Build baselines
You can build a baseline from the web client or desktop client. Building a baseline fetches the contents of the selected baseline to the specified area.
Considerations
When building a baseline, you build all the targets affected by any item in the baseline. You can also use baselines to reproduce an earlier build.
When you build a baseline, the build configuration and sources used in the build are the versions at the time the baseline was taken.
Guidelines:
-
To build items, you need the Build from a Baseline privilege.
-
You can build a baseline only if it was created against a Dimensions CM project/stream that has one or more build configurations. For details about creating build configurations, see the Dimensions Build.
-
You can build a baseline only in a work area.

Baseline build configurations
Build configuration versions that are prefixed with an asterisk (*) were checked in when the baseline was created against the Dimensions CM project/stream. These are the latest versions of the build configurations at the time the baseline was created.
Build configuration versions that don't have the asterisk (*) prefix were created after the baseline was captured for the project/stream.
For example:
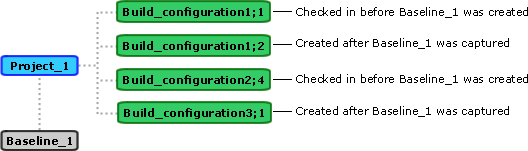
In this example, the Build Configuration list in the Run Build wizard displays the following configurations:
-
*Build_configuration1;1
-
Build_configuration1;2
-
*Build_configuration2;4
-
Build_configuration3;1
Baseline build work areas
The Build Area list in the Run Build wizard displays available work areas:
-
Work areas above the divider are those to which you have access and which are set up for the build configuration you have selected.
-
Work areas under the divider are all other areas to which you have access.
For example:

In this example, the Build Work Area list displays the following work areas:
WA_1
WA_2
----
WA_3
WA_4
Web client: Build a baseline
You can build a baseline using the web client.
To build a baseline:
-
In the web client, select the baseline you want to build. For example, open the Baselines view, and click Catalog in the navigation pane. Then select a baseline in the content pane.
-
On the toolbar, click Build
 , and select Build. The Run Build wizard opens, displaying the name of the baseline to build, and the Dimensions CM project or stream
against which the baseline is built.
, and select Build. The Run Build wizard opens, displaying the name of the baseline to build, and the Dimensions CM project or stream
against which the baseline is built. -
Specify the following options and click Next:
Option Description Build configuration Select the build configuration you want to build.
You can build only those configurations that are associated with the Dimensions CM project/stream from which the baseline was created.
Build area Select a work area where to build the baseline. To build all deployment areas associated with the stage, select <All areas>. Build area user If required, enter the ID of the Dimensions CM user who owns the area. Then enter and confirm the password. Start search path from stage Select the stage where you want the search path to start. Apply system date/time to downloaded files Select this option to apply system date and time to files that are downloaded. -
To capture the build outputs and check them in to Dimensions CM automatically, select the option Check in build outputs automatically, specify the following details, and click Next:
Specify the request(s) the build outputs will be related to To relate the build outputs to specific requests when the outputs are checked in, click the browse button. In the Request wizard, select one or more requests. You can also enter request IDs in the following format:
"QLARIUS_CR_44", "QLARIUS_CR_43"
If your process model specifies that checked-in items have to be related to a request, this option is required.
Specify the project where the build outputs will be checked in to To check in the build outputs to a different project or stream, click the browse button. In the Select Project/Stream wizard, select a project or stream. -
Select build options:
Option Description Audit area(s) before build Produces an audit report for the build areas associated with the Dimensions CM project/stream. The report is produced before the build. Clean area(s) before build Runs the clean script (in the build configuration). Lock area(s) in search path Work area builds only: Locks all deployment areas associated with the build and prevents other changes to these areas while the build is running. Rebuild all targets Rebuilds all targets.
To build only those targets whose source is at the correct stage, select Rebuild all targets and then Targets only in the current stage.
Other build options Enter additional options, if any. For details about the build options, see the templating language and processor section in the API reference.
-
Specify target selections for the target list:
Option Description Show all targets from build configuration Displays all targets from the build configuration. Show final targets only Does not display intermediate targets. Show foreign items Displays items that are related to items in a different project or stream. Show side-effect targets Displays files created at the same time as the main target, such as a compile listing. Show predicted targets Display targets based on the item's previous revision. This is relevant when the selected revision has not yet been built. If you change target selections, click Re-query to refresh the target list.
-
From the Build Targets list, select one or more targets to build. The list displays all targets that are impacted by the objects you selected to build. Follow the guidelines for specifying build targets, described in Run builds in Dimensions CM clients.
For each target, the following build dependency information is included:
Field Description Target The name of the target, as defined in Dimensions Build. Filename The file name of the target or mask, as defined in Dimensions Build. Found In The relationship of the objects that you are going to build to the target. Can be one of the following:
-
Build Config: Matches a rule in a build configuration (explicit relationship).
-
BOM: Named in a bill of materials (BOM) from a previous build (implicit relationship).
-
Build Config/BOM: Matches both Build Config (explicit) and BOM (implicit).
-
<blank>: No matches were found for the selected objects.
Build Config The build configuration you selected. The configuration version may be different from that in the Build configuration list (the latter is ignored when this data is processed). Details Can be one of the following:
-
Prediction. The relationship is based on a previous item revision.
-
Foreign. Related to an item in a different project/stream.
-
-
Click Next. A summary of the build command is displayed.
-
Review the summary of the build command, and click Finish to start the build.
Desktop client: Build a baseline
You can build a baseline using the desktop client.
To build a baseline:
-
In the desktop client, open the project/stream containing the baseline you want to build.
-
Select the baseline to build. For example, in the My Current Project/Stream view, expand the Catalog node and select Baselines. In the content pane, select a baseline.
-
Select Baseline > Build Baseline. The Build wizard opens, displaying the name of the current Dimensions CM project or stream.
-
Specify the following options and click Next:
Option Description Build configuration Select the build configuration you want to build.
You can build only those configurations that are associated with the Dimensions CM project/stream from which the baseline was created.
Build area Select a work area where to build the baseline. Build area user If required, enter the ID of the Dimensions CM user who owns the area. Then enter and confirm the password. Start search path from stage Select the stage where you want the search path to start. Apply system date/time to downloaded files Select this option to apply system date and time to files that are downloaded. -
To capture the build outputs and check them in to Dimensions CM automatically, select the option Check in build outputs automatically, specify the following details, and click Next:
Specify the request(s) the build outputs will be related to To relate the build outputs to specific requests when the outputs are checked in, click Select. In the Request wizard, select one or more requests. You can also enter request IDs in the following format:
"QLARIUS_CR_44", "QLARIUS_CR_43"
If your process model specifies that checked-in items have to be related to a request, this option is required.
Specify the project where the build outputs will be checked in to To check in the build outputs to a different project or stream, click Select. In the Select Project/Stream wizard, select a project or stream. -
Select build options and click Next:
-
Select the dependencies and targets to be built:
Option Description Deployment analysis Runs dependency analysis. Predicted (using soft relationships) Displays targets based on a previous revision of an item. This is relevant when the selected revision has not yet been built. Foreign (cross project dependencies) Displays items that are related to items in a different project or stream. Side effect (from observed builds) Displays built items created at the same time as the main target, such as a compile listings and secondary targets. Configuration analysis Analyzes the build configuration. Final targets only Does not display intermediate targets. All targets Displays but does not necessarily select all targets in the build configuration. For details, see the
BLDcommand in the Command-Line Reference.If you change target selections, click Query to repopulate the target list.
-
From the Build Targets list, select one or more targets to build. The list displays all targets that are impacted by the objects you selected to build. Follow the guidelines for specifying build targets, described in Run builds in Dimensions CM clients.
For each target, the following build dependency information is displayed:
Field Description Target The name of the target, as defined in Dimensions Build. Filename The file name of the target or mask, as defined in Dimensions Build. Found In The relationship of the objects that you are going to build to the target. Can be one of the following:
-
Build Config: Matches a rule in a build configuration (explicit relationship).
-
BOM: Named in a bill of materials (BOM) from a previous build (implicit relationship).
-
Build Config/BOM: Matches both Build Config (explicit) and BOM (implicit).
-
<blank>: No matches were found for the selected objects.
Build Config The build configuration you selected. The configuration version may be different from that in the Build configuration list (the latter is ignored when this data is processed). Details Can be one of the following:
-
Prediction. The relationship is based on a previous item revision.
-
Foreign. Related to an item in a different project/stream.
-
-
Click Next.
-
Review the summary of the build command, and click Finish to start the build.
| Option | Description |
|---|---|
| Audit area(s) before build | Produces an audit report for the build areas associated with the Dimensions CM project/stream. The report is produced before the build. |
| Clean area(s) before build | Runs the clean script (in the build configuration). |
| Lock area(s) in search path | Work area builds only: Locks all deployment areas associated with the build and prevents other changes to these areas while the build is running. |
| Rebuild all targets |
Rebuilds all targets. To build only those targets whose source is at the correct stage, select Rebuild all targets and then Targets only in the current stage. |
| Other build options | Enter additional options, if any. |
For details about the build options, see the templating language and processor section in the API reference.
 See also:


