Web client main window
This topic describes the areas and elements of the Dimensions CM web client's main window.
Web client UI areas
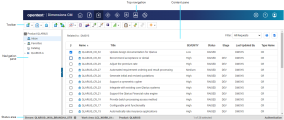
The following image demonstrates the areas of a web client's main window.
The following table describes the areas of the web client's main window.
| Area | Description |
|---|---|
| Top navigation |
Contains object icons to open views for different objects in a product. Includes links to user preferences, help resources, and the Administration Console. For details, see Web client's top navigation. |
| Toolbar | Contains buttons for the operations you can perform on an object, depending on the selected object type. |
| Navigation pane |
Contains options or object trees for displaying different types of objects in the content pane. Expand the tree to view and select objects. For details, see Web client's navigation pane. |
| Content pane |
Displays a list of objects and their details. For example, on the Pending tab of the Deployment view, the content pane displays either your pending items, pending requests, or pending baselines. Select objects in the content pane to work with them. For details, see Web client's content pane. |
| Status area |
Displays your current product, current project/stream, and the associated work area. You can perform the following tasks:
|
Web client's top navigation
The web client's top navigation bar contains the following elements:

| Element | Description |
|---|---|
| Company and product logo | Use the product logo to return to your current project/stream window. |
|
|
Use the My Current Project/Stream view to work with the objects that belong or are related to your current project/stream. Create and run reports on Dimensions CM objects using Report Builder. In the navigation pane, expand the tree and click the relevant icon to display its contents or related objects:
For details, see My Current Project/Stream view. |
|
|
Use the Items view to work with items in your current project/stream. The view is organized either by project folders or design parts. Create and run reports on items using Report Builder. To change the view of the items, switch between the tabs in the navigation pane:
To display the relevant items in the content pane, click the appropriate icon:
|
|
|
Use the Requests view to work with all requests in a product or all requests that affect a design part. Create and manage request lists. In the navigation pane:
On the toolbar, select Request Lists:
|
|
|
Use the Projects view to work with all projects in a product. Create and run reports on projects using Report Builder. Note: This icon is not displayed if your database options have been set up to use streams only. In the navigation pane:
|
|
|
Use the Streams view to work with all streams in a product. Create and run reports on streams using Report Builder. Note: This icon is not displayed if your database options have been set up to use projects only. In the navigation pane:
|
|
|
Use the Baselines view to work with all baselines in a product or all baselines created from a design part. Create and run reports on baselines using Report Builder. In the navigation pane:
|
|
Automation (Available only if Dimensions CM integrates with Deployment Automation) |
Use the Automation view to review the details of promotions, demotions, and automations in Deployment Automation. In the content pane:
For details about using Deployment Automation, see Use Deployment Automation. |
|
|
Use the Deployment view to manage and monitor promotion and deployment activities using native Dimensions CM deployment. In the content pane:
For details about Dimensions CM deployment, see Use Dimensions deployment. |
|
|
Use the Reports view to create or run Dimensions CM reports. Select the appropriate object class node (Requests, Items, Baselines, or Projects/Streams) in the navigation pane, and do the following:
For details about working with reports, see Run reports. |
|
Administration Console |
Open the Administration Console main window in a new tab or window. For the Administration Console help, see Set up the process model. |
|
Help |
|
|
User icon |
|
Web client's navigation pane
In the web client's navigation pane, work with object trees to select what to display in the content pane.
An object tree displays hierarchical objects in a tree view. The web client has the following object trees:
| Folder structure tree | Displays the organization of the current project/stream and its related objects. |
| Design part structure tree | Displays the organization of the product design parts. |
| Areas tree | Displays the associated areas. |
In the Items view, you can switch between the tabs:
-
To display the project folder view, select the Dirs tab.
-
To display the design part view, the Inbox, and Catalog, select the Items tab.
To navigate an object tree:
-
To expand a node, click the right-hand arrow icon next to it.
-
To collapse a node, click the down arrow icon next to it.
-
To select an object and display its contents in the content pane, click the object's icon.
-
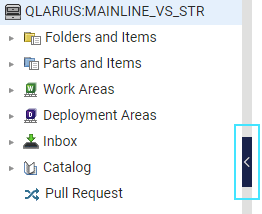
To hide the navigation pane, click the arrow on the splitter bar in the right side of the navigation pane:

-
To show the navigation pane, click the arrow on the left side of the collapsed pane.
Web client's content pane
In the web client's content pane, view, select, and modify objects or reports and lists, depending on what you have selected in the navigation pane.
Objects are displayed in a table called the object list. The way you work with object lists is the same for all object types.
The following table describes how to use the content pane.
| Task | Description |
|---|---|
| Select objects |
To select a single object, select the checkbox next to it. To select all
objects in the list, click Select All |
| Sort a list based on the contents of a column |
To sort the list by a column, click the header of the column. An up arrow indicates that rows are sorted in ascending order. A down arrow indicates that rows are sorted in descending order. |
| Save and print a list |
Use the buttons in the upper-right corner of the content pane:
The list is displayed in a new window in your web browser from which you can save or print it. |
| Filter objects in the list | From the Filter list in the upper-right corner of the content pane, select a filtering option or create a new filter. For details, see Create and use object filters. |
My Current Project/Stream view
In the My Current Project/Stream view, work with the objects in your current project or stream.
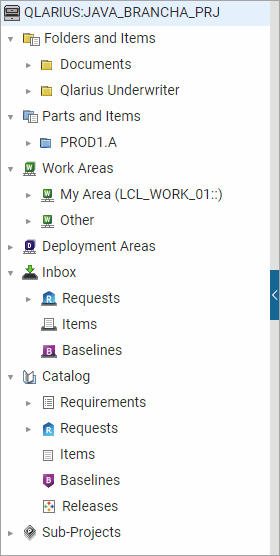
The navigation pane on the My Current Project/Stream page contains a tree view of the items and related objects for your currently selected project/stream:

The following table describes the top-level nodes of the My Current Project/Stream view.
| Node | Description |
|---|---|
| Folders and Items | Contains the folder structure for the current project/stream. Click a folder icon to view its items in the content pane. |
| Parts and Items | Contains the design part structure for the current project/stream. Click a design part icon to view its items in the content pane. |
| Work Areas |
Contains a node for:
|
| Deployment Areas | Contains a node for each stage for which Deployment areas have been defined for the project/stream. Click a node to view details of those areas in the content pane. |
| Inbox |
Contains nodes for the objects related to the current project/stream that are pending action from you. The classes of object are:
Click a node to view the objects in the content pane. |
| Catalog |
Contains nodes for the objects in the Dimensions CM product related to the current project/stream. The object classes are:
Click a node to view the objects in the content pane. |
| Sub-Projects |
Contains subprojects or baselines related to the current project. Click a node for a sub-project to expand the folder structure for that project and view the items in it. Note: Subprojects are not available for streams. |
 See also:


 on the toolbar.
 on the toolbar.
 in the column
heading.
 .
. .
. 


